Monday, December 20, 2021

Visible Image Journal Booklet for Topflight Stamps

 Hello My Stampy Friends! Welcome to my last post for Topflight Stamps. After 2 1/2 years with this awesome team it is time for me to move on. Life has gotten super busy & just does not leave me time to continue. This has been a wonderful experience. The gals on this team are super supportive & friendly. It has been a pleasure to play with so many, wonderful, stamp company products & get inky on my Mixed Media Mondays. A special thanks to Donna Bowman for creating this creative space for us to play in. Lisa Hoel thanks for hanging in with me when things went pear shaped! You are a wonderful DT Lead. 

Now on to my project! This week the team is focusing on the UK company Visible Image. I made a Full Size Journal a while back & decided I wanted to add a signature for some arty play in January. I will show the journal & link to it below. I love how this booklet turned out. It some of my favorite elements. Texture, a metallic shine, cool quotes. Hum I may have to add some metal LOL.


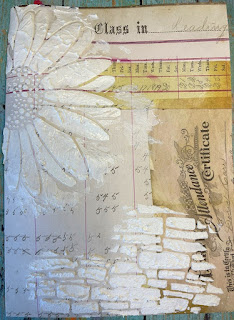
This booklet started with a 12 x 8 1/4 sheet of scrapbook paper from a Tim Holtz paper pad. Pulling out a few stencils, some Grit Paste (bricks) & crackle paste Daisy)  was added. Then the page was set aside to dry.  

Next up: Pulled out my Gel Press to use as a palette. This is a great way to not waste paint & if you want to brayer your background. At the end of your session you can pull a print so the left over paint is used up. 

Here is the brayer painted background, with my main title "Escape From Real Life". I know many of us are feeling this now more then ever, art is such a great escape & good for our mental health. Colors used are London Bus & Truffle. Looking at my Infusions swatch was the next step. This helps to figure out what colors the project options are. 


Once the pastes were good & dry it was time for color. Adding Infusions in Lemoncello & Golden Sands with some water gave my Daisy a dynamic yellow, golden brown look. 

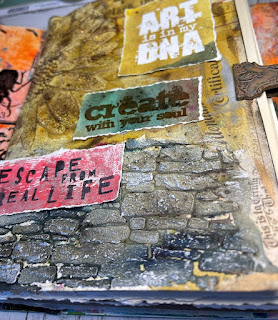
For the brick area powders, In the Navy & Sleigh Blue were used. Lovely & grungy. It is crazy how realistic this brick will look when finished.

I had this idea & wasn't sure if it would work but that is sometimes the best way to discover new techniques. The idea was to have some of the art quotes embedded in the background using clear &/or white embossing. I made a couple of samples to see which I like better. Below is the same technique I used for the left hand side sample. 

Also realized there was more success in seeing the quote if the starting background was light with a darker color on top. This creates more of a contrast making it easier to see the quote. This has a watered down Sleigh Blue underneath, then clear embossing powder & Royal Blue on top.  Once the Infusions are dry, clean off the embossed area well with a baby wipe. If you use a heat gun to dry, the emboss heats up again and you may lose your image. I didn't end up using this & learned this technique works better with a crisp, well defined image like the Art is in my DNA. 


I had to show this luscious piece of mixed media paper that is covered in the various Infusion colors. Just so nummy! 


In the process of that I realized the torn quotes made me happier. Totally different look then I envisioned but really like it. This is the fun part of art, changing your decisions as you go. This quote background is from a piece of the paper in the last photo, above. The quote was stamped in Roasted Coffee ink & embossed with Lime which is a translucent embossing powder.


Do you ever have a product or technique that you can't stop using at the moment? I feel that way about adding Sizzix Luster Wax. It just creates such a rich, dynamic, aspect especially to embossed images. Hit the high points of the stenciled images using the wax & a piece of hard (Phat)  foam. So hard to see how dynamic the metallic shine is in a photo! 

Here is a close up of the bricks. How realistic & random the color is! Keep in mind there is also that silver metallic which make it just so delicious. 


I also wanted to show what the left side of the paper looks like without all those layers. Amazing where this page started from! 

Almost there. To make the cover more sturdy & cover up any ink bleed through, a heavier weight card stock was cut, sewn around & adhered down to the inside cover. 

Time to build the book. Simple to grab random papers, tags, envelopes to make a signature. Keep the pages around 12" long by 8 1/4" tall. I made some smaller just to add interest & of course the tags will do that as well. Fold the pages & insert them into each other. Bam done. 

Last step is to slip the booklet into my already completed Full Size Journal. I love this size & Eileen Hull's diecut makes these books easy to create. You can find the full tutorial to the cover of the Journal here. I am going to change my date to 22, just waiting on the stencil number to arrive. The booklets slide in & out through elastic which makes working in them a breeze.


Here is another more realistic look at the bricks. Hard to see but there is silver in with the white highlights. They turned out so great! Love that Grit Paste. Well that is it for me. I hope you subscribe to my blog, You Tube, Facebook & Instagram. I post different projects on these platforms. Lots more content coming your way, including working in this book. Have a great day & hope you have a chance to get inky! For photos of Topflight Stamp products you can go here.

Supplies:

Monday, December 6, 2021

Playing with Gel Press & Crafty Individuals Stamps

 Hello stamping fans. Here today to start the new Topflight Stamps week with an inky Mixed Media Monday. This week the team is playing with stamps from Crafty Individuals. They have an awesome varied mix of red rubber high quality stamps,  many which are collections of images, like the one I showcase today. *Affiliate- some of these companies have given me product to use, play & experiment with. The ideas are my own but I tend to work with companies whose products I like so enjoy the inspiration.  **some of these links are affiliate, I receive a small percentage from the company at no cost to you. This helps me deliver free content! 

Let's make an art journal page! My focal image is the Counted Toadstools which has a background with cool font words, circles & numbers. There are a lot of lovely layers. December can be hectic so taking time out to art is important.

This page started out with a gel print & layers of paint. The stencil image was done using the whole stencil on the gel press with a white paint. This way you get that sketchy image instead of a crisp clear one. Love that look.

My focal image was stamped using a stamp press with Archival ink. I like to use a press whenever the image is really detailed in order to get a good print. I pulled out my handy dandy ink chart to figure out my colors.

The toadstools were colored using Prism Ink & a water brush. Just smoosh some color on your craft mat & away you go. 


A piece of card stock was spritzed using Glimmer Mist to create the background.

It was stamped with the Toadstool stamp. The cut out images were then adhered just a little to the right of the background to create a bit of a shadow.  

A few more images were auditioned (tried out, not glued down) including the crow. This was stamped in black. The Christmas Postage stamp was was stamped on colored paper & the individual stamp cut out.  I distressed the edges of my images before they were adhered with Roasted Coffee & French Navy Prism Ink.

I then decided to paint the crow with a bit of Glamour Gold Glimmer Mist, to give it that pop of shimmery goodness. Highlights were added with a white paint pen. The page elements were adhered & some shadowing was done with paint pens & distress crayons. 

Including some items from my stash. I am trying to be purposeful about adding that "stuff" that has been collected over the years. Fly was cut from scrapbook paper, now & forever is a chipboard piece from who the heck knows, LOL. 

The wonderful shiny snowflake helped to bring the page into the season of winter. That is it for this Mixed Media Monday, thanks for joining me today. I hope you take some time over the next few weeks to get your inky on!! For photos of the products used & links head over to my Topflight Stamps blog post here. 

Supplies:

Tuesday, November 30, 2021

December Round Up for Eileen Hull Designs 2021

 Hello Fans of Eileen Hull it is time for the annual December Round Up! This is when the team picks their 3 favorite projects of the year. Not always an easy task! I will also add the individual photo & link of each project in case you missed it or want to make one of your own. Drum roll Please...

*Affiliate- some of these companies have given me product to use, play & experiment with. The ideas are my own but I tend to work with companies whose products I like so enjoy the inspiration.  **some of these links are affiliate, I receive a small percentage from the company at no cost to you. This helps me deliver free content!

 Here are my favorite 3 of the year. It was a bit hard to decide so I let my daughter chose the 3rd one & she picked "the yellow box" so there you go!!

Let's go in order of making. Project #1 was made in February, 2021 using the Folio Journal die as the base. It was created for the Chapter 1 Release Blog Hop & all the release dies were used. For example the Mandala die is on the cover, as well as the Folio Page Pocket & Flowers are used inside. There is a 2 part tutorial if you are interested in how this was put together. Remember a lot of these techniques can be used to make other sized books as well.

Part 1

Part 2

Project 2: Is the latest & greatest book die, which is also my favorite of all time. The Full Journal. This wonderful book is 6x9" plus of fabulousness. You can see the tutorial here. 

Project 3: Made for the release of Eileen's Maker Forte stamps, this Mixed Media Storage Box was made using the Scallop Edged Box. More commonly called the Yellow Box LOL. This is a bright & cheery addition to any organization attempts.  I also have a make along with me video! You can find all the info here.   Well that is it for this year. Wow, there have been a lot of makings. Feel free to follow my blog by email on the right hand side so you are sure not to miss a post! I hope you have a wonderful holiday season of making & a fabulous December filled with friends & family. 

Monday, November 22, 2021

Let's Make Gift Tags!

Happy Mixed Media Monday, this week the Topflight Stamps Team is all about gifts! Gift tags, card holders, packaging, decor. So many choices! Still working in my December Daily, so I want to make something that will double up. I am also going to share a decor item made for Eileen Hull using her truck die. The items can be bought at Topflight Stamps. Check below to see an easy way to create gift tags as well.*Affiliate- some of these companies have given me product to use, play & experiment with. The ideas are my own but I tend to work with companies whose products I like so enjoy the inspiration.  **some of these links are affiliate, I receive a small percentage from the company at no cost to you. This helps me deliver free content!


Here is the gift tag I made. I had lots of ideas & did a lot of playing around, so making some more will be easy. 


!Also Topflight Stamps is having a sale!! This is the perfect time to pick up your wish list! Back to the technique... Do you ever have an idea & then just have to admit it is a craft fail? It is harder embossing in the winter when the air is dry. the products used to adhere the powder tend to dry very quickly which adds some challenges. Especially when it comes to a chunky emboss which I love to use.

This play started out with trying different ways to emboss using chunky embossing powder (White Wonder), then spray Glimmer Mist on top. Chunky emboss & a detailed stamp, doesn't work very well was the result. The emboss creates this great snow like finish however as it is chunky, there wasn't a great way to have the emboss adhere to the image. I tried an embossing pad, embossing ink, gesso, even decoupage glue.


This was my idea. Cover the tag with White Wonder emboss then spritz with Glimmer Mist. I also added some Blue Moon embossing powder. This try was using gesso to adhere the embossing powder. It was spread in a nice layer so I was hoping the slower dry time would allow the emboss to stick. The cool thing is where there was no emboss I still got the snow flake image. You can see it in the lower left corner. See how detailed it is? The gesso acts as a resist however it still didn't create a crisp embossed image. I had to do the math. The chunky parts of the emboss are too thick for the skinny snowflake details. This would be better used as Santa's hat or on a snowman stamp. Good to know!


This tag was made using gesso & Blue Moon emboss. I love how it turned out. The embossing didn't stick everywhere but you still see the white of the snowflake. The embossed portions are sparkly & ice like. Kinda fun! The contrast with the black tag is awesome. 

I did still want to use the Glimmer Mist so Apple Green was spritzed on a piece of card stock & once dry my sentiment was stamped on. Cut it to make this cute banner & a sparkle gold star was added. 

Next a focal image was chosen. I just received this set House of Butterflies & love the house image. Simply stamp your image on card stock, fussy cut & add on. The beauty of this, the image can suit the receiver. Lastly add some ribbon & thread, you could also add a charm if you want. 

Here is the idea for a quick way to make gift tags. Simply cut out the cards from the Stamperia paper pad, Winter Tales. There is a great image on one side & a space to write on the other. Add a ribbon on top and bam, done.


While we are at it with the Stamperia Bundle here is a wonderful decor item made using items from Stamperia Winter Tales Bundle. To see how this was made you can go here. That is it for today. I hope you get the chance to create some gift tags of your own. Have a great week. You can check out my blog post over at Topflight Stamps that has photos & links of all their products used. One stop shopping yay!

Supplies:

Monday, November 8, 2021

North Pole Mini Art Journal Page

Hello Blogland, this week I am working in my Gel Print Notepad. The Topflight Stamps theme for the week is Winter/Christmas so a mini art journal page came to mind. *Affiliate- some of these companies have given me product to use, play & experiment with. The ideas are my own but I tend to work with companies whose products I like so enjoy the inspiration.  **some of these links are affiliate, I receive a small percentage from the company at no cost to you. This helps me deliver free content!


The star of this page is Darkroom Door stamps from the Merry Mail set. It is one of my personal favorites. Prism Ink was used to stamp with. The colors are perfectly holiday like. 


Here is the Notepad Art Journal this page was designed in. This book was so much fun to make & you can find it here. It is ready to be filled with inky goodness!


This page starts as a Gel Print using Fresco Finish Paint. It was a wipe up print so yet another good reason not to clean your gel plate!


I had a bit of an ephemera making session, just stamping the different images while trying to capture that junk journal vibe. The images were stamped on card stock, book paper, Paper Favorites paper pad & deli paper. Santa was colored in with Copic markers. The pieces were assembled & voila. A happy mail art page! Hop on over to the Topflight Stamps blog if you want to see photos of the products used. Have a wonderful week!!

Supplies:

Tuesday, November 2, 2021

Magical Winter Truck with Stamperia for Eileen Hull

Hello fans of Altered Art, today I am making a winter truck with Stamperia paper for Eileen Hull. The Inspiration Team is playing with all things Seasonal. Fall, Winter, Thanksgiving or Christmas, dealers choice. I hope you check back throughout the month on Eileen's blog to see all the inspiration. *Affiliate- some of these companies have given me product to use, play & experiment with. The ideas are my own but I tend to work with companies whose products I like so enjoy the inspiration.  **some of these links are affiliate, I receive a small percentage from the company at no cost to you. This helps me deliver free content!

I just love this project, it will look great with my Christmas decor. The truck was really easy to make & the possibilities are endless!! If you want more inspiration on making trucks you are in luck! If you haven't heard Eileen is having a tailgate party. Details from Eileen as follows: 


This event will stream to EHD Facebook page and YouTube channel on Wednesday, November 10 at 9:00 Pac/12:00 ET/5:00 UK. In attendance will be 3 retailers and 6 Sizzix employees from US and UK and me. They will each be creating their version of the Vintage Truck on the Streamyard platform so you will see 10 people creating at one time. Viewers will be invited to craft along and there will be prizes, etc. After the event, anyone who posts a truck and uses the hashtag #eileenstailgateparty be entered to win the grand prize. It is going to be amazing! 


 I hope you can join us!! For now I will start the fun with a truck tutorial of my own. This did not take too much time & it is a great way to use that fabulous scrapbook paper we own. To start cut 2 trucks out of mat board & 4 trucks out of paper. I used 2 different snowy papers & cut each paper in both directions. 

The paper was adhered using UltraBond glue, scraped on with a stencil pal. The nice thing about this is, the glue is nice & strong but you have a few seconds to wiggle the paper into proper position. Make sure you spread the glue on a non stick mat so the paper is easy to peel up.

 
Once the paper was adhered down it was distressed with Chipped Sapphire Distress Ink. The white edges of the mat board were colored with distress marker. The middle of the truck piece was cut out of mat board & for some unknown reason (I like making things difficult) strips of paper were used to cover it. It would be easier to just cut one piece but I like that the paper fits really well into the bed of the truck. 

To make things easier for you to follow, Eileen made a video with some samples & how to put the truck together. The explanation of the die & piecing of the truck is at the 6:55 mark.

I wanted snowflakes for the wheels & used Eileen's die for that, then cut some of the branches off. The left overs would make great branches or leaves too. 


I followed the video that Eileen made to put my truck together. Love it so far!


I tested some Distress Stain & Mica colors to see what I would like to use. These tags just have this most amazing shimmer & vibrancy. The colors & links are listed below.


Once I had an idea of the colors I wanted it was time to ink up the tree. The base was taped down with purple tape which helped hold the tree in place. The spray was sprayed in a controlled fashion to get the striped look. So cool. Once dry a bit of random collage medium was put across the front side with my finger. Distress Glitter was sprinkled on to add a bit of shine. 

This is just so pretty!!! The best part is you can color the tree to fit your project. 


Time for the embellishments! Using the Winters Tale Chipboard pack and some foam squares to layer the pieces. These images are just gorgeous. Thanks so much for joining me today. I hope to see you over in the Eileen Hull Fan Club. Have a great day!!

Supplies:

LinkWithin

Related Posts Plugin for WordPress, Blogger...