Showing posts with label stencils. Show all posts

Monday, December 20, 2021

Visible Image Journal Booklet for Topflight Stamps

 Hello My Stampy Friends! Welcome to my last post for Topflight Stamps. After 2 1/2 years with this awesome team it is time for me to move on. Life has gotten super busy & just does not leave me time to continue. This has been a wonderful experience. The gals on this team are super supportive & friendly. It has been a pleasure to play with so many, wonderful, stamp company products & get inky on my Mixed Media Mondays. A special thanks to Donna Bowman for creating this creative space for us to play in. Lisa Hoel thanks for hanging in with me when things went pear shaped! You are a wonderful DT Lead. 

Now on to my project! This week the team is focusing on the UK company Visible Image. I made a Full Size Journal a while back & decided I wanted to add a signature for some arty play in January. I will show the journal & link to it below. I love how this booklet turned out. It some of my favorite elements. Texture, a metallic shine, cool quotes. Hum I may have to add some metal LOL.


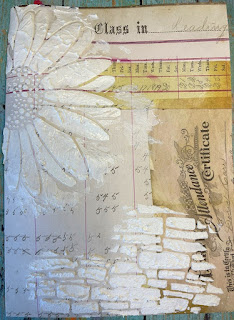
This booklet started with a 12 x 8 1/4 sheet of scrapbook paper from a Tim Holtz paper pad. Pulling out a few stencils, some Grit Paste (bricks) & crackle paste Daisy)  was added. Then the page was set aside to dry.  

Next up: Pulled out my Gel Press to use as a palette. This is a great way to not waste paint & if you want to brayer your background. At the end of your session you can pull a print so the left over paint is used up. 

Here is the brayer painted background, with my main title "Escape From Real Life". I know many of us are feeling this now more then ever, art is such a great escape & good for our mental health. Colors used are London Bus & Truffle. Looking at my Infusions swatch was the next step. This helps to figure out what colors the project options are. 


Once the pastes were good & dry it was time for color. Adding Infusions in Lemoncello & Golden Sands with some water gave my Daisy a dynamic yellow, golden brown look. 

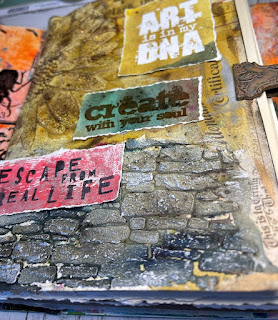
For the brick area powders, In the Navy & Sleigh Blue were used. Lovely & grungy. It is crazy how realistic this brick will look when finished.

I had this idea & wasn't sure if it would work but that is sometimes the best way to discover new techniques. The idea was to have some of the art quotes embedded in the background using clear &/or white embossing. I made a couple of samples to see which I like better. Below is the same technique I used for the left hand side sample. 

Also realized there was more success in seeing the quote if the starting background was light with a darker color on top. This creates more of a contrast making it easier to see the quote. This has a watered down Sleigh Blue underneath, then clear embossing powder & Royal Blue on top.  Once the Infusions are dry, clean off the embossed area well with a baby wipe. If you use a heat gun to dry, the emboss heats up again and you may lose your image. I didn't end up using this & learned this technique works better with a crisp, well defined image like the Art is in my DNA. 


I had to show this luscious piece of mixed media paper that is covered in the various Infusion colors. Just so nummy! 


In the process of that I realized the torn quotes made me happier. Totally different look then I envisioned but really like it. This is the fun part of art, changing your decisions as you go. This quote background is from a piece of the paper in the last photo, above. The quote was stamped in Roasted Coffee ink & embossed with Lime which is a translucent embossing powder.


Do you ever have a product or technique that you can't stop using at the moment? I feel that way about adding Sizzix Luster Wax. It just creates such a rich, dynamic, aspect especially to embossed images. Hit the high points of the stenciled images using the wax & a piece of hard (Phat)  foam. So hard to see how dynamic the metallic shine is in a photo! 

Here is a close up of the bricks. How realistic & random the color is! Keep in mind there is also that silver metallic which make it just so delicious. 


I also wanted to show what the left side of the paper looks like without all those layers. Amazing where this page started from! 

Almost there. To make the cover more sturdy & cover up any ink bleed through, a heavier weight card stock was cut, sewn around & adhered down to the inside cover. 

Time to build the book. Simple to grab random papers, tags, envelopes to make a signature. Keep the pages around 12" long by 8 1/4" tall. I made some smaller just to add interest & of course the tags will do that as well. Fold the pages & insert them into each other. Bam done. 

Last step is to slip the booklet into my already completed Full Size Journal. I love this size & Eileen Hull's diecut makes these books easy to create. You can find the full tutorial to the cover of the Journal here. I am going to change my date to 22, just waiting on the stencil number to arrive. The booklets slide in & out through elastic which makes working in them a breeze.


Here is another more realistic look at the bricks. Hard to see but there is silver in with the white highlights. They turned out so great! Love that Grit Paste. Well that is it for me. I hope you subscribe to my blog, You Tube, Facebook & Instagram. I post different projects on these platforms. Lots more content coming your way, including working in this book. Have a great day & hope you have a chance to get inky! For photos of Topflight Stamp products you can go here.

Supplies:

Monday, September 27, 2021

Falling Into Autumn Art Journal Mini

Hello My Inky Friends, today I have a mini art journal page for you. I also have a video!! It is the start of a new week over on Topflight Stamps & we are moving into the Fall/Halloween realm. I have been working in a Dina Wakley 6x6 kraft journal & decided to just keep on going. 

Here is my Fall page, again played with quite a few different products. The funny thing about this page was being sure it represented Fall. For some reason bats immediately came to mind, yet bats fly around all the time! Anyway the spark for my page was the beautiful owl stamp by Visible Image. I suppose you could do any project and just add candy corn to the photo, LOL. 

Video Link

Check out my You Tube video & play along. Just grab supplies from the list below or whatever you have that you feel like playing with & create along!


These were the products I started with. As you can see they were added to while working. You don't have to know everything you are going to be doing when you start. Once creating the ideas spark from there.


Let's Get Inky! 

Started with some white gesso to help the background colors pop. I have been playing with Dina Wakley supplies just for fun lately so carried on experimenting with those. Stenciled through multiple images using her acrylic paint in Sedona, Tangerine, Fuchsia & Lemon.
 
 
Ahhh love these layers of stenciled images. In the end that 9 was a bit strong so it was knocked back with some gesso. 


Next up!

Let's make that cool leaf. The Lavinia stencil is so detailed & spritzing with multiple colors of Glossy Spray made for a nice shiny leaf. The back of the stencil was spritzed 1st with Pixie Spray. This creates a tacky surface that keeps the stencil in place. Wait a minute for the spray to dry & the stencil will stick down. This helps prevent the paint from seeping under the stencil. Spritz on the Gloss, letting the color dry in between if you don't want them to mix. Hot tip: Wipe the nozzle down & re-cap immediately to help prevent clogging. More tips on my video.
 

Glossy spray is a unique acrylic paint spray that dries permanent. Once the leaf was well dry, some doodles were added. *Hot Tip: Unless you are using a Posca Pen wait 4-5 hours for the spray to fully cure or you risk ruining your pen. The next time you go to use it, it won't work.
 
 
While the pen marks were drying it was time to add some stamping to the background. Using the Foliage Set & some Archival Ink in Cobalt Blue & Seafarer, random images were added. 


My focal image, the owl was stamped on white card stock in Black Soot Archival. The quotes were also stamped on parchment paper in a few colors. Which one should I choose? In my video, you can see more option choices as well as tips on getting photo polymer stamps to ink up & play nice.


Next up, time to glue. Once my decisions on placement were made, the images were glued down using Ultra Bond. I like to take the lid of & use an old credit card to spread the glue on the back of my cut out, then simply adhere it down. This glue is great for getting heavier papers to stay put, like card stock or watercolor paper. 


Here come the bats!! Using black card stock my bats were die cut. Not sure if this die is still available. It was from last year or a few years ago & as it is seasonal once it is gone they don't always bring it back. I may have glued one of the bats upside down, ssh don't tell anyone. 


A moon was cut out of white card stock & partially embossed with Seth's Blue Moon embossing powder. It helps give it that extra wow factor.


Time for more assembly!! The moon was highlighted & the bats doodled on using Posca pens. Way more steps were added then initially planned but that is the fun of art journal pages. Hop over to Topflight Stamps to see photos of the products.  Links are below & I hope you subscribe to my You Tube channel. More technique videos are coming!!! Have a great week!
 
Supplies:
  • Night Owl Stamp Set by Visible Image
  • Tracy Evans Foliage set by AALL & Create #496
  • Autour de MWA Stencil  "                  " #131
  • Sara Naumann Circle Stencil by PaperArtsy PS203
  •  "              "     Textures Stencil "        "    Ps090
  • Leaf Mask Stencil by Lavenia 
  • Seth Apter Blue Moon embossing powder by WOW
  • Dina Wakley kraft album 6x6 by Ranger Ink
  • "             "  Acrylic Paint          "            "
  • "          "      Gloss Sprays       "            "
  • Archival Ink  by Ranger Ink
  • Tim Holtz Bat Crazy die cuts by Sizzix
  • "          "   Frightful Things "        "
  • Ultra Bond by Therm*O*Web 
  • Pixie Spray "              "
  • Posca Pens

Monday, August 30, 2021

Autumn Card For Topflight Stamps

Hello Stamping Fans, this is my bi-weekly post for Topflight Stamps. Mixed Media Monday I will start off the week with our new theme- Fall/Autumn. I have some recycled fun for you. How many packaging tags have you saved? I have a lot!

Here is my Autumn tag. It is shimmery from the mica spray (hard to see on camera) & has lots of nummy texture. 

With fall right around the corner I HAD to get the newest Mica Sprays from Tim Holtz. They are sold in sets of 3 & have great packaging so that is the base to my card. 

I also had to swatch these shimmery babies out. They look so good! Love that mica spray look. Hard to see from the photo but just nummy shimmery goodness.

Let's get inky. Using the packaging, cover the words using some gesso just in case I missed a spot. You could also use a tag or make a card. Next up was a layer of crackle paste through a stencil. So many choices but a spider web would be a good one. The stencil at Topflight Stamps is a bit different but would work great. As always the links for the products are below. 

Set that aside to dry & stamp the mushrooms from EKC36 with Archival ink & cut them out. Color them with your favorite inks or pencils. Same goes with the quote, which you can also stamp onto patterned paper for extra fun. 

Now for some color, use the sprays randomly, keeping the color in the same spots so you don't make the colors muddy. Although the Flickering Candle & the Crooked Broomstick make a lovely brown. Add some back ground stamping once the background is dry. The edges were also distressed in French Navy. I also stamped my journal while I was at it... 2 birds...

All that is left is to assemble. For added interest the quote was distressed in Roasted Coffee & the edges curled to make it look like a parchment sign. I also popped a butterfly on at the last minute! Thanks for joining me today! Remember to hop over to the Topflight Blog for photos of the products & links, the links are also below.

Supply List:

Monday, June 21, 2021

Make It an Art Card or a Pocket!

 Hello Inky Friends, today for Topflight Stamps, we are making an art card or a pocket element. I have been working on Junk Journals lately & am finding fun additions to pop in there. This card can either go in a collection or be added to a card stock background & turned into a pocket. This week the team is playing with Stamperia, so I used their stamps as my focal image. Feel free to make the same card using your favorite images.*Affiliate- some of these companies have given me product to use, play & experiment with. The ideas are my own but I tend to work with companies whose products I like so enjoy the inspiration.  **some of these links are affiliate, I receive a small percentage from the company at no cost to you. This helps me deliver free content! 


Here is my card, the inspiration for this page was the quote I found in a newspaper "encourage acts of kindness" something I am striving to do more. It is so easy to get busy leaving no time to help others who may be struggling. When times are stressful it is also a good idea to take your eyes off yourself. Makes me realize we are all going at it rough sometimes. 


I have a video for you too! This is a play along with me video so I hope you have the chance to pull out some supplies & make an art card. 


Step 1: This card started as a 4x6 piece of scrapbook paper. German book paper & another light scrapbook paper were torn & adhered with a glue stick.

Step 2: Next step was to add some stencil work with watered down Fresco Finish paint. I stuck to warm colors. 


 Step 3: Stamp the focal image with archival or waterproof ink. 


Step 4: Watercolor the focal image using watered down Fresco Finish paint, & cut out. Excess paint can be put on spare paper & used with stamps or as back ground pieces. Using cool colors or the opposite of the background helps the image pop.


Step 5: Add the focal image again directly on the background a few times. Also some random stamping was done with the driftwood to add texture.


Step 6: Add the sun stamped image. Originally I stamped directly on the background but the image didn't show up well. So it was re-stamped on white card stock, cut out & glued using Cosmic Shimmer Glue. My quote was cut apart, distressed with French Navy Prism ink & adhered

I found the background colors were overpowering the focal images so a light wash of watered down gesso was added. This helps keep the images intact but knocks them into the background a bit. To make up for the loss in color some mark making was done to help the background stand out just a bit. Pen was used & smudged to create shadows. 

Thanks so much for joining me today, I hope you have the chance to play along!

Supplies:


Monday, April 12, 2021

Topflight Stamps Mixed Media Art Journal Page

Hello Mixed Media Fans, this week we are making an art journal page for Topflight Stamps. I hope you join me & create your own sunny page! 

I am doing another page in my Art By Marlene Journal and it is kind of happy & sunny. Spring is starting to actually show its warm face in our area. I added a photo after the piece was finished. I love adding photos to my art journal page it adds to the story & helps document what is going on.


Start with some paint & a stencil. Using Fresco Finish paint and a dabber to create a fun image. I chose colors that daisies come in but remember this is art so the sky's the limit. The big flower was made using the Daisy Daisy stencil. As is usual there is a supply list below. 

Next, stamped the cute gnome directly on the mixed media paper. "Ernest" was painted with Prism ink & water. The shroom was stamped on card stock & painted with wet Fresco Finish paint.


I love using ink as paint. Really adds potential to your paint supply! Simply stamp a bit on your craft mat, add a spritz of water & you are good to go.
 

 Finally some random stamping around the edges, love using these multi image stamps! This is a really large stamp with lots of images on it! Got to love that French Navy ink. Really pops off the page.

 Very interesting how the image is sort of buried into the flower and creates dimension. Thanks so much for joining me today I hope you have a chance to create an art journal page! Hop over to Topflight Stamps to see pics of the stamp sets...

Supply List:

LinkWithin

Related Posts Plugin for WordPress, Blogger...