Monday, February 28, 2022

Eileen Hull Gustav Klimt Book Box with Stamperia

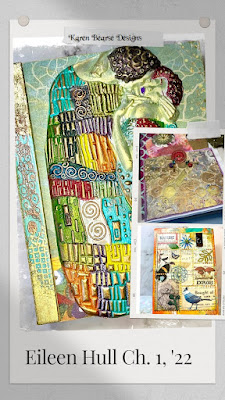
 It is time for the tutorial of my Eileen Hull, Gustav Klimt Book Box!!! This project took some time but it was so worth it. Gustav is one of my favorite artists, with The Kiss being one of my all time favorite paintings. He was born in Austria in 1862, & what I love about his art (other then it being crazy unique) is that he used gold leaf on his paintings. He was a Symbolist painter and worked primarily with paintings, murals & sketches. He lived in poverty most of his childhood & most of his family were artists. Klimt first started using gold leaf in 1898. His "Golden Phase" is where most of his critical success came from. He lived a simple life with art & family being his focus.

I hope you enjoyed that mini documentary, I find looking back at artists lives fairly fascinating. Let's get on with the show! Back to die cutting.

The amazing thing about Eileen's die cuts is they are a blank canvas just waiting for your individual inspiration. They can be used over & over which is so satisfying. As soon as I saw the Stamperia line using Klimt's paintings I knew exactly what I wanted to do. A huge bonus is the line comes with molds so I pulled out my resin to create the dimensional cover of the box. 

To start mat board was covered on both sides with the paper from the Stamperia line. You will need to cut 2 tops (rectangular piece), 2 short sides & 2 long sides (they have score lines & tabs). The paper that goes on the inside of the box faces up on the die. You will want to put Super Tape on each of the tabs (on the side that is scored) & the long skinny edge. You will also need 1 spine (you can see it below), the piece that has score lines through it like the spines of Eileen's past books. I only used paper on the inside of the spine, so face up on the die.


Next up the outside of the spine was painted with Salvaged Patina, love this color! I left the corners blank to give the next step a clear field.

 
3D adhesive was painted on the ends of the spine with a bit of a jagged edge. Once that was clear & was tacky Metallic Flakes in Gold were applied with my fingers, pressing in as I went. I had never used Metallic Flakes before, although had been meaning to for years & this was so easy! Then any left overs were brushed back into the jar. Love, love the look!

 
Continuing with the Klimt Gold theme stamps were used & embossed to create this awesome look. 

Then it was time to assemble to box. This came together very simply. After bending the tabs, adhere a short piece to a long piece so you have 4 sides of the box. Standing over the bottom of the box, position the side piece so equal space is showing on all sides. The small edges will adhere to the bottom piece. Push down to create the bottom of your box. It is much easier to do this as it does come together pretty obviously.

Hot Tip: Adhere the box without the paper & add the paper after. That way the seams of the box won't show. Here is the before. One of the things about designing with new dies is we get to experiment with the construction. I cut a piece of paper, deciding on a different one, 4 5/8 x 5 3/4" to adhere to the bottom of the box. 

 
I cut a piece of paper to fit on the inside, you will notice it is a different piece. I changed my mind & liked this one better. It is the Tree of Life painting re-worked.
Which one do you like better?

You may want to watch the release video On Facebook to see all the great inspiration from the team. You will see Eileen showing my box with my commentary on how it went together.  Eileen also puts together a box toward the end of the video. Here is the link.

 
OK now for the fun part! I used Amazing Fast Cast Resin because I am impatient & this stuff is amazing. It cures in 10 minutes! I also used advice I got from Resin Obsession to know how much resin to use. Fill the mold with water then pour in a measuring cup. This gives you how much resin you will need! Freaking brilliant.
 
 
This is the amazing piece of resin I pulled out of the mold. It is an image from the most famous painting The Kiss. The edges were trimmed immediately while the resin was still soft. Resin is a plastic so if you want to paint it with acrylic paint (also a plastic) it is better to add a coat of gesso first. Gesso has tooth & will help the paint stick. 

 
I wanted to add my own stamp to this project so I chose my favorite thing to do, add all the colors. I pulled my vast selection of Art Alchemy paint by Finnabair to paint this wonderful piece. 

 
Here is my in progress piece. It is looking pretty cool at this point, but wait there is more! LOL
 

I carefully painted the segments using a smaller paint brush. Some of the paint is metallic, some of them sparks which has shimmer. Looks pretty cool at this point but the best is yet to come.

 
At this point I was having too much fun & forgot to take a photo. Hitting the high points of this resin piece with Luster wax gave it even more of that metallic look, helping the image pop. I also feel like it honors Klimt who made his paintings with gold. To see another project that does have step out pics for that technique you can go here.
 

A photo of the assembled box. You can see how the spine is adhered to the outside of the cover piece, Super Tape was used. My resin piece was adhered with many pieces of Super Tape. I was not sure if this would work but it has stayed on brilliantly. 

 
Here is the inside of the box with The Kiss on the left side. Do you see how I added my own touch to this project? Very excited to have this beautiful box to keep some special treasures in. Make sure you check out the other tutorials from last month & the new ones showing up in the next few month on Eileen's blog. Thanks so much for joining me on my adventures in art & please leave a comment to let me know what you think!
 

Supplies:

Friday, February 25, 2022

Eileen Hull February Makers Forte Stamp Release!

Hello Journal Fans!! Today is the much anticipated, February Eileen Hull Stamp release with Makers Forte. You are going to love these stamps, they co-ordinate with her past releases. I don't know about you but I love things that work in a series! It may be the collector in me. We also have a blog hop for you, all the links are below!

Here is my Full Size Journal cover, using the Snail Mail Postage set. I just love the look of the Snail Mail die, especially when cut on patterned paper. It is so fun to then add the elements that make up the postage stamps. This book was my Seasons Book that will be a monthly Junk Journal class. 

Here is the stamp set that was used for this project. So many great postage stamps & travel elements on this set. Very unique & did you notice there are 2022 dated cancellation marks! Love it. The Admit One ticket is from the previous release. 

This is the other set that is a companion set for the last Button Cards. If you know Eileen you may know the connection to the stamps. To get to know her better make sure you join the fan club! 

Here is my 2nd make. Continuing on the series theme I reworked a design I had come up with awhile ago. This is my 3rd piece using the same sort layout. What I love about this idea is:

  1. Design once make multiple pieces. 
  2. It really allows for more creative freedom when the 2nd & 3rd pieces are made. Now it is just playing with product not having to overthink placement etc.
  3. Makes arting totally fun!!  

To see the other 2 pieces I made using the same layout design you can go here & to see the tutorial for the original piece go here.

Thanks for joining us for the Makers Forte February Release. I hope you join the blog hop & check out all the awesome inspiration created by the teams. Remember to also become a member of the Eileen Hull Fan Club, a great group of creatives that are there to cheer you on, offer support, encouragement & inspiration. 

Sarah Lizzie
Lisa Hoel
Jennie Atkinson

Karen Bearse *you are here
Pam Bray
Maggi Harding
Tonya Trantham
Susie Bentz
Elizabeth Robinson

Supplies:
  • Eileen Hull Stamp- Snail Mail Postage for Makers Forte
  • "          "             - Button Card 2 "           " 
  • "          "             - Damask          "           "
  • Eileen Hull Full Size Journal for Sizzix
  • "           " Snail Mail die cut    "     "
  • "           "   Heart Mandala
  • Tim Holtz Mushroom (Funky Foliage) die cut "      "
  • Tim Holtz Ephemera & fabric
  • Owl Graphic Fairy 
  • Paper & Butterfly- 49th & Market

Tuesday, February 1, 2022

And So It Begins... Eileen Hull's Chapter 1 Release!!!!

Hello Eileen Hull Fans! Very excited to be here with a few sneak peaks of projects that will be blogged over the next few months. It is time for Eileen's Chapter 1, 2022 release with Sizzix! Drum roll please! The teams have been working super hard to bring you these awesome projects & as usual we have a blog hop for you to see all the goodies in one go. I also hope you will turn in live to Eileen's Facebook page to see some of the samples that the team have made. Maybe a special guest will appear, hee hee. Video brings these projects to life so much better! *links below include a small affiliate at no cost to you, thanks in advance for helping me bring content!


Here is my latest collection of fun. This Gustav Klimt line by Stamperia was perfect for my Treasure Box, made with the new "Book Box" die. This die is so versatile & can be used as a box, or an album & I am sure we can come up with some organizer items to boot! We also have the wonderful Phone Stand which makes for great gifts. Easy to personalize for your favorite people. Both of these dies are Scoreboards die, meaning they can cut the heavier materials like mat, corrugated or card boards with ease. See if you can spot the other 2 releases from the description below. 


In Eileen's words...
I am so excited to share my Chapter 1 release with you! The dies in this collection are versatile, practical and fun to embellish.
The Phone Stand, an XL ScoreBoards die, is a MUST- you need one for every room! Make for yourself, family, friends, for gifts or to sell- the die cuts the stand in one pass and is very easy to assemble.
The Book Box can be used to make a book or a box that holds A-2 greeting cards. What a great way to package handmade cards ... or a quick and easy book!
Add the Vintage Buttons folder to create vintage backgrounds for cards, journals, pages and tags. The 3D effect is stunning when you add a little Luster Wax to bring out the highlights...
The Snail Mail Thinlits die cuts a postal pane that coordinates with two of Eileen's Snail Mail Maker Forte stamps. This die was designed to use on the front of an A-2 card!
 
  
The detail on the Vintage Button Texture Emboss folder is insane! I didn't have long to play with this one so stay tuned for additions to this pocket as well as other fabulous things! In the meantime, can you guess what die cut of Eileen's the craft card stock tag was made from? Tune into the Facebook Live on Eileen Hull Designs to find out! 


Supplies: 

  • Eileen's Book Box Scoreboard die by Sizzix
  • "           Phone Stand   "           "
  • "           Snail Mail Thinlets  "       "
  • "           Vintage Buttons 3D Textured Embossing Folder.

LinkWithin

Related Posts Plugin for WordPress, Blogger...