Showing posts with label stamperia. Show all posts

Tuesday, July 5, 2022

It's Time To Travel!

Hello Fans of Eileen Hull it is time to travel! With so much of the world being opened up again let's make a Travel Journal. It could be used for older trips or ones that are upcoming, or a combination of both. This book has the space for 5 signatures & I plan on using it for 3-5 trips depending on the number of photos I take. Using my favorite book the Full Size Journal was a good place to start.
*Affiliate- some of these companies have given me product to use, play & experiment with. The ideas are my own but I tend to work with companies whose products I like so enjoy the inspiration.  **some of these links are affiliate, I receive a small percentage from the company at no cost to you. This helps me deliver free content! 


You can make this book in as little as a day, with these simple directions. However this book took me days & days to create. Creating involves lots of decisions, play time plus trial & error. As usual I got carried away so there are a lot of techniques. While my cover was drying, I would work on elements for the inside or the 1st travel booklet. If you want to make this book that is my suggestion but I will do my tutorial on the cover 1st. I also made  a few mistakes along the way so I will let you know what does not work, or an easier way to get the same result.


Start by cutting 2 pieces of the Full Size Journal (links to all supplies are below). You will need the bigger Sizzix machine, the Plus or Switch Plus for this. I just used card board for this. I covered the card board with gesso but I don't recommend this. It ended up being a mistake as what I forgot, Distress Oxide does not dry on a gessoed surface. Crazy right? To fix this I would cover the pieces with mix media or watercolor paper.
 
 
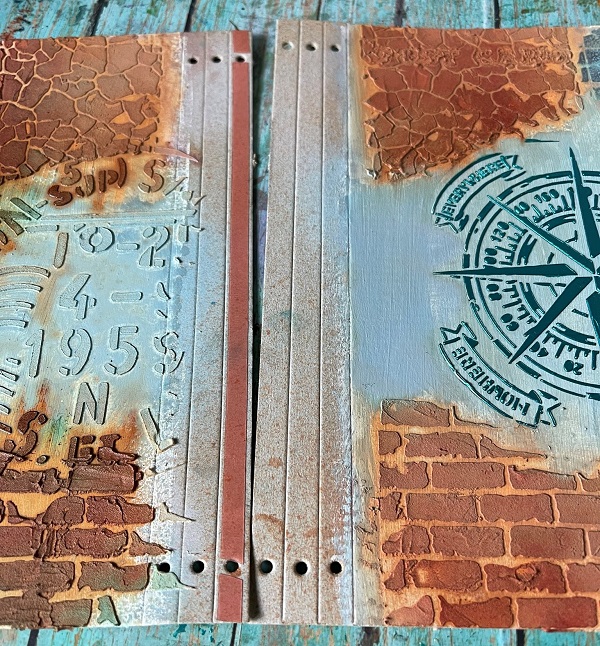
Next step was adding texture. I mixed some paint with crackle paint translucent. The great thing about this technique is you get the true color of the paint. Then added it through a stencil. I was thinking in hind sight to color the base first. The challenge was adding color after makes it difficult to keep the brown stencil image.

Next step was adding stencil images using modeling paste. I don't have a pic of this step. The stencil & postage image were white & set aside to dry. Once dry they were colored with distress spray stain & oxide. The stenciled images grabbed the color and the gesso part became a pastel, which then refused to dry fully. If you used paper instead you won't have this problem. I also came up with a solution to my problem, which I share when I get to that point.
 
I used stencil butter with a Stamperia stencil that was perfect for my theme. What I love about this product is it keeps it's shape even if the stencil is detailed.
 

Hot tip: while you have the stencil & paste out it is a good idea to create another piece. I covered a piece of scrapbook paper which I can use inside my book as a tuck or tip in. You can see here how fine & perfect the details are. This product is the reason for that crispness.
 
Once my covers were dry it was time to adhere them together. Just put a strip of Super Tape down one of the edges of the spine. Over lap the edge spines pieces & line up those middle set of holes. Easy peasy. You will go from 6 holes top & bottom to 5 holes.
 
I reinforced the spine with a piece of card board & then re-punched the holes. 
 
If you used paper to cover your books you can skip this next step. To fix the non drying Distress Oxide I painted those spots with like color Distress Paint. It still would not dry all the way, I figure as it was sliding around on the gesso. This was finally fixed by covering it with Collage Medium. It looks patchy but that will be fixed in the next step.

To help this area blend in better, stamping in different colors of archival ink were added. I used all kinds of travel type stamps. For the back cover. A fleur des lys was heat embossed in metallic gold on a piece of scrapbook paper & cut out. A few pieces of washi tape was a good base for this embellishment. 
 

I knew I wanted some hand made embellishments for the cover & also to use on the inside to travel things up. Started with the Snail Mail die Cut on a parchment type paper. 

Next step was to stamp the sectioned pieces with different colors of Archival Ink. 
 

 I pulled apart the sections & added small stamps & die cut images. This was just plain fun. For the 2 pieces that I used on the cover, they were embossed with UTEE.
 

 The postage stamp pieces were layered with some Tim Holtz ephemera. Love this cluster of travel fun! 
 
To finish up the cover some chipboard pieces from Stamperia Sir Vagabond Aviator were added. I also added the door hanger which will be part of my closure. This was from my stash & is an old 7Gypsies element. Always great to get some stash items used up with the new stuff! You can see that a clasp was used to clip on the ring of the door hanger. This will be my book closure.

 
Here is a picture of the clasp which was adhered with a jump ring to a chain. The challenge with making closures for these books is there is no way of knowing how long to make them. I don't yet know how big my book is going to get. I solved this by using a small safety pin on the chain which clips to a jump ring on the back of the book. Leaving extra chain dangling down means as my book grows I can just move the safety pin making the closure larger. Bonus is being able to add charms to the chain.


For the spine a piece of fabric was glued on using Ultra Hold Glue. Once dry the holes were re-punched. Elastic was added so my booklets can slide in & out. I added the beaded strips separately as the elastic is too fat for a lot of the beads I wanted to use. Thin but strong hemp was simply knotted on the inside of the book & a drop of glue on the knots to keep them solid. 
 
 
Here is a video to show you how to create the hidden spine. Then you simply add your beaded pieces with hemp or thinner cording. This way your signatures benefit from a strong elastic like 1mm, but you can still add a wide variety of beads to you project. This was a bit different then the way I did mine but their is video of this one so yay.
 
 
Of course the textured images were begging for Luster Wax. I added both the gold & rose gold with a hard piece of foam, only hitting the high points. A bit of wax was also added to the chipboard pieces. 
 
 
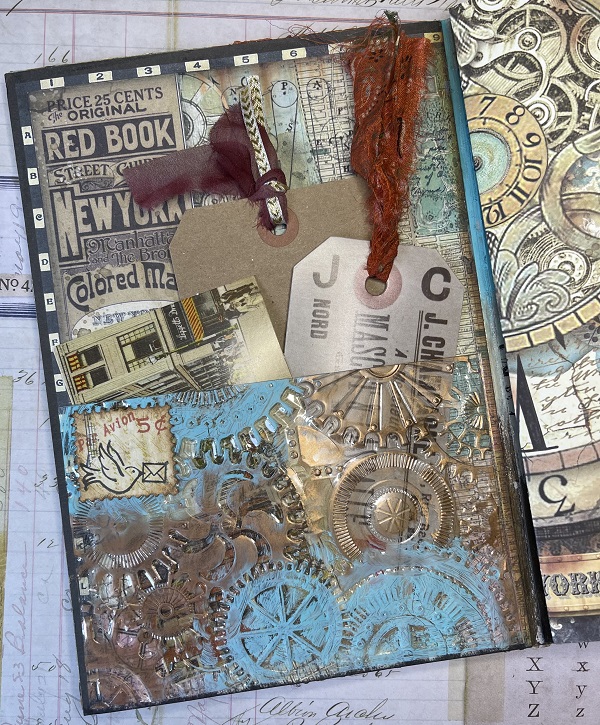
Let's give you some ideas for the inside of the book. I used more of the Stamperia collection. Cutting the papers to fit the inside covers. The pocket was made with a piece of acetate run through an embossing folder. The high points of this pocket were hit with some Salvaged Patina paint & Luster Wax. One of my postage stamps was added. I also left space for a title as I wasn't ready to commit.  

 
Here is a bit of a close up of the pocket, just nummy inkyness! Hot Tip: use Super Tape to adhere the pocket. It is the only thing I know of that will hold acetate. 


My 1st travel booklet has a combination of different papers but the cover is more of that luscious Stamperia. Well this post seems nice & long enough. I hope you get a chance to work on a book of your own. I have been posting more photos of this project on my Instagram if you want to check them out over there. 

Supplies:

Monday, February 28, 2022

Eileen Hull Gustav Klimt Book Box with Stamperia

 It is time for the tutorial of my Eileen Hull, Gustav Klimt Book Box!!! This project took some time but it was so worth it. Gustav is one of my favorite artists, with The Kiss being one of my all time favorite paintings. He was born in Austria in 1862, & what I love about his art (other then it being crazy unique) is that he used gold leaf on his paintings. He was a Symbolist painter and worked primarily with paintings, murals & sketches. He lived in poverty most of his childhood & most of his family were artists. Klimt first started using gold leaf in 1898. His "Golden Phase" is where most of his critical success came from. He lived a simple life with art & family being his focus.

I hope you enjoyed that mini documentary, I find looking back at artists lives fairly fascinating. Let's get on with the show! Back to die cutting.

The amazing thing about Eileen's die cuts is they are a blank canvas just waiting for your individual inspiration. They can be used over & over which is so satisfying. As soon as I saw the Stamperia line using Klimt's paintings I knew exactly what I wanted to do. A huge bonus is the line comes with molds so I pulled out my resin to create the dimensional cover of the box. 

To start mat board was covered on both sides with the paper from the Stamperia line. You will need to cut 2 tops (rectangular piece), 2 short sides & 2 long sides (they have score lines & tabs). The paper that goes on the inside of the box faces up on the die. You will want to put Super Tape on each of the tabs (on the side that is scored) & the long skinny edge. You will also need 1 spine (you can see it below), the piece that has score lines through it like the spines of Eileen's past books. I only used paper on the inside of the spine, so face up on the die.


Next up the outside of the spine was painted with Salvaged Patina, love this color! I left the corners blank to give the next step a clear field.

 
3D adhesive was painted on the ends of the spine with a bit of a jagged edge. Once that was clear & was tacky Metallic Flakes in Gold were applied with my fingers, pressing in as I went. I had never used Metallic Flakes before, although had been meaning to for years & this was so easy! Then any left overs were brushed back into the jar. Love, love the look!

 
Continuing with the Klimt Gold theme stamps were used & embossed to create this awesome look. 

Then it was time to assemble to box. This came together very simply. After bending the tabs, adhere a short piece to a long piece so you have 4 sides of the box. Standing over the bottom of the box, position the side piece so equal space is showing on all sides. The small edges will adhere to the bottom piece. Push down to create the bottom of your box. It is much easier to do this as it does come together pretty obviously.

Hot Tip: Adhere the box without the paper & add the paper after. That way the seams of the box won't show. Here is the before. One of the things about designing with new dies is we get to experiment with the construction. I cut a piece of paper, deciding on a different one, 4 5/8 x 5 3/4" to adhere to the bottom of the box. 

 
I cut a piece of paper to fit on the inside, you will notice it is a different piece. I changed my mind & liked this one better. It is the Tree of Life painting re-worked.
Which one do you like better?

You may want to watch the release video On Facebook to see all the great inspiration from the team. You will see Eileen showing my box with my commentary on how it went together.  Eileen also puts together a box toward the end of the video. Here is the link.

 
OK now for the fun part! I used Amazing Fast Cast Resin because I am impatient & this stuff is amazing. It cures in 10 minutes! I also used advice I got from Resin Obsession to know how much resin to use. Fill the mold with water then pour in a measuring cup. This gives you how much resin you will need! Freaking brilliant.
 
 
This is the amazing piece of resin I pulled out of the mold. It is an image from the most famous painting The Kiss. The edges were trimmed immediately while the resin was still soft. Resin is a plastic so if you want to paint it with acrylic paint (also a plastic) it is better to add a coat of gesso first. Gesso has tooth & will help the paint stick. 

 
I wanted to add my own stamp to this project so I chose my favorite thing to do, add all the colors. I pulled my vast selection of Art Alchemy paint by Finnabair to paint this wonderful piece. 

 
Here is my in progress piece. It is looking pretty cool at this point, but wait there is more! LOL
 

I carefully painted the segments using a smaller paint brush. Some of the paint is metallic, some of them sparks which has shimmer. Looks pretty cool at this point but the best is yet to come.

 
At this point I was having too much fun & forgot to take a photo. Hitting the high points of this resin piece with Luster wax gave it even more of that metallic look, helping the image pop. I also feel like it honors Klimt who made his paintings with gold. To see another project that does have step out pics for that technique you can go here.
 

A photo of the assembled box. You can see how the spine is adhered to the outside of the cover piece, Super Tape was used. My resin piece was adhered with many pieces of Super Tape. I was not sure if this would work but it has stayed on brilliantly. 

 
Here is the inside of the box with The Kiss on the left side. Do you see how I added my own touch to this project? Very excited to have this beautiful box to keep some special treasures in. Make sure you check out the other tutorials from last month & the new ones showing up in the next few month on Eileen's blog. Thanks so much for joining me on my adventures in art & please leave a comment to let me know what you think!
 

Supplies:

Monday, November 22, 2021

Let's Make Gift Tags!

Happy Mixed Media Monday, this week the Topflight Stamps Team is all about gifts! Gift tags, card holders, packaging, decor. So many choices! Still working in my December Daily, so I want to make something that will double up. I am also going to share a decor item made for Eileen Hull using her truck die. The items can be bought at Topflight Stamps. Check below to see an easy way to create gift tags as well.*Affiliate- some of these companies have given me product to use, play & experiment with. The ideas are my own but I tend to work with companies whose products I like so enjoy the inspiration.  **some of these links are affiliate, I receive a small percentage from the company at no cost to you. This helps me deliver free content!


Here is the gift tag I made. I had lots of ideas & did a lot of playing around, so making some more will be easy. 


!Also Topflight Stamps is having a sale!! This is the perfect time to pick up your wish list! Back to the technique... Do you ever have an idea & then just have to admit it is a craft fail? It is harder embossing in the winter when the air is dry. the products used to adhere the powder tend to dry very quickly which adds some challenges. Especially when it comes to a chunky emboss which I love to use.

This play started out with trying different ways to emboss using chunky embossing powder (White Wonder), then spray Glimmer Mist on top. Chunky emboss & a detailed stamp, doesn't work very well was the result. The emboss creates this great snow like finish however as it is chunky, there wasn't a great way to have the emboss adhere to the image. I tried an embossing pad, embossing ink, gesso, even decoupage glue.


This was my idea. Cover the tag with White Wonder emboss then spritz with Glimmer Mist. I also added some Blue Moon embossing powder. This try was using gesso to adhere the embossing powder. It was spread in a nice layer so I was hoping the slower dry time would allow the emboss to stick. The cool thing is where there was no emboss I still got the snow flake image. You can see it in the lower left corner. See how detailed it is? The gesso acts as a resist however it still didn't create a crisp embossed image. I had to do the math. The chunky parts of the emboss are too thick for the skinny snowflake details. This would be better used as Santa's hat or on a snowman stamp. Good to know!


This tag was made using gesso & Blue Moon emboss. I love how it turned out. The embossing didn't stick everywhere but you still see the white of the snowflake. The embossed portions are sparkly & ice like. Kinda fun! The contrast with the black tag is awesome. 

I did still want to use the Glimmer Mist so Apple Green was spritzed on a piece of card stock & once dry my sentiment was stamped on. Cut it to make this cute banner & a sparkle gold star was added. 

Next a focal image was chosen. I just received this set House of Butterflies & love the house image. Simply stamp your image on card stock, fussy cut & add on. The beauty of this, the image can suit the receiver. Lastly add some ribbon & thread, you could also add a charm if you want. 

Here is the idea for a quick way to make gift tags. Simply cut out the cards from the Stamperia paper pad, Winter Tales. There is a great image on one side & a space to write on the other. Add a ribbon on top and bam, done.


While we are at it with the Stamperia Bundle here is a wonderful decor item made using items from Stamperia Winter Tales Bundle. To see how this was made you can go here. That is it for today. I hope you get the chance to create some gift tags of your own. Have a great week. You can check out my blog post over at Topflight Stamps that has photos & links of all their products used. One stop shopping yay!

Supplies:

Monday, October 25, 2021

Done By December Daily Album

 Do you participate in December Daily? This week the Topflight Stamps Design (TF) Team is all about Winter or Christmas!! I am just starting to work on #donebydecember the idea being, finish your last years album before you start on the new year. For me I have many started December Daily books but only 1 that is finished. This is the perfect project as I was determined to get my last one finished!*Affiliate- some of these companies have given me product to use, play & experiment with. The ideas are my own but I tend to work with companies whose products I like so enjoy the inspiration.  **some of these links are affiliate, I receive a small percentage from the company at no cost to you. This helps me deliver free content!


My albums are created a year behind while I simply document the current year. I decided to create a page for my 2019 book using a few different supplies. Did you know that TF also carries paper? There are some awesome Stamperia paper bundles & one of them has the beautiful Winter Tales paper pad. Perfect to make a mini album page.


Starting with a piece of paper that was cut from an ECD die seemed like a good idea. Did you know that these dies fit the Ali Edwards albums? I use the 6x8 album size which is the same size as the paper pad. The back of the page simply has a tag pocket with another pocket made from more of the paper. Inside pop a card from the kit, there is space to journal on the backside of this card. All my edge distressing was done in French Navy.

 Same page just with more light! Using the script part of the stamp with Cinnamon Swirl ink, some embossing in Weathered Gold was added & the quote stamped, distressed & adhered. My double pocket is ready for tags, photos or whatever that day needs to be documented.
 

This paper is double sided which gives the page a good start. The other side of the paper has a simple pattern. This is ripe for some inky fun. I am going to use this page as a title, with the date on it. 

My quote was stamped with French Navy ink & embossed in Blue Moon distress powder. 

The stars were stamped from the Jofy70 set. How fun are they? The inside details were colored with a gold, gel ink pen. The images cut out & adhered to my page.

Stamperia products have some amazing images. Included in the bundle are some chip board die cuts. The bird & I'm Dreaming of... were adhered with glue. They were a great way to add some magic to this page. 


All I needed was the date. This is also an ECD die cut and was the perfect place for the wee birdie to perch. I hope you enjoyed my December Daily pages, thanks for joining me. As always you can go to the Topflight Stamps blog to see the product images. Have a wonderful, crafty day!

Supplies:

LinkWithin

Related Posts Plugin for WordPress, Blogger...