Hello Blogland, I am here with part 2 of my junk Christmas junk journal. This will be my design team post for Topflight Stamps so let's see what inky fun we can get up to! Happy Mix Media Monday!

My book will need some tags, pockets & in general some shenanigans. How about we make ephemera that can be used for scrap booking, art journal or even your December Daily? These pieces can also be used as a back ground for cards, tags, etc.

I started with some random pieces of white card stock. Next sprinkled some of the PaperArtsy Infusion on my craft sheet & spritzed with water. See the magical crystals come to life? This is Sunset Beach.

I then took a wet paint brush to smooth the color across the card- hum pretty but it takes away from what makes this product special- multiple colors & the walnut crystals.

Next up, sprinkle some crystals on the craft mat, spritz with water & with a new piece of card stock I tapped it into the colorful puddles, moving the card around to get the color on the card. I left some spaces white. Dry the card somewhat. To add more dynamics, repeat the last step with a change of color & add it into the white areas. Dry the card. Continue by adding color on top of the existing color, if you have added too much just pull the color up with a tag or paper towel. This is Royal Blood & Black Current.

It was fun to experiment, I even grabbed some tags that already had some back ground on them & just dabbed some color on top. I also added color to that red card from the top photo- more Royal Blood & Black Knight- that would be perfect for something Halloween like! I may have over done that one a tad- hee hee.

This sample instead of tapping into the puddles, the paper was dragged through creating streaks. The card on the right was made using the left over ink & that is why it is lighter. It was finished off by adding some Lemonchello directly on top & then spritzing with water, using my finger to spread. I hope you give this product a good play & experiment to see what else it does!

Dry all the card stock really well. Time to pull out the die cuts! Cut a bunch of tags, shapes ephemera etc. I will list the dies I used in the supplies.

These pieces are so rich in color & I just love the look of the these. I also am finding it makes more sense to die cut a bunch of things when you are crafting than to just do 1 at a time. The key to this is to have you die pieces organized so they are easy to find & pull out when you don't have time to cut. I have that solution for you further down in the post.

Next step was to grab some stamps & make some ephemera. I put on a movie & just had fun making bits'n pieces for my junk journal. Using more die cuts or pieces of pattern paper & stamping randomly.

Here is one of the tags I made. The background was one of my Infusion samples. Some random stamping on the background. Colored in the stamped images with watercolor paint & added some ephemera.

If you want an idea of how to organize your ephemera I made another book to house my die cuts in an easy way. You can find that post here. There is also a link to a video that shows how to thread these books once we are done.

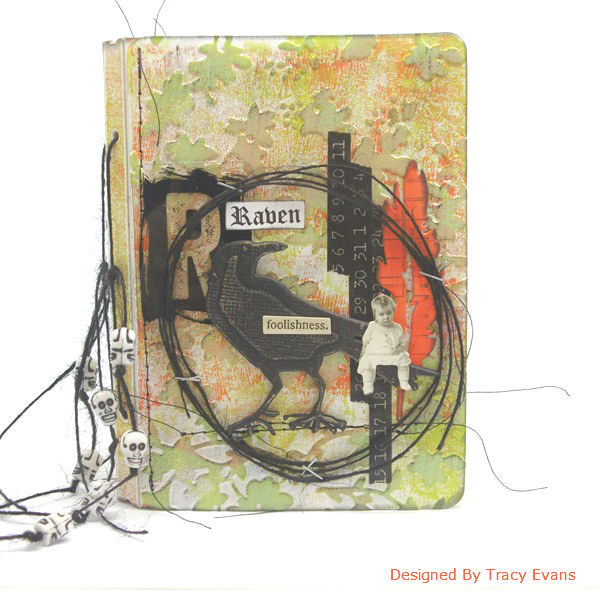
Here is the cover of the book that is Part 1 which will house the fun ephemera that was show today. It was made using Eileen Hull's Pocket Notebook die, & there is a full tutorial which you can find here.
I hope you join me next month for part 3 where the insides of the book will be worked on. Stay tuned!
Supplies:
PaperArtsy Infusions- Emerald Isle, Sunset Beach, Royal Blood, Black Knight, Black Current, & A Bit Jaded.
Paper Artsy Stamps- ZA18, ESN40,ETS27,
Eileen Hull die cuts by Sizzix
Tim Holtz Tags & Ephemera & diecuts by Sizzix
Cardstock

These pieces are so rich in color & I just love the look of the these. I also am finding it makes more sense to die cut a bunch of things when you are crafting than to just do 1 at a time. The key to this is to have you die pieces organized so they are easy to find & pull out when you don't have time to cut. I have that solution for you further down in the post.

Next step was to grab some stamps & make some ephemera. I put on a movie & just had fun making bits'n pieces for my junk journal. Using more die cuts or pieces of pattern paper & stamping randomly.

Here is one of the tags I made. The background was one of my Infusion samples. Some random stamping on the background. Colored in the stamped images with watercolor paint & added some ephemera.

If you want an idea of how to organize your ephemera I made another book to house my die cuts in an easy way. You can find that post here. There is also a link to a video that shows how to thread these books once we are done.

Here is the cover of the book that is Part 1 which will house the fun ephemera that was show today. It was made using Eileen Hull's Pocket Notebook die, & there is a full tutorial which you can find here.
I hope you join me next month for part 3 where the insides of the book will be worked on. Stay tuned!
Supplies:
PaperArtsy Infusions- Emerald Isle, Sunset Beach, Royal Blood, Black Knight, Black Current, & A Bit Jaded.
Paper Artsy Stamps- ZA18, ESN40,ETS27,
Eileen Hull die cuts by Sizzix
Tim Holtz Tags & Ephemera & diecuts by Sizzix
Cardstock