Showing posts with label art journal. Show all posts

Tuesday, October 4, 2022

Eileen Hull Chapter 4 Release Time!!

 Hello Eileen Hull Fans! Can you believe it is October already??? What is going on with time? The good news it means it is release time as Chapter 4 is just raring to go. There are a number of awesome dies & a 3D Folder for you to fall in love with. 

Here is my contribution of just a few of my projects. I am visiting my Mom and staying longer then planned so a few projects are back home. I have made a super mini art journal from the lid of the Geometric Box. It measures 3x3 just the perfect small size. You could use one of the spines cut down from the other book dies as well. If you know me you know I had to make a book! 


 I had to show a close up of the 3D Folder Silverware. Can you believe these are made from paper? Amazing. 

As usual the Inspiration & Education teams have sneak peaks for you ready to go. Some may even have tutorials so make sure you hop on the blog hop! Keep checking back to Eileen's Blog for links to all the tutorials over the next few months. There are also prizes to win. I hope you join us on Eileen Hull's Facebook page for the release party. All the details are below. 
 

In Eileen's words...

The Geometric Box is a different kind of design for me. I love the ease of assembly, the unique shape and and the possibility of expanding the box into larger containers! This is a ScoreBoards die so it may be cut from sturdy materials like mat board, chipboard, metal, leather and fabric. The finished box measures 4” h x 3” w x 4” d… or so… a fun feature of this die is that it adapts to how you shape it. You’ll see 🙂 Watch my live stream videos to show how to expand the possibilities of this die.
Use the Geometric Box for storage- for pencils, silverware, flowers, or tools. The box may also be used as a gift container- imagine adding teabags, a pretty silver spoon and a bow as a get well gift!
The Sunflower is a Bigz L steel rule die- designed to cut and score a myriad of materials. The Sunflower is BIG- it measures about 4" across and comes with a leaf, three sizes of petals and a flower center! Stack layers of petals to make a traditional sunflower, or change colors and create a pink coneflower. The basic shape is there for you to create your own flowers! Make a stem for the flower using wire and your Twist and Style Tool. The coordinating Geometric Box die works perfectly as a vase.
I love the whimsical patterns of vintage cutlery and that's why I created this Silverware 3D embossing folder! The design is so detailed you can actually see a tiny bride and groom on the handle of a cake server.
This folder is perfect for creating seating charts, menus, invitations, cards and recipe books. You would be surprised at the many materials you can emboss- metal, paper, cardboard, Sizzix texture roll and more. Once you have embossed the image, rub a light coat of a metallic Luster Wax over the top of the design and you have an amazing result!
I hope you will give these dies a try. Please remember to share them in the Eileen Hull Fan Club Facebook group so we can all be inspired!
"Enter the giveaway! Comment during the Release Party video and answer this question, "What would you create with these dies?" We loved hearing all your amazing ideas last time and want to hear more! Extra points for creativity 🙂 There will be two winners- one on Facebook and one on YouTube. Entries closed at 5:00 pm on Oct. 10. Winners will be announced on my Tuesday 10/11 livestream."

Tuesday, February 1, 2022

And So It Begins... Eileen Hull's Chapter 1 Release!!!!

Hello Eileen Hull Fans! Very excited to be here with a few sneak peaks of projects that will be blogged over the next few months. It is time for Eileen's Chapter 1, 2022 release with Sizzix! Drum roll please! The teams have been working super hard to bring you these awesome projects & as usual we have a blog hop for you to see all the goodies in one go. I also hope you will turn in live to Eileen's Facebook page to see some of the samples that the team have made. Maybe a special guest will appear, hee hee. Video brings these projects to life so much better! *links below include a small affiliate at no cost to you, thanks in advance for helping me bring content!


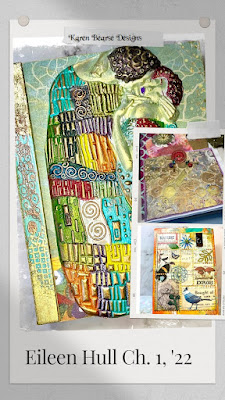
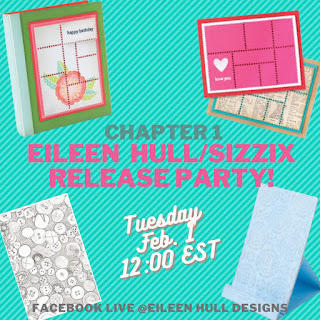
Here is my latest collection of fun. This Gustav Klimt line by Stamperia was perfect for my Treasure Box, made with the new "Book Box" die. This die is so versatile & can be used as a box, or an album & I am sure we can come up with some organizer items to boot! We also have the wonderful Phone Stand which makes for great gifts. Easy to personalize for your favorite people. Both of these dies are Scoreboards die, meaning they can cut the heavier materials like mat, corrugated or card boards with ease. See if you can spot the other 2 releases from the description below. 


In Eileen's words...
I am so excited to share my Chapter 1 release with you! The dies in this collection are versatile, practical and fun to embellish.
The Phone Stand, an XL ScoreBoards die, is a MUST- you need one for every room! Make for yourself, family, friends, for gifts or to sell- the die cuts the stand in one pass and is very easy to assemble.
The Book Box can be used to make a book or a box that holds A-2 greeting cards. What a great way to package handmade cards ... or a quick and easy book!
Add the Vintage Buttons folder to create vintage backgrounds for cards, journals, pages and tags. The 3D effect is stunning when you add a little Luster Wax to bring out the highlights...
The Snail Mail Thinlits die cuts a postal pane that coordinates with two of Eileen's Snail Mail Maker Forte stamps. This die was designed to use on the front of an A-2 card!
 
  
The detail on the Vintage Button Texture Emboss folder is insane! I didn't have long to play with this one so stay tuned for additions to this pocket as well as other fabulous things! In the meantime, can you guess what die cut of Eileen's the craft card stock tag was made from? Tune into the Facebook Live on Eileen Hull Designs to find out! 


Supplies: 

  • Eileen's Book Box Scoreboard die by Sizzix
  • "           Phone Stand   "           "
  • "           Snail Mail Thinlets  "       "
  • "           Vintage Buttons 3D Textured Embossing Folder.

Monday, November 8, 2021

North Pole Mini Art Journal Page

Hello Blogland, this week I am working in my Gel Print Notepad. The Topflight Stamps theme for the week is Winter/Christmas so a mini art journal page came to mind. *Affiliate- some of these companies have given me product to use, play & experiment with. The ideas are my own but I tend to work with companies whose products I like so enjoy the inspiration.  **some of these links are affiliate, I receive a small percentage from the company at no cost to you. This helps me deliver free content!


The star of this page is Darkroom Door stamps from the Merry Mail set. It is one of my personal favorites. Prism Ink was used to stamp with. The colors are perfectly holiday like. 


Here is the Notepad Art Journal this page was designed in. This book was so much fun to make & you can find it here. It is ready to be filled with inky goodness!


This page starts as a Gel Print using Fresco Finish Paint. It was a wipe up print so yet another good reason not to clean your gel plate!


I had a bit of an ephemera making session, just stamping the different images while trying to capture that junk journal vibe. The images were stamped on card stock, book paper, Paper Favorites paper pad & deli paper. Santa was colored in with Copic markers. The pieces were assembled & voila. A happy mail art page! Hop on over to the Topflight Stamps blog if you want to see photos of the products used. Have a wonderful week!!

Supplies:

Monday, September 27, 2021

Falling Into Autumn Art Journal Mini

Hello My Inky Friends, today I have a mini art journal page for you. I also have a video!! It is the start of a new week over on Topflight Stamps & we are moving into the Fall/Halloween realm. I have been working in a Dina Wakley 6x6 kraft journal & decided to just keep on going. 

Here is my Fall page, again played with quite a few different products. The funny thing about this page was being sure it represented Fall. For some reason bats immediately came to mind, yet bats fly around all the time! Anyway the spark for my page was the beautiful owl stamp by Visible Image. I suppose you could do any project and just add candy corn to the photo, LOL. 

Video Link

Check out my You Tube video & play along. Just grab supplies from the list below or whatever you have that you feel like playing with & create along!


These were the products I started with. As you can see they were added to while working. You don't have to know everything you are going to be doing when you start. Once creating the ideas spark from there.


Let's Get Inky! 

Started with some white gesso to help the background colors pop. I have been playing with Dina Wakley supplies just for fun lately so carried on experimenting with those. Stenciled through multiple images using her acrylic paint in Sedona, Tangerine, Fuchsia & Lemon.
 
 
Ahhh love these layers of stenciled images. In the end that 9 was a bit strong so it was knocked back with some gesso. 


Next up!

Let's make that cool leaf. The Lavinia stencil is so detailed & spritzing with multiple colors of Glossy Spray made for a nice shiny leaf. The back of the stencil was spritzed 1st with Pixie Spray. This creates a tacky surface that keeps the stencil in place. Wait a minute for the spray to dry & the stencil will stick down. This helps prevent the paint from seeping under the stencil. Spritz on the Gloss, letting the color dry in between if you don't want them to mix. Hot tip: Wipe the nozzle down & re-cap immediately to help prevent clogging. More tips on my video.
 

Glossy spray is a unique acrylic paint spray that dries permanent. Once the leaf was well dry, some doodles were added. *Hot Tip: Unless you are using a Posca Pen wait 4-5 hours for the spray to fully cure or you risk ruining your pen. The next time you go to use it, it won't work.
 
 
While the pen marks were drying it was time to add some stamping to the background. Using the Foliage Set & some Archival Ink in Cobalt Blue & Seafarer, random images were added. 


My focal image, the owl was stamped on white card stock in Black Soot Archival. The quotes were also stamped on parchment paper in a few colors. Which one should I choose? In my video, you can see more option choices as well as tips on getting photo polymer stamps to ink up & play nice.


Next up, time to glue. Once my decisions on placement were made, the images were glued down using Ultra Bond. I like to take the lid of & use an old credit card to spread the glue on the back of my cut out, then simply adhere it down. This glue is great for getting heavier papers to stay put, like card stock or watercolor paper. 


Here come the bats!! Using black card stock my bats were die cut. Not sure if this die is still available. It was from last year or a few years ago & as it is seasonal once it is gone they don't always bring it back. I may have glued one of the bats upside down, ssh don't tell anyone. 


A moon was cut out of white card stock & partially embossed with Seth's Blue Moon embossing powder. It helps give it that extra wow factor.


Time for more assembly!! The moon was highlighted & the bats doodled on using Posca pens. Way more steps were added then initially planned but that is the fun of art journal pages. Hop over to Topflight Stamps to see photos of the products.  Links are below & I hope you subscribe to my You Tube channel. More technique videos are coming!!! Have a great week!
 
Supplies:
  • Night Owl Stamp Set by Visible Image
  • Tracy Evans Foliage set by AALL & Create #496
  • Autour de MWA Stencil  "                  " #131
  • Sara Naumann Circle Stencil by PaperArtsy PS203
  •  "              "     Textures Stencil "        "    Ps090
  • Leaf Mask Stencil by Lavenia 
  • Seth Apter Blue Moon embossing powder by WOW
  • Dina Wakley kraft album 6x6 by Ranger Ink
  • "             "  Acrylic Paint          "            "
  • "          "      Gloss Sprays       "            "
  • Archival Ink  by Ranger Ink
  • Tim Holtz Bat Crazy die cuts by Sizzix
  • "          "   Frightful Things "        "
  • Ultra Bond by Therm*O*Web 
  • Pixie Spray "              "
  • Posca Pens

Monday, June 7, 2021

That Time I wanted to Play with Crackle Paste

 Hi Arty Friends, 

I was starring at a blank piece of paper wondering what to do for my Topflight Stamps blog post when it came to me. Crackle Paste. Yup that one thought, as I had nothing else to go on I went with it. Let's see where it led me. *Affiliate- some of these companies have given me product to use, play & experiment with. The ideas are my own but I tend to work with companies whose products I like so enjoy the inspiration.  **some of these links are affiliate, I receive a small percentage from the company at no cost to you. This helps me deliver free content!


This is my finished art journal page. I so miss the ocean & going to the beach. We try to go every summer but the summer of 2019 we only got 1 1/2 days in. Little did we know that covid was going to come hammering down. Creating a beach drought so to speak. 

I started with a stencil & the crackle paste, simply scrape some on with a palette knife. My paste is kinda old & didn't go on well. I added some water to see if that would help. While that was drying I pulled out some Fresco Finish paint.

Added some paint to get some color down, just with a dry brush. Some of the paste peeled off as I was laying down the color. 

Hum let's see if we can try a solution to the peeling crackle paste. I did a second round of the paste but 1st added a layer of decoupage glue, while it was still wet did another round of the crackle paste through a stencil. My thought was when the glue dried it would stick the paste to the paper. I also added more water & stirred the paste up, it also was a closer consistency to fresh paste but I thought the crackles might be lost in the process. 

While that was drying the focal image was stamped on card stock, & cut out. It is a Stamperia set called Octopus. The backing of these stamps is very different so they are flexible and do not adhere to an acrylic block.  Simply run a bit of adhesive on a block if you want to use it that way. I also stamped the quote in French Navy ink. Some random stamping in Thundercloud with the background image from the same set was next. It just adds a bit of interest. 

Next up was some seaweed courtesy of the Lavinia, Sea Flower. It was stamped in Rainforest Green, Ocean Spray & Cinnamon Swirl. It didn't show up as well as I liked. So the image was re-stamped in French Navy. That worked well & made it look like a field of seaweed with the lighter images creating depth. 

The glue under the paste tricked worked with the newer image staying put nicely. Even with the water added there was still a lot of crackle effect so that was a nice surprise.

Added a bit of washi tape, always good to add a pattern. 

Next up was some stencil work with some acrylic paint. Used Pixie Spray to help the stencil stick to the card stock while I worked. 

With a paint brush & some warm colors I painted inside the stencil.


Before the shapes were cut up some random stamping was added. Once dry the shapes were cut out & doodled around. The nice thing about this technique is you don't have to be good at drawing to make something cool! In hind sight the doodling should have been done after the circles had been adhered. 

All that was left was assembly. I put the pieces together and this is what I came up with. The following night I woke up in the early morning with the idea that the bubbles were not great & what I needed were fish! 

Back to the drawing board! Painted on a piece of deli paper with random blue Fresco Finish. A color similar to China, Blueberry & South Pacific I did 3 spots of plain color & then one big swatch mixing the colors using a dry brush.


Then I added some fish from the PaperArtsy set ESC10. It may be out of stock but there are plenty of fish stamps if you go here. The deli paper fish gave the journal page a bit of something extra. Well that is it for this week. I hope you give this tutorial a try & play along.

Supplies:

Monday, April 12, 2021

Topflight Stamps Mixed Media Art Journal Page

Hello Mixed Media Fans, this week we are making an art journal page for Topflight Stamps. I hope you join me & create your own sunny page! 

I am doing another page in my Art By Marlene Journal and it is kind of happy & sunny. Spring is starting to actually show its warm face in our area. I added a photo after the piece was finished. I love adding photos to my art journal page it adds to the story & helps document what is going on.


Start with some paint & a stencil. Using Fresco Finish paint and a dabber to create a fun image. I chose colors that daisies come in but remember this is art so the sky's the limit. The big flower was made using the Daisy Daisy stencil. As is usual there is a supply list below. 

Next, stamped the cute gnome directly on the mixed media paper. "Ernest" was painted with Prism ink & water. The shroom was stamped on card stock & painted with wet Fresco Finish paint.


I love using ink as paint. Really adds potential to your paint supply! Simply stamp a bit on your craft mat, add a spritz of water & you are good to go.
 

 Finally some random stamping around the edges, love using these multi image stamps! This is a really large stamp with lots of images on it! Got to love that French Navy ink. Really pops off the page.

 Very interesting how the image is sort of buried into the flower and creates dimension. Thanks so much for joining me today I hope you have a chance to create an art journal page! Hop over to Topflight Stamps to see pics of the stamp sets...

Supply List:

Monday, February 1, 2021

Art Journal Page to Chase the Blues Away

Hello Inky Painty Fans! For this Mixed Media Monday I have an art journal page for you. It has been a long time since I finished a larger page & it felt good to get back to it! This week is anything goes at Topflight Stamps so let's play with a few fun products. *Affiliate- some of these companies have given me product to use, play & experiment with. The ideas are my own but I tend to work with companies whose products I like so enjoy the inspiration.  **some of these links are affiliate, I receive a small percentage from the company at no cost to you. This helps me deliver free content!


I got a new art journal from Art By Marlene & one of the cool things is it is a 3 ring binder. The paper is a nice 300 gsm multi purpose paper which measures 6 3/4" x almost 9".  


The outside is vinyl & there is also a zip pocket on the inside to hold your ephemera, cut out stamp images or paper elements pad. I love the vibrant colors of these paper element pieces.

Design Time.  

I started by choosing which paper element pieces I wanted and placing them on my page. Taking a photo at this stage is always a good idea to remind you of placement.


Let's Paint!

Next up was dry brushing Fresco Finish paint directly on the paper. I used a palette of blues, yellow & green. This will help the hot colors of the diecut pieces to pop. 
 

Using up the excess paint on a 2nd art journal page means that I have a background already started for next time. 


Adding Some Stencil Work

Using some fun Darkroom Door Stencils and a dabber to add some background interest, was up next.  I kept the color's similar to the background but I did want the stencil work to show a bit. Again used up the extra paint by adding some stencil work, this time in my daily journal.


Doodle Time! 

I really love the circles from the Polka Dot stencil so doodling helped bring out the design a bit more. One of the bonuses of Fresco Finish paint is you can use a pen right way without damaging the pen. Most acrylic paint would need 4-6 hours to dry before you could draw on it.


Rebuild the Elements

Now it was time to add my elements back in & adhere them to the page. Love where this is going so far! The great thing is, these elements are already cut you just have to pop them out of the paper pad. The tea package was made into a pocket by taping the bottom & sides only. I love using everyday ephemera in my work to remind me of things like the tea I was drinking at the time. 


Add a Title

Now it was time to add a title using my favorite new alphabet stamp set. The words were stamped on white card stock & cut out. The letters have lots of little details that would get lost by fussy cutting. There is a trick so you won't lose these. This is a great technique to use for example when you don't want to cut out bee antenna, or a birds legs. 


Simply stamp the images directly on the background of your art journal page. Now the little details are there. Just adhere the cut out pieces on top. For the letters hot tip the top of the letters have depth & the bottom are just a line. This helps for letters like i or o so you don't stamp them upside down. 
 

The result is very subtle in this case but adds depth & the little details without a white edge showing.
 

Lastly I used the same color palette to make up my tag. More of the paper elements were used as well as a few quotes from Marlene's Sticky Quote pad. 
 
  
The tag was coated in decoupage glue so the elements will not pull off when it is removed from the pocket. Don't you love that cute little fish?
 

 The bonus is every Yogi Tea tag has a quote on it. I choose "happiness is an accomplishment" which is a very perfect quote for times like these. That little tag peaking out of the tea pocket makes me so stinkin happy!! Thanks for joining me today, I hope I inspired you to get some paint on! You can see pictures of the products in my Topflight Stamps blogpost.

Supplies:

LinkWithin

Related Posts Plugin for WordPress, Blogger...