Wednesday, March 31, 2021

Topflight Stamps Birthday Blog Hop Winner!

 Hi there thanks to everyone who joined in out Birthday Blog Hop!! 

Drumrollllllllllllll and the winner of my $25 gift certificate to the Topflight Stamps store is......

Deb Bacon!!!! congrats, you can email me at scrapowl@gmail.com to claim your code! 

Thanks to everyone who hopped along!


Monday, March 29, 2021

Travel Journal with Darkroom Door

 Hello Blog Land, remember today is the last day to join in & comment on our 4th Birthday Blog Hop, there are prizes to be won!! 

I am working on a new travel journal using a lot of Darkroom Door Stamps & stencils. This week the Topflight Stamps Design Team is all about this awesome stamp company. Darkroom Door is an Australian company & I am very blessed to call the owner/designer Rachel Greig, friend. I hope you check the TF blog this week to see what the rest of the team is up to.*Affiliate- some of these companies have given me product to use, play & experiment with. The ideas are my own but I tend to work with companies whose products I like so enjoy the inspiration.  **some of these links are affiliate, I receive a small percentage from the company at no cost to you. This helps me deliver free content!

 I am hoping that sometime in the near future we will be able to travel again. I thought prepping a travel book & making some ephemera, would be a way to pretend. Yet another week where I just got lost in playing with the products & adding to the pages in my book. 

Rachel does a lot of travel journal work also & has a number of travel journal videos on her YouTube channel. This one is a flip through of some of her books. It is a great way to get inspired.

 I started with a traveler's notebook, some different types of paper & a gaggle of stamps. 


We had the 1st warm day of spring so it was time for a little wine on the deck with some stamping. One of my new favorite things to do is to stamp with multiple colors. Using Prism Inks to ink individual stamps with 2 or 3 colors is just plain fun & creates a colorful palette of colors. 

Simply chose colors that play nicely together. For some only 2 colors were used but overlapped to create a 3rd. For example French Navy & Peacock Green make a very pretty purple. 

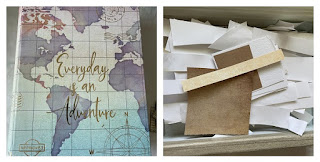
Do you keep all your scrappy bits? Here is one of my organizing solutions for them. I have a decorative box that I got at Michael's to put light colored pieces in. 


They are easily at the ready when I need a scrap to stamp a quote on. When the box gets too full, just have a stamping session for ready to grab words.


Here is the inside cover of my book. The left side has stencil work with some washi tape & a spot to put a map of the route my future journey will take. The right some washi tape, a quote & stamping. I like stamping in my books leaving them open to color while I am on my trips.


Page 2 & 3, a combination of stickers, washi & stamping. Every trip starts out with coffee! My current favorite is Cafe Verona so adding the label seems like a good idea. Do you add ephemera to your pages? I find it adds interesting images plus reminders of my travels.


Pages 4 & 5 is about the bees. I love the Buzzing Bees set & find ways to use it when I can! The die cut colored images are Art By Marlene. She has wonderful images in her Paper Elements packs. When prepping pages I don't worry about the theme, it is mainly a place to write & add a few photos and ephemera. The more prepped the pages are the more I tend to work on them. Journal time is a bit limited when traveling, as participating in the vacation is the most important thing.


Pages 6 & 7- Love these filmstrip stamps. This page is more vacation like, the images were stamped on scrapbook paper to give interest behind the stamp. The circles are a DRD stencil. Of course more washi was needed. I do have quite a collection. The hand is from the Lots of Labels set. Thanks so much for joining me & I hope this inspires you to work in a journal.

 Supplies: 

Thursday, March 25, 2021

Topflight Stamps 4th Birthday Blog Hop!

It's Topflight Stamps 4th birthday and to celebrate, I’ve teamed up with some great designers to showcase birthday cards using the unique products available at Topflight Stamps. Please hop along with us and see all the beautiful talent from this group of amazing designers! You should have arrived here from Cornelia Wenokor's blog. If not, no worries, catch the details below. I also have a video so you can follow along with me. You can see it below or link to it here. 
 
 
I am not a card maker but I managed this mixed media explosion of color & I kinda love it! Yes basically an art journal page for a card but it counts! I also had so much fun making this & may have gotten carried away. I kinda like when that happens. 
 

Here is the logo for our birthday hop. I hope you play along cause you can win prizes! Don't forget the awesome sale too! 
 
I did make a wee video for you to play along with me. I hope you pull out some of your supplies too. This card can easily be changed up to be a tag, an art journal page or a piece to put in your junk journal. 
 

So fun to use multiple products on this card. Don't you love playing with all the things? 
 
 
I do go over all the techniques in my video but here is a quick rundown for you. The magic of Art By Marlene's collage paper is the base to this kraft card stock card. I used a large craft scraper called stencil pal to apply the glue. It's a new way for me but I kinda like it. All the supplies & links to product are below. 
 

Stamp your focal image in archival ink. This cute cupcake stamp is PaperArtsy by Jofy. Perfect for any celebration. Using the new Lavinia Ink pads or a die based ink put some on your palette with a small spritz of water. Take a water brush & simply water color the image. Mixing these ink colors also gives you a larger palette as you can see in my video. For the frosting only the lines were colored.
 

Once the image was completely dry adding some chunky emboss for the frosting seemed logical. Crystal Glaze emboss by Andy Skinner has all sorts of mixed chunky goodness. Different blues, greens & copper it is very dynamic. Use a paint brush & embossing ink put on your palette. Try & avoid the lines of the frosting image but you can always use a paint marker to add them back in as I did. 
 

Both my focal image & the card Using washi tape is always the right answer. When adhering my paper crooked the bottom of the paper was torn so adding a strip of washi was a quick fix! 
 
 
Next up let's add some stamping. After the image was adhered down with double sided tape, multiple stamp "celebrate" quotes were made to give me some options. Darkroom Door Labels & Christmas sentiment stamp were perfect. My quote was easy to find using Art By Marlene's sticky quotes. Now we are getting somewhere.
 

Time to add some background stamping! Sometimes I do this at the beginning of making my background but today it was done after the card was almost complete. To keep the images from being to dark they were stamped once on card stock & then stamped on my background using lighter pressure. Bonus is left over collage fodder. A few different stamps by Seth Apter worked well. 


That is it! My card is complete & ready to be sent. I actually think I will put it in my Photo Journal with pictures on the inside of the card, from this years family birthdays. Thanks so much for joining me today. Read below for the prize info, the supply list & the link list. I hope you get a chance to get inky! 

Supply List
Of course, it wouldn’t be a birthday celebration without prizes! Topflight Stamps is giving one lucky winner a $100 Gift Certificate to the store. But wait, there is more, each stop on the hop has an additional $25 Gift Certificate up for grabs for some lucky commenter. For a chance to win, make sure to visit every stop on the hop and leave a comment by March 29th. Winners will be announced on the Topflight Stamps blog on March 31st. Good Luck!
 
***this contest is closed my winner of $25 is #15- Deb Bacon
 
Follow along here and if you get lost you can always go to the Topflight Stamp Blog. 

Monday, March 15, 2021

Tags with PaperArtsy!!

Hello Blogland today it is tag play with PaperArtsy products. The Topflight Stamps theme for the week is Fresco Finish acrylic paint. I love playing with these paints. They are fairly quick drying, matte finish paint. The beauty is when art journaling the paint, once dry can be written on with almost any type of pen without ruining the pen. Most paints need 4-5 hours dry time before you can do that. *Affiliate- some of these companies have given me product to use, play & experiment with. The ideas are my own but I tend to work with companies whose products I like so enjoy the inspiration.  **some of these links are affiliate, I receive a small percentage from the company at no cost to you. This helps me deliver free content!


I made 2 tags for you this week. Same techniques just different colors & stamps. This weeks blog post is different as I have video!!! 


Link To Video

I did not do step out photos as a result, you can just watch the video & play along with me. The supply list is below so you can pull the products you need to play along. If you pop over to the Topflight Stamps Blog there are photos & links of all the products from the shop. Remember code karenbearse saves you 12%!


Supply List:

Saturday, March 6, 2021

Junk Journal Memory Book using The Folio Journal for Eileen Hull- Part 2!

Hello Fans of Eileen Hull, here today with Part 2 of the Junk Journal Folio. I even have a flip through video!!! The links to the other posts & main supply list are at the bottom of this post.  *Affiliate- some of these companies have given me product to use, play & experiment with. The ideas are my own but I tend to work with companies whose products I like so enjoy the inspiration.  **some of these links are affiliate, I receive a small percentage from the company at no cost to you. This helps me deliver free content!

As the cover & most of how that was made in Part 1, today we go into a bit of detail on adding the elastic & the inside of the books. There were a lot of products used so they will be linked individually, underneath the pages talked about to help you find what you are looking for. 


Video Flip Through! 

One of my big goals this year is more video. I said that last year but the family challenges brought on in 2020 made dried that goal into dust. The best part of life is that goals can always be reset so here we are! The flip through is thorough & I do talk you through the new dies & how my cover was made. Feel free to fast forward to the spots that interest you if you don't want all that info.

 Making The Signatures 

Next step was to prepare my signatures. Paper was cut 8.5 wide by just a line under 5 tall in kraft paper & folded in half. The clock catalog paper & German book paper was cut just under 4.75 wide as it was not wide enough to cut & fold. This is a great way to add cool paper that might not be big enough. The 2 peices were taped together using washi to create the fold. I either use a stronger washi or add a permanent tape runner adhesive to help it stay stuck. 4 signatures were made, then tags & gel prints were added from my stash.


Inside Cover & 1st Signature

Here is the inside cover. On the left side paper was glued down & the same paper was used to make the pocket & quote box. I often get questions on what glue to use... ideally the Easy Cut adhesive could be used for the background paper as it is nice & strong. Another option is ATG glue around the edges & through the middle & strong glue stick for the rest. The pocket was made using the new dies & a digital envelope popped in the pocket. 

 
The little quote box was a rectangle with a die cut used to create the decorative window. A Clipping sticker was put on the background paper & little dots were added to help the title pop. 


The cover of the 1st signature is a gel print from my stash. The stencil is Dyan Reaveley, I believe that one is discontinued but here is a similar one. The numbers are a new die from Tim Holtz by Sizzix. Other supplies:


A Few Inside Pages

This is the backside of that gel press with a strip of another gel press print added. The little pocket/tags is an Eileen Hull die Bookmark Tag & Pocket.  The other side is an inky tag with a flower made from various gel prints & the new Folio flower.
 
 
This page has a fun interactive element where the beehive cut piece flips up to allow extra writing, photo or mixed media fun. It was cut from the Abandoned paper using a Tim Holtz (TH) die to create the hive element. Another Clipping Sticker was used. The little tab is cut from Gift Tag TH set by Sizzix. The bee is from the Entomology Stamp set which is so useful & easy to cut using the matching die cut set.  


Under the flip, the stencil is TH Honeycomb with Rusty Hinge Distress Ink. The stamped script is from that Entomology set & is one of my go to stamps when I want a bit of text in the background. 
 

One More!

As you can see all these pages & more on the video flip through I will just do one more idea. This was missed in the video so it is added here. I love making elements that can then be added to these books. I taught an inky envelope class back in the day of live classes & then did a tutorial which you can find here. The idea in the true spirit of junk journal is to take mail and turn it into art. Then it is always easy to make a "tip in" by adding it into your book with washi or a folded piece of card stock & glued to create an extra page or element. All right that is a wrap on my Junk Journal Folio. Below are all the links to the Inspiration that this book has created. I hope you have a chance to get inky today!
  1. Tutorial Part 1
  2. You are here Part 2
  3. Blog Hop & Release with links to all the inspiration by the team. 
  4. You Tube Video Flip through. 
  5. Eileen Hull Release Party Live

Supply List

Wednesday, March 3, 2021

Junk Journal Memory Book using The Folio Journal for Eileen Hull

I am back with the junk journal memory book tutorial for Eileen Hull. This month the team is continuing to showcase Chapter 1 die cut release from Sizzix. I am happy to bring you my tutorial from the release hop. This is a 2 part post & there is a video flip through in part 2!!! Link to Part 2. 

 *Affiliate- some of these companies have given me product to use, play & experiment with. The ideas are my own but I tend to work with companies whose products I like so enjoy the inspiration.  **some of these links are affiliate, I receive a small percentage from the company at no cost to you. This helps me deliver free content!

 This is my mixed media junk journal. I will be using it to put my favorite photo each week so at the end of the year I will have a snapshot of what 2021 was all about. There were many steps in making this book & I used some of my favorite techniques & colors. I even made a flower! Not well known for my flower skills I think it turned out all right.  


Let's Get Started!

Eileen's new mandala is awesome, to be honest I am not a huge mandala fan but there is something about this one that is really different & intricate. I knew as soon as I saw it that is would make a great stencil. The challenge is it is very intricate & easily damaged so I cut it out of paper then covered it with a few coats of collage medium. Set that aside to dry & continue on by prepping the cover. Make sure you do this on plastic or a glass mat so it can be picked up & set aside to dry.


*Hot Tip: If there are bits that do not pop out immediately after die cutting simply take a piece of purple tape or low tack tape & press into the areas that did not release. The tape picks up the bits but does not damage the image. Much faster then using a pokey hole tool!


It really is amazing that this project started with white board & white card stock! That is the great thing about Eileen's dies, start with the base & the sky is the limit. While this die cut makes a folio that has a fold to create a box on the front & back of the project I cut the edges off to create a book. Please check out all that samples that were made during the blog hop if you missed it, so much inspiration you can find it here. Acrylic paint was used on the edges & spine. Once dry that was covered in multiple stamped images. Then the cover was set aside to work on the main image.


Time To Add Some Paste!

Once the mandala was dry it was time to use it as a stencil! Heavy Card stock was cut using the Deckle Trimmer, 1/4" smaller than the cover. I made one for the front & the back. Texture paste was carefully scraped on using a spatula. Crackle paste was scraped on around the edges of the image covering the rest of the card stock pieces & set aside to dry. The beauty of the Ranger products is they dry very quickly in about 15-20 minutes. 
 
 
The image was covered in a few layers of spray inks. I kept the colors in the same areas overlapping a bit. If you use colors that work well together like blues, yellows & browns your cover will not look muddy. 


Once the paper was dry it was adhered to the cover using double sided adhesive. 


Making The Flower

A piece of card stock that was leftover from an inky project was used to make the flower. It just had layers of various Distress Sprays on it. The Folio Page Pocket comes with these flower pieces. 


The pieces were run through an embossing folder. Then wax was applied on a hard piece of foam & run flat across the high points to create the metallic copper look I love. 


I used different embossing folders for each layer & also switched to a gold wax color for the top petal. The group was held together with a brad. 

 
I used the same wax & technique to hit the high points on the Mandela being careful on the crackle paste parts so they would not chip off. *before anything was attached, the cover was treated to protect the paste from not peeling off when handled, as described in the next step.


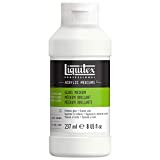
I am missing some step outs but they are easy to describe. Gloss Medium was poured over the card board mandala image. This product is self doming so it will stay on the area you are pouring it on. I coated the cover well, carefully using a spatula to spread it evenly. The cover will look milky but dries to a clear glossy finish, protecting the paste underneath. The project must lay perfectly flat & takes hours to dry. I let it dry over night.
  

While the cover was curing, a cool charm was made. Cardboard was covered in metallic tape then run through an embossing folder. Next the House Ornament die was used to cut out the small house. Alcohol ink was dabbed on. The image was covered in the Gloss Medium. You can see how it sits on top of the piece & doesn't run over the edges. You can see it looks milky. Let dry overnight.


Here is the finished house. It looks so dynamic! A gear charm was attached with a brad & that was attached to a cool rusty binder clip with a tiny paperclip. Love adding these details! 


This project has a few more steps but as this post has gotten very long. I will finish it off in another post Friday, along with a video flip through. I hope to see you back!! Don't forget to check out my teammates posts & remember to join Eileen on her Facebook Lives Tuesday & Thursdays!

Supplies: 

LinkWithin

Related Posts Plugin for WordPress, Blogger...