Showing posts with label art tag. Show all posts

Monday, November 22, 2021

Let's Make Gift Tags!

Happy Mixed Media Monday, this week the Topflight Stamps Team is all about gifts! Gift tags, card holders, packaging, decor. So many choices! Still working in my December Daily, so I want to make something that will double up. I am also going to share a decor item made for Eileen Hull using her truck die. The items can be bought at Topflight Stamps. Check below to see an easy way to create gift tags as well.*Affiliate- some of these companies have given me product to use, play & experiment with. The ideas are my own but I tend to work with companies whose products I like so enjoy the inspiration.  **some of these links are affiliate, I receive a small percentage from the company at no cost to you. This helps me deliver free content!


Here is the gift tag I made. I had lots of ideas & did a lot of playing around, so making some more will be easy. 


!Also Topflight Stamps is having a sale!! This is the perfect time to pick up your wish list! Back to the technique... Do you ever have an idea & then just have to admit it is a craft fail? It is harder embossing in the winter when the air is dry. the products used to adhere the powder tend to dry very quickly which adds some challenges. Especially when it comes to a chunky emboss which I love to use.

This play started out with trying different ways to emboss using chunky embossing powder (White Wonder), then spray Glimmer Mist on top. Chunky emboss & a detailed stamp, doesn't work very well was the result. The emboss creates this great snow like finish however as it is chunky, there wasn't a great way to have the emboss adhere to the image. I tried an embossing pad, embossing ink, gesso, even decoupage glue.


This was my idea. Cover the tag with White Wonder emboss then spritz with Glimmer Mist. I also added some Blue Moon embossing powder. This try was using gesso to adhere the embossing powder. It was spread in a nice layer so I was hoping the slower dry time would allow the emboss to stick. The cool thing is where there was no emboss I still got the snow flake image. You can see it in the lower left corner. See how detailed it is? The gesso acts as a resist however it still didn't create a crisp embossed image. I had to do the math. The chunky parts of the emboss are too thick for the skinny snowflake details. This would be better used as Santa's hat or on a snowman stamp. Good to know!


This tag was made using gesso & Blue Moon emboss. I love how it turned out. The embossing didn't stick everywhere but you still see the white of the snowflake. The embossed portions are sparkly & ice like. Kinda fun! The contrast with the black tag is awesome. 

I did still want to use the Glimmer Mist so Apple Green was spritzed on a piece of card stock & once dry my sentiment was stamped on. Cut it to make this cute banner & a sparkle gold star was added. 

Next a focal image was chosen. I just received this set House of Butterflies & love the house image. Simply stamp your image on card stock, fussy cut & add on. The beauty of this, the image can suit the receiver. Lastly add some ribbon & thread, you could also add a charm if you want. 

Here is the idea for a quick way to make gift tags. Simply cut out the cards from the Stamperia paper pad, Winter Tales. There is a great image on one side & a space to write on the other. Add a ribbon on top and bam, done.


While we are at it with the Stamperia Bundle here is a wonderful decor item made using items from Stamperia Winter Tales Bundle. To see how this was made you can go here. That is it for today. I hope you get the chance to create some gift tags of your own. Have a great week. You can check out my blog post over at Topflight Stamps that has photos & links of all their products used. One stop shopping yay!

Supplies:

Monday, August 30, 2021

Autumn Card For Topflight Stamps

Hello Stamping Fans, this is my bi-weekly post for Topflight Stamps. Mixed Media Monday I will start off the week with our new theme- Fall/Autumn. I have some recycled fun for you. How many packaging tags have you saved? I have a lot!

Here is my Autumn tag. It is shimmery from the mica spray (hard to see on camera) & has lots of nummy texture. 

With fall right around the corner I HAD to get the newest Mica Sprays from Tim Holtz. They are sold in sets of 3 & have great packaging so that is the base to my card. 

I also had to swatch these shimmery babies out. They look so good! Love that mica spray look. Hard to see from the photo but just nummy shimmery goodness.

Let's get inky. Using the packaging, cover the words using some gesso just in case I missed a spot. You could also use a tag or make a card. Next up was a layer of crackle paste through a stencil. So many choices but a spider web would be a good one. The stencil at Topflight Stamps is a bit different but would work great. As always the links for the products are below. 

Set that aside to dry & stamp the mushrooms from EKC36 with Archival ink & cut them out. Color them with your favorite inks or pencils. Same goes with the quote, which you can also stamp onto patterned paper for extra fun. 

Now for some color, use the sprays randomly, keeping the color in the same spots so you don't make the colors muddy. Although the Flickering Candle & the Crooked Broomstick make a lovely brown. Add some back ground stamping once the background is dry. The edges were also distressed in French Navy. I also stamped my journal while I was at it... 2 birds...

All that is left is to assemble. For added interest the quote was distressed in Roasted Coffee & the edges curled to make it look like a parchment sign. I also popped a butterfly on at the last minute! Thanks for joining me today! Remember to hop over to the Topflight Blog for photos of the products & links, the links are also below.

Supply List:

Monday, August 16, 2021

Mixed Media Art Tag with AALL & Create.

Hello Inky Adventurers! Today for Topflight Stamps I am making a mixed media tag. If you follow me on Instagram (link on the right hand side of  my blog), I recently posted a group of background tags. Thought this would be the perfect opportunity to pull them out & finish one. *Affiliate- some of these companies have given me product to use, play & experiment with. The ideas are my own but I tend to work with companies whose products I like so enjoy the inspiration.  **some of these links are affiliate, I receive a small percentage from the company at no cost to you. This helps me deliver free content!

There are a number of mixed media techniques going on here but it was fairly easy to put this together as the background was already finished! 


 The tag started with Distress Oxide sprays in Broken China & Fired Brick as well as some Fossilized Amber. The tag was spritzed with water 1st & then spray was added. 


 Love me some washi tape!! Such a simple way to add dynamic images. Just put a few strips down. These are all by AALL & Create and there are a bunch more in the store.


Next up was of course some embossing powder. The side piece was done with Crystal Glaze a fun mix of blue greens & some specks of black & gold, so pretty. 

On a piece of parchment some of the background images were stamped in French Navy & Thundercloud Prism Ink. The gal focal image was stamped, then re-drawn with a heavier pen to help the image pop.  

She kind of reminds me of the main character from the TV show Blindspot who was tattooed all over. 

Added some background stamping with Cinnamon Swirl with the circle techno kinda piece. More embossing- the  arrow type piece in Crusty Copper. Then a piece of a shower pouf was cut out. I liked the idea of her being in a net of some kind. No idea why, just where my brain went, LOL. 

I also liked the idea of her wings being made from vellum. Copied the same technique as a few weeks ago, which you can see here. They were embossed using Dragon's Egg powder which is a pretty iridescent purple. 

All that was left was assembly. The pieces were layered wings 1st, then netting, then her body. I used Cosmic Shimmer glue which did the trick nicely. A few tiny staples were added with the tiny attatcher & some sari ribbon to finish it off. Thanks so much for joining me today. To see photos of the product you can go to my blog post on Topflight Stamps. There are also links for all the products below. Have a great day!

Supplies: 

Monday, August 2, 2021

Art By Marlene Tag Fun

Hello Paper craft Fans, today we are going to make an Art By Marlene Tag for Topflight Stamps. Do you ever just want to play with some colorful paper & die cuts? Then this is the project for you. 

 Art By Marlene makes crafting super easy when you put her products together. Here is the cute, colorful tag I made using some of her newest So-Fish-Ticated line. 


Here is the handful of products used for this project. Did you know that Marlene has a cool Tab Tag book? That is what I used for the base of my project. 


Started with some of the fabulous collage paper & tore random pieces of paper, gluing it to the tag base. 

Next popped out some images from the Paper Elements pack. Over 250 eclectic colorful images to chose from! Played around with placement until I found an arrangement that I liked. Images were glued down easy peasy. 

Added a bit of stamping & distressed the edges of the tag, outlined the flowers too. A bit of ribbon & that was it! 
I do wish I had this set so I could have added the waves! Maybe next time.Thanks so much for joining me & I hope you have the time to take a crafty break.

Supplies:  

Monday, July 19, 2021

Art Tag with lots of Carabelle Studios

Hello My Inky Friends, let's play with some vellum today! I love vellum and have been using it for years & years, so thought it was high time to pull some out today. Let's see what happens!!  **In case you have not heard Topflight is no longer participating in the affiliate program & my coupon code no longer works. Sorry about that. Luckily they have lots of good sales!

*Affiliate- some of these companies have given me product to use, play & experiment with. The ideas are my own but I tend to work with companies whose products I like so enjoy the inspiration.  **some of these links are affiliate, I receive a small percentage from the company at no cost to you. This helps me deliver free content!

Absolutely love this piece, it just makes me happy!! All the layers, some die cuts, inky goodness. Oh what shall I do with it? To see photos of the Topflight Stamp products used go here. The full supply list with links is below. 

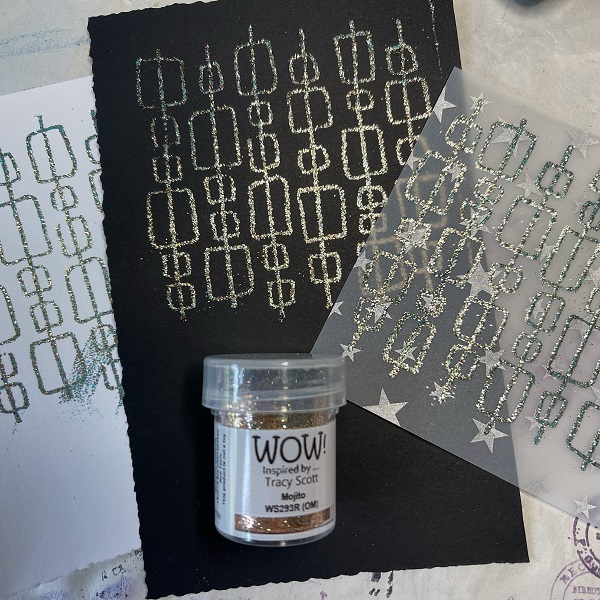
This is what started this project, some Eileen Hull embossing powder & some printed vellum sheets. I really had no idea where I was going at this point. Sometimes that is all you need to get the creative juices flowing.  

The fabulous new On The Line stamps by Carabelle Studio were stamped using an embossing pad & the powder in Aqua Splash & White Wonder. The results were so dynamic more play was definitely needed.  

Next up was Tracy Scott's powder in Mojito by WOW. This powder packs a punch of color & glitter, it has a very patina look to it. It is part of the Fiesta Trio.

Definitely needed a back ground for this to land on. Just for something different I pulled out some 49th & Market ephemera packs I got ages ago. This could be fun!

Pulled some pieces together for an audition. 

Using other stamps from the On The Line set did some random stamping using Prism ink. Love the coverage of this ink!

I chose a focal image, also by Carabelle Studios called Pretty One. Love this girlie with wings. I wasn't sure if I was going to add wet color or not so Archival Ink was the way to go. Did you know there are 4 new Distress colors. Some of my favorites too I tried Black Soot, Vintage Photo & Ground Espresso.


I decided to add a bee tab from a previous post. It is from the postage stamp collection The Great Outdoors. To see other ways to use this stamp you can check out my blog post here. I made a bunch of so cool paperclips.


Took some Infusions & sprinkled them on wet watercolor paper. To pull up the excess walnut crystals simply press a piece of card stock on top of the wet product. Left side the watercolor, right is the 2nd print.

Next step was some die cutting using Tim Holtz die cuts by Sizzix, Crochet & Wild Flowers 1. Just love how delicate these die cuts are. 

The last step was adding some interest to the paper slide. It was distressed using watered down Roasted Coffee & then stamped with Thundercloud. The small images from the postage stamps were used like the script & postage marks. I love using my stamps in different ways! Those little details take this embellishment & make it look so much more dynamic. 


All that was left was assembly & even that was fun! Don't you love that crochet colored with Lemoncello & Golden Sands? Again just nummy. 

Some metal touches were added as the layers just go & go. They are all Tim Holtz from his Ideology Line. The arrow has the added bonus of some wire & beads wrapped around it. Well that is it for today!! I hope you enjoyed the tour of my art tag & that you have the chance to follow along with your own supplies.

Supplies:

LinkWithin

Related Posts Plugin for WordPress, Blogger...