Monday, July 20, 2020

Let's Make Garden Rocks with Darkroom Door Stamps!!

Hello Topflight Stamps Fans!! This week the team are playing with darkroom door Background Stamps. If you saw all the awesome Christmas in July 2 weeks ago we all used the same Snow Flake stamp as our background- so funny we had no idea!!
*Affiliate- some of these companies have given me product to use, play & experiment with. The ideas are my own but I tend to work with companies whose products I like so enjoy the inspiration.
**some of these links are affiliate, I receive a small percentage from the company at no cost to you. This helps me deliver free content!


I have been working in my garden & have wanted to add some painted rocks for awhile & this seemed the perfect time to do it. I am so happy with how they turned out. One of the great things about this technique is you don't have to be able to draw to get a very cool painted rock.


Here is a sample of some Background Stamps that darkroom door has available. So much bang for your buck! You can use the whole stamp as I have done on my rocks, cut out individual images or use it as a background to create interest.


Let's Get Painting!  

First I picked out a rock & a brick that I was going to work on. I started by washing them & letting them dry. Next step was a layer of white gesso. While that was drying in the sun I prepped the background. Simply stamp on tissue paper with Archival ink. Using decoupage glue paint the rock and adhere the tissue, paint a layer of glue on top as well to seal it. 


Next up let's add some color! I used an alcohol ink based marker to color the flowers. Some of the flowers were simply one color, others had the darker color on the inside & the lighter color pulling to the outside. As my base is decoupage glue the marker has no problem grabbing on to the slick surface.


I also liked using the alcohol markers because I wanted something permanent. As these rocks will be outside in the elements another layer of decoupage will be necessary so I didn't want the colors to smudge. Yet another bonus of using alcohol markers, is the transparent color. The stamped image is still visible, letting the images sing. 


Add A Quote...

I love quotes and a rock is the perfect place for one. It may encourage the viewer to pause to read and really enjoy your creation. For my brick I decided to keep it simple with just the image & quote. The quotes were done on card stock the same way, in Archival, inked and glued.


I am moving my rock around my garden trying to decide where it should live. Kinda like it sitting with my hydrangeas!

 
Here is the last example of using the Snow Flake background stamp with embossing powder. You can see this post here or just keep scrolling it is the next post down. 
If you want more examples take a look and see all the different ways to play with these awesome stamps. Start here to take a look. Then go to older posts to see more! This is a great way to see how one stamp can look so different!  Remember to check back on the blog this week to see how my teammates play with these stamps!


If you want some snow flakes there is also a winter sale going on!! Time for some early Christmas shopping perhaps? That is it for today, I hope you get a chance to gather some rocks & get inky!!

Supplies:  

darkroom door stamps - Fun Flowers, Butterflies. Snow Flakes,  
Adventure Sentiment.
Prism alcohol Markers
Gesso
Super Matt Varnish for your decoupage glue.
Tissue paper, rocks &/or bricks.  

Monday, July 6, 2020

Christmas in July Topflight Stamps Style.

Hello Topflight Stamps fans, this week we are having Christmas in July!! This Mix Media Monday's project can be used many different ways. Just by changing the colors to reds & greens along with more Christmas like stamps this project could be turned into a Christmas card, gift tag, ornament, mini album... so many possibilities!
*Affiliate- some of these companies have given me product to use, play & experiment with. The ideas are my own but I tend to work with companies whose products I like so enjoy the inspiration.
**some of these links are affiliate, I receive a small percentage from the company at no cost to you. This helps me deliver free content!


 I was feeling very "Jingle All The Way" and wanted to use the newest diecut release by Eileen Hull as my base cause is is so cute & versatile. It was so much fun to make this project. For now it is a tag but I can change it into a mini album which I am tempted to do.   


Let's Get Inky!

I cut my pieces out of mat board to give my project some stability. This makes the project versatile as I don't know what I will be using it for yet. The diecut also comes with a zig zag twill type piece & 4 sizes of hearts. 


Next up was some color. I chose 3 Fresco Finish paints & blended Aquamarine & Blue Lagoon to make a 4th color. This way I know they will be the right tone. Then painted the colors light to dark in a stripe pattern.


Time To Emboss!

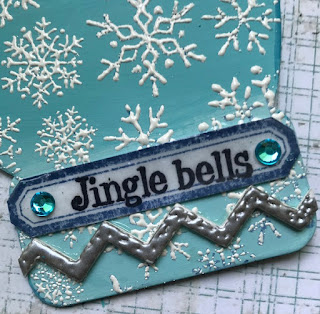
I knew that I wanted to add snowflakes using this great background stamp by darkroom door- Snow Flakes. Embossing is the perfect way to bring a dynamic look to the stamped image. I chose a few colors of Eileen's embossing & the embossing fluid from Wow.


The mitten once completely dry, was embossed using Seashell Ivory. This is a finer powder & did a great job to highlight the snowflakes. To emboss I stamped the snowflake with distress oxide in Faded Jean. This works for embossing as it has a higher wet time, but a bit of stickiness to keep the powder in place. The bonus is any place you miss with the powder, still gets the stamp image. I like to intentionally miss some spots or brush the embossing off to create that effect. 


This is one of my favorite techniques & I use it a lot but the results are so different depending on how it is done. For example here it was used with pattern paper 7 clear embossing to create the cover of a mini book.  The full tutorial is here.


The twill piece was covered with the emboss brush & heat set using Polished Silver. These Molten Dimension powders are chunky & need a heavier embossing ink. See how the silver is so thick & real looking? My quote was simply stamped out & covered with Glistening Glass to get that epoxy look. Use an embossing pad for this with archival ink so the images don't smear. A few Diamond Sparkles were added to jazz it up. 


Love This Owl.

Time to add my focal image which is the awesome owl, it comes in a set of owls- so fun. 


The image was stamped with Archival ink & colored using watercolor paint. The hat was colored with alcohol ink markers so it would pop. The fluff of the hat was embossed with White Wonder which gives it this chunky cool look. Lastly the ribbon & chain with jingle bells was added.

Thanks so much for joining me today! Stay safe & sane- make art! Hop over to Topflight Stamps to see all the awesome products that were used on this project. Remember karenbearse saves you 12% *some restrictions apply.


Supplies:

Wednesday, July 1, 2020

July Eileen Hull Release Hop!!!

Hello Crafty friends it is release time for Eileen Hull Designs Sizzix diecuts! Happy Canada Day!!! We are having a fabulous blog hop complete with prizes so I hope you hop along!  I hope you subscribe & follow my blog for lots of free tutorials & projects!!

Thanks for coming to the Eileen Hull/Sizzix Chapter 3 Release Party Blog Hop! Check out the creative ways the Inspiration and Education Teams have used the Mitten and Snowman dies! We hope that you will be inspired too and share how you use the dies in the Eileen Hull Fan Club.
But wait- there’s more- the Release Party continues! You won’t want to miss the Facebook Live at Eileen Hull Designs at 12:00 noon Eastern time on Wednesday, July 1! Join the chat- and a random commenter will win the Snowman die. We are so glad you joined us to celebrate the Chapter 3 release.
Please hop with us through all of the projects and leave comments on the different designers' blogs. A lucky commenter will win the Mitten Box die!!!
Thanks everyone!
*Affiliate- some of these companies have given me product to use, play & experiment with. The ideas are my own but I tend to work with companies whose products I like so enjoy the inspiration.
**some of these links are affiliate, I receive a small percentage from the company at no cost to you. This helps me deliver free content!


Here is my July 1st, Happy Canada Day, Christmas in July project all in one! Eileen Hull has 2 new die cuts out and we are hopping to show them off! One of the new die cuts is called Box Mitten. If you know anything about winter sports in Canada the Olympic Team traditionally wears Canada Mittens for the opening ceremonies as part of their uniform. That was the inspiration for my project. I made a Display Stand for a photo from my days as an athlete. I used a clip so I can change the photo out if I want to. 


Wow look at all the amazing projects on the hop! That is a lot of inspiration!! Don't forget the release party too!!

Tutorial Time!!

This is an easy project to do & would be easy to change to suit whatever photo you choose to display. Cover mat board with double sided adhesive & your chosen paper. If you want you can put paper on the other side as well. For this project it worked fine that the edges & part of the back show in white. Place the paper you want showing face down onto the die cut. 


This die cut is a little longer than 12" so you will want to make sure the paper lines up with the straight line at the top leaving a bit of the stand part without paper. This will not show when assembled. Super easy to make these stands!! Simply assemble the stand as in the above video! The actual assembly is at the 1 min mark. 

I wanted to add a few Canada chipboard elements. I got these a few years ago from a wonderful, Canadian Woman run company called Southern Ridge Trading Co. The Maple leaf was covered & heat embossed using Eileen's White Wonder powder. You may want to gesso the chipboard in white 1st to get a true color. 


Next I covered Canada in Golden Rod. 


The mitten die was covered in paper & cut out. Then is was run through using the Sizzix machine using the Basket Weave embossing folder. Sadly I didn't realize this one is not available. However you can use any folder you have- be creative! The edges of the mitten were distressed with Ebony ColorBlends. 


The pieces were simply glued together & the photo added. Just like that I have a Canada keepsake. Also it lies flat when not assembled which makes it easy to mail! This project would be great with snowy winter paper & a winter photo. 

Supplies
Eileen Hull Mitten Box diecut by Sizzix
"         "      Display Stand "             "
"         " embossing folder Basket Weave  by Sizzix
Embossing in Golden Rod & White Wonder by Emerald Creek
Ebony Colorblend
Paper & sticker by Photoplay 

Blog Hop order!! remember to leave a comment to win. 

LinkWithin

Related Posts Plugin for WordPress, Blogger...