Thursday, September 28, 2017

Encaustic Canvas Time!

Hello & happy Thursday to you all! This means it is time for my Topflight Stamps blog post. Today I am playing with one of my favorite things encaustic on a canvas. I don't do this often but I need to because it is a lot of fun & the results are very cool. 


Playing with Wax!

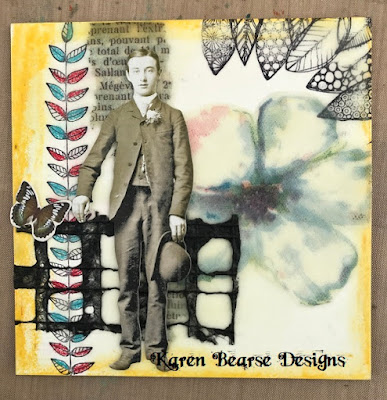
Here is my finished canvas. There are quite a few layers on this as that is how encaustic works!  You heat prepared beeswax, brush it on a encaustic friendly surface, heat the wax to fuse it. Add your layer, add wax, heat the wax to fuse it & repeat. There is of course a lot more to it then that, but for today I will just show you how I created my layers.


Stamps from Topflight

First let's talk about the stamp set I used! I played with Carabelle Studio stamps using Birgit  Koopsen's creations. Scribbled Leaves & Textured Circles. So many possibilities with this set. 


Time for some images...

With encaustic, to get crisp stamp images they need to be on the bottom layer. There are ways around this but that is where I started. For this piece I had an idea of where I was going so I placed my ephemera as I worked to make the layering easier. The leaves on the left side were stamped directly on the encaustic board with Archival Ink. They were colored with Caran D'ache Watercolor crayons. 


Next I stamped the leaves in the upper right corner. At this point no wax has been used. I also cut a flower from a paper napkin to add. Note how stark the white is. This will change as the wax layers are added.


Let's Add Some Color

Here is where I started adding layers of wax and ephemera just building up the piece. The yellow was added using oil pastels.


While my paper doll was added last I kept placing him as I worked so I knew where he would end up.


Adding A Personal Touch with Words.

As a final step I added color to my stamped leaves in the right hand corner. These had been stamped directly on the board but I was able to color them on top of the beeswax on the top layer using Crayola Crayons! Also I added one of the textured circle layers. I stamped on tissue paper which allowed the tissue to melt away when added using a layer of wax.  As this layer was one of the last it sits on top of the piece showing very clearly. I was very excited to discover I could write with a ball point pen on tissue & add it. Now I have a memory of my family on this canvas. I decided to put the title in the paste tense to go with the vintage photo.


Can you see the wax?

This piece came together really well. I love using these Tim Holtz paper dolls in my work but I also like to give them context. I have started creating little stories that meld with members of my family. That gives this stranger in my picture a little familiarity. My son wore a hat every Friday one year while in high school. He also loves pie! Now the piece has more meaning in my life. 


Here is another close up getting some of the wax to show. This piece was created in a monthly group I am in. A group of women from different walks of creative life that come together to play & teach each other. This month my friend Deborah Mahnken led the project. It was fun to see how different each persons project turned out. 

That is it for today. I hope you enjoyed the tour of my canvas. Hop on over to Topflight Stamps & order some of their cool stamps, then add your creation onto our Facebook Group, Topflight Stamps Design Gallery! Until next time, get inky!

Monday, September 25, 2017

Eileen Hull's Book Club Collection Sneak Peak

Hello Eileen Hull fans, today I have a sneak peak using a die for the upcoming release Book Club. For an explanation of this new release who better then Eileen herself to explain it?

One word that sums up the new Sizzix Book Club collection is VERSATILE! 
Eileen is happy to introduce new Three-in One dies- dies that serve multiple purposes to fit into every area of your life. 
There are three new Score Boards dies for sturdy project bases and three die sets to embellish them. Each die may be used in many ways- on books, cards, gift boxes, home decor projects, and for storage and organization.
Imagine a die that can create a box, a book and a frame all on one die- we have that! Come explore the Book Club collection with the Inspiration Team and let us know which one is your favorite! Releasing this November 2017.

Book Club Collection by Eileen Hull

Art Card Box

This is actually more than just a sneak peak, I am showing you most of the project, it is just the tutorial you have to wait for! These dies will be out in November but we could hardly wait to show them off! I used the Card Box die which is good for planner, storage & organizer. I was feeling very Dylusional as you can see, combining 2 of my favorite designers felt like a good way to go! Dyan Reavley's products are so bright & cheery.


This box is very sturdy when made with Sizzix mat board & glued using Therm O Web Supertape. I plan on making a lot of these to hold some of my favorite things but I thought I would start with art cards. Stay tuned for the tutorials the team have been working on. To see lots more of this release follow the links!!

 
Disclaimer
*I have received product as part of the Eileen Hull Inspiration Team. Lucky for me I love her products!! The ideas & projects are my own but may have been influence by all the awesome inspiration of my team mates, master artists & Thor. Also potentially from movies, nature, tv, & cool but funky quotes.  Fan Girl Out.


Thursday, September 21, 2017

Time to Make the Coffee Card

Happy Thursday Topflight Stamps fans! I am here today with a card as the design team are participating in the Fall Coffee Lovers Blog hop. I am not traditionally a card maker so this should be interesting! You will want to play along but hurry the hop ends tomorrow. There are about a gamillion prizes!! Link to the hop is at the bottom of my post.


Here is the card I came up with using the Crafty Individuals stamp as my main focus & Dark Room Doors Stamp set for accents & the quote. For more info & links to the stamps you can go here.


I started playing with this very detailed, etched rubber stamp while on vacation in Florida this August.  We had the good fortune of a deck overlooking the ocean which I spent every morning with my coffee, soaking in the view. I so miss it!!  


Basically painted this in using Prima Watercolor Tropicals set while listening to the waves roll into the beach.


Fast forward to today Sept. 18th where I am adding some touches to make my card.  I need to change it from tea to coffee which was easy to do just by switching out the title with "you perk me up". I wanted the title bold so I heat embossed with Emerald Creeks Burnt Copper which kinds reminds me of... yup you guessed it- coffee!! 

Of course I also needed to add in the coffee rings, which let's face it you would not have with a tea saucer but come on this is art! I love me some coffee rings! Put it all together & voila my card. Here is the link to the Fall Coffee Blog Hop if you want to join in the fun!  Just scroll all the way to the bottom of the post to link up. Contest ends Friday Sept. 22 at 6am pacific.

Wednesday, September 20, 2017

Let's Make Planner Dividers using Resin!

Hello Resin fans, today I have a tutorial on the Resin Obsession blog making planner dividers. I thought I had a brilliant new resin technique too but it may be a fail, you can check it out here. Is it a fail or kinda cool? Leave me a comment & let me know on their blog.


These were the successes. Full tutorial on how I made these! Love working with resin!

Thursday, September 14, 2017

Cactus Art Journal Page

Happy Thursday, it is time for my Topflight Stamps blog post. Let's play with a mix media, smash book, art journal type page from My Favorite Book Journal. Even though the photo shows us having super fun & doesn't match the title. I wanted to remember the over all feeling which was walking through the gardens, quiet & calm with lots & lots of green.


Green Was the Silence

Last January I was in Phoenix, AZ for the first time. Creativation is the big winter convention for AFCI (Association For Creative Industries). It involves days of setting up a booth, demo's, classes, tons of people, lots of talking, laughing and just noise in general.  After the convention there were a few days to just be tourists. My bestie Suzie & I had the opportunity to spend the afternoon at the Desert Botanical Garden. It was amazingly, awe inspiring as I had never seen a cactus in the wild. Not to mention Cacti that were massively huge like trees. There were very few people there so we were able to wander in almost silence looking at the gamillion different types of cacti.


Art Journal Fun 

My page started as a wipe up page from using stencils & modeling paste. I was totally inspired by the Words & Paintery Challenge for this layout. Especially the line "Green was the silence". 


This background had the perfect colors to work with their prompt. Again the quote immediately made me remember the feeling of walking among this forest of amazing vegetation, it was almost like walking through a museum. It also helped that it was in the middle of the week & not that many people were around.


Carabelle Cactus

 It took just a few minutes to complete this page using the stamps from Topflight. For the tall cactus I simply stamped on patterned card stock, the middle one was done using a spritz of glimmer mist & the roundish one was water color marker. The pots were also card stock. I added foam dots to the one on the left to add some depth. 

Remember the Story

I added a bit of the story on the back of the tag & tucked it in the side of the photo. Simple to only adhere tape to 3 sides of the pic & create a side pocket. I love how these stamps just make the page. Remember if you want the coolest European stamps bought from an American Company just go to Topflight Stamps!

Wednesday, September 13, 2017

The Basics of Mixing Resin

Hello Resin Fans! I decided to make it easier when blogging about resin to have this tutorial that I can link you to if you need the basics. That way experienced resiners (yes I made that word up) do not have to go over this every time I blog. I have a chart below with the ratios & times...I will add to this as I expand my product knowledge.


First of, make sure you read the directions for your resin as some of them have different time or mixing information. Any that I have used have instructions for level of humidity & temperature. So for example, you do not want to mix this on your patio in the summer when it is 90 degrees out! The ones I have used have a part A & B, Resin & Hardener. 70 degrees- 80 degrees seems optimal.


Pour the amounts of each part into a plastic mixing cup. Stir with a stick for x minutes. Pour this mix into a fresh cup & with a clean stir stick, stir for another x minutes. Now your resin is ready to pour. Usually you have about 30 minutes depending on the resin, temperature etc. to pour. 

Tips:
* I always use gloves as this stuff can be super sticky!
*have a clock/timer ready to go other than your phone, you do not want to be touching your phone if it goes to sleep while mixing resin. 
have your supplies ready to go, working with resin has a time limit & the experience is much more fun if everything is set. ie: parchment paper to set pieces on, molds, bezels...


Resin Obsession- 2 parts A with 1 part B. Stir for 2 minutes. Fully cured in 12 hours. Is a hard super shiny finish that does not dome. 

Easy Cast Resin- 1 part A with 1 part B. Mix for 2 minutes then pour in a fresh cup & with a fresh stick mix for 1 more minute. Domes when poured in a bezel. Works really well for paper resin. Do not mix more then 6oz at a time.


Thursday, September 7, 2017

Spooky Halloween Fun on a Tag

Today I am playing with Topflight Stamps, making a spooky Halloween Tag. I love this holiday it is my 2nd favorite. I also love making tags so perfect combo. 


Spooky Tag Fun!

Here is my cool tag using Katzelkraft stamps. I also recently bought the Tim Holtz Stamp Platform, mainly for kitting for my classes. However I played with it for the 1st time on this tag & realized even mix media artist need this!! I will show you how the Stamp Platform saved my tag. I am also entering this tag in the Craft Stamper Magazine challenge site, this months challenge can be found here if you want to play along. 
First off here is the stamp set Halloween I got to play with. You can buy this from Topflight as well as Tim's platform. More on that as we play!

 Let's Distress a Tag. 

 Starting with tag spritzed lightly with water, spray your colors on the tag. I was worried that these colors would make mud together because of the purple so I did a test first on a piece of paper. Where the purple & yellow mixed it was muddy but a nice espresso color so I went with it. 


Opps Craft Fail...

After adding some washi tape I heat embossed the haunted house. My idea was to add some alcohol ink to darken it some & doodle. As I started working on it I realized a lot of the cool detail that makes the stamp special was being lost as the emboss is too thick for it to show. So I flipped the tag over & started again. I can always add a piece of pattern card stock on this side to hide my boo boo. 


Stamp Platform Time

At this point I pulled out this handy dandy device. You can find it here at Topflight Stamps. Rather then me try & explain how it works how about I let Tim show you in this video you can find here. 


Just like in the video, opened the tool & placed my tag using the magnets. Next step is to position the stamp on the tag & bring the top acrylic piece down & push so the stamp adheres to the acrylic. 


After opening the tool lid & inking my stamp I brought the lid down and pressed as if it was a normal acrylic block, just like in the video. After lifting the lid I realized that my stamp was resisted by the washi tape as it has a slick finish & bold image. Normally this would be a problem that potentially would cause me to start over. Not with the Platform however! I simply removed the washi tape. See the blank spot where the washi was on right side pic above?


 I simply brought the lid down again & re-stamped. The image is crisp & much darker. YAY!!!! Total craft save! It is hard to tell in the above pic how well this 3x stamped image worked but you can sure see it below.


Now let's add to this tag! Using the eye & bat stamps with some heat emboss helped the images to pop. I really wanted the bat to show up so why not yellow, this is art after all not real life. Who says a bright yellow bat could not be living on my imaginary tag? Inking in some details using paint & gel pens also really bought this tag to life.  


Time to add my stamped, distressed & pop dotted title. Love the details on this title! Finished this tag with ribbons & some charms. Thanks so much for joining me today & please head over to the Topflight Blog & leave me a comment, it would be much appreciated! I hope you have some time to play today!

Friday, September 1, 2017

Star Wars Pocket using Eileen Hull's House Die

Wow I dare you to say that title 5 times fast! Today I am here with a Star Wars double planner pocket using the Eileen Hull's House die. I had a little too much fun making this & the geek in me is very excited with the result!


Not only that but it was super easy to do once I figured it out so you get the bonus of the easy how-to version.  


I found the most amazing Star Wars paper pad at Hobby Lobby. It is made by Disney. I was very excited to find this as you Geek fans know some shows are hard to find scrapbook supplies for. 


This technique will take no time at all & can be used in your journals, planners, or junque journals. On the left side I made a double sided tuck pocket. All you do is make 2 cuts of the scrapbook paper using the base of the house die. 


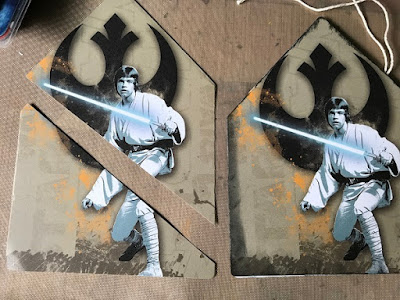
Take one of the pieces & cut about 1/4" above the bend in a diagonal. Adhere a strong glue on left side & bottom of the cut piece & adhere to the solid piece to make your pocket- easy peasy. Distress the edges if you like. 


Make a second pocket the same way & adhere the pockets back to back so you have a pocket on both sides. Here are the 2 papers I used before I put the pockets on. You can see the finished pocket below.


For the right side I made an envelope pocket. Cut 2 house backgrounds & then cut the triangle portion on only 1 of the pieces. You won't use this.


If you use a double sided card stock you can skip this step and simply add the pocket. Cut a 3rd house from a different piece of paper, this will be the inside of the pocket. This paper is a bit thin so adding the whole piece helps give it some stability. I glued the 2 full pieces, plain side together. I wanted to sew on my pocket portion (the rectangular piece) so I moved the adhesive from the edges so the needle wouldn't go through the glue. 


Punch a half circle in the rectangular piece and adhere to make the pocket. Sew using a machine or by hand around the edges.


Next step was to turn the 2 pocket pieces into one piece that can slide in my journal. I really wanted to use washi tape for this step but couldn't get my hands on Star Wars washi fast enough so I made it with paper. First cut out 2 pieces of paper, in this case the square black rebel alliance piece. Next, leave a bit of space between the pocket & envelope & adhere one square like in the picture above.Then flip the piece over & adhere the 2nd square lining them up. Finally add some ephemera. 


Now you can bend the piece and you have 2 pages. I printed some tickets from the internet to put in my pocket. I plan on putting photos or more ephemera in the pockets, maybe a quote from the movie on a tag. Do they make Star Wars stamps?


All that was left is to slip the pockets into my journal. If you want to see the original post on how I made my Fan Girl Journal (including my Star Wars booklet) using Eileen's journal die the original post is here.

 
Thanks for coming along on the ride with me. I hope you get a chance to play with this fun die!! Make sure you hop on over to Eileen's blog to see what the rest of the team is making this week. Cheers!

LinkWithin

Related Posts Plugin for WordPress, Blogger...