Showing posts with label Infusions. Show all posts

Monday, December 20, 2021

Visible Image Journal Booklet for Topflight Stamps

 Hello My Stampy Friends! Welcome to my last post for Topflight Stamps. After 2 1/2 years with this awesome team it is time for me to move on. Life has gotten super busy & just does not leave me time to continue. This has been a wonderful experience. The gals on this team are super supportive & friendly. It has been a pleasure to play with so many, wonderful, stamp company products & get inky on my Mixed Media Mondays. A special thanks to Donna Bowman for creating this creative space for us to play in. Lisa Hoel thanks for hanging in with me when things went pear shaped! You are a wonderful DT Lead. 

Now on to my project! This week the team is focusing on the UK company Visible Image. I made a Full Size Journal a while back & decided I wanted to add a signature for some arty play in January. I will show the journal & link to it below. I love how this booklet turned out. It some of my favorite elements. Texture, a metallic shine, cool quotes. Hum I may have to add some metal LOL.
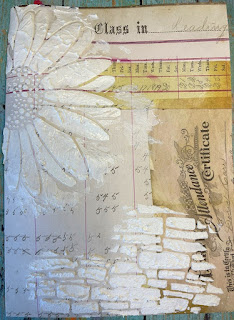

This booklet started with a 12 x 8 1/4 sheet of scrapbook paper from a Tim Holtz paper pad. Pulling out a few stencils, some Grit Paste (bricks) & crackle paste Daisy)  was added. Then the page was set aside to dry.  

Next up: Pulled out my Gel Press to use as a palette. This is a great way to not waste paint & if you want to brayer your background. At the end of your session you can pull a print so the left over paint is used up. 

Here is the brayer painted background, with my main title "Escape From Real Life". I know many of us are feeling this now more then ever, art is such a great escape & good for our mental health. Colors used are London Bus & Truffle. Looking at my Infusions swatch was the next step. This helps to figure out what colors the project options are. 


Once the pastes were good & dry it was time for color. Adding Infusions in Lemoncello & Golden Sands with some water gave my Daisy a dynamic yellow, golden brown look. 

For the brick area powders, In the Navy & Sleigh Blue were used. Lovely & grungy. It is crazy how realistic this brick will look when finished.

I had this idea & wasn't sure if it would work but that is sometimes the best way to discover new techniques. The idea was to have some of the art quotes embedded in the background using clear &/or white embossing. I made a couple of samples to see which I like better. Below is the same technique I used for the left hand side sample. 

Also realized there was more success in seeing the quote if the starting background was light with a darker color on top. This creates more of a contrast making it easier to see the quote. This has a watered down Sleigh Blue underneath, then clear embossing powder & Royal Blue on top.  Once the Infusions are dry, clean off the embossed area well with a baby wipe. If you use a heat gun to dry, the emboss heats up again and you may lose your image. I didn't end up using this & learned this technique works better with a crisp, well defined image like the Art is in my DNA. 


I had to show this luscious piece of mixed media paper that is covered in the various Infusion colors. Just so nummy! 


In the process of that I realized the torn quotes made me happier. Totally different look then I envisioned but really like it. This is the fun part of art, changing your decisions as you go. This quote background is from a piece of the paper in the last photo, above. The quote was stamped in Roasted Coffee ink & embossed with Lime which is a translucent embossing powder.


Do you ever have a product or technique that you can't stop using at the moment? I feel that way about adding Sizzix Luster Wax. It just creates such a rich, dynamic, aspect especially to embossed images. Hit the high points of the stenciled images using the wax & a piece of hard (Phat)  foam. So hard to see how dynamic the metallic shine is in a photo! 

Here is a close up of the bricks. How realistic & random the color is! Keep in mind there is also that silver metallic which make it just so delicious. 


I also wanted to show what the left side of the paper looks like without all those layers. Amazing where this page started from! 

Almost there. To make the cover more sturdy & cover up any ink bleed through, a heavier weight card stock was cut, sewn around & adhered down to the inside cover. 

Time to build the book. Simple to grab random papers, tags, envelopes to make a signature. Keep the pages around 12" long by 8 1/4" tall. I made some smaller just to add interest & of course the tags will do that as well. Fold the pages & insert them into each other. Bam done. 

Last step is to slip the booklet into my already completed Full Size Journal. I love this size & Eileen Hull's diecut makes these books easy to create. You can find the full tutorial to the cover of the Journal here. I am going to change my date to 22, just waiting on the stencil number to arrive. The booklets slide in & out through elastic which makes working in them a breeze.
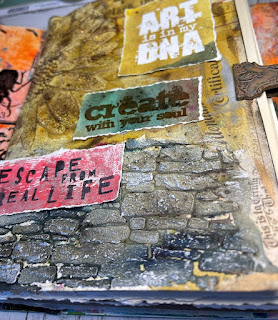

Here is another more realistic look at the bricks. Hard to see but there is silver in with the white highlights. They turned out so great! Love that Grit Paste. Well that is it for me. I hope you subscribe to my blog, You Tube, Facebook & Instagram. I post different projects on these platforms. Lots more content coming your way, including working in this book. Have a great day & hope you have a chance to get inky! For photos of Topflight Stamp products you can go here.

Supplies:

Monday, March 1, 2021

Create A Tag Using Paper Rose

Tag making is one of my favorite things to do, so today let's create a tag using Paper Roses stamps & stencil. Happy Mixed Media Monday for Topflight Stamps! As always you can see the tutorial here & pictures of the products used on Topflight Stamps site. If you use the code karenbearse you can save 12%!!! *Affiliate- some of these companies have given me product to use, play & experiment with. The ideas are my own but I tend to work with companies whose products I like, so enjoy the inspiration.  **some of these links are affiliate, I receive a small percentage from the company at no cost to you. This helps me deliver free content!
 
 
Tags are so fun to create, such a great way to experiment. This tag has a few layers & packs a punch with all the color. The whole tag was inspired by the product. I hope you will join in & make one yourself!
 
 
I started by swatching my latest 3 colors of Infusions. I have all my colors on this die cut on a ring which makes choosing a color easier. As the theme of the stamps is paint palette, color wheel etc. the tag obviously called for color! 
 
Step 1: Confession, I may have saved the inside wrapper of a Wendy's burger (cleaned of course) because there was a beehive pattern. Very happy to have used it! Just decoupaged onto a tag. You can use a piece of napkin or decorated tissue also.


Step2: Add Infusions powders & a few spritzes of water. A Bit of Jade & Black Current. I sprinkle them separately in 2 different areas & let a bit of overlap. That produced the lovely purple that you see. Once the water is added let the inky move & blend. 


Here are the Paper Roses stencil & stamp set that I used. As always the supply list with links is below. 
 

Step 3: Stencil the quote with a brush & ink. In this case Prism French Navy was used. The words were stenciled on a piece of lined paper. Fun & different.

 
Once the tag was dry, the stencil was used with a pen. Making the lines sketchy was a different way to utilize a stencil & create a kind of hand drawn quality. 
 
 
The paint palette stamp was used on card stock with an archival ink. Watercolor paint to paint in the boxes just as a real palette would look. All that was left was assembly & some doodling around the quote & edges.
 

 A few of the smaller paint brush stamps were used along the side of the tag. The whole thing was finished off adding sari ribbon & twine wrapped around with a charm. Thanks so much for joining me today. I hope you get the chance to create a tag! 

Supply List: 

Monday, January 4, 2021

3 Tag Backgrounds with Infusions

Hello Blogland, today I have 3 tag backgrounds for you using PaperArtsy Infusions. First I hope you managed to find joy your holiday season. I wish you & yours, peace, happiness & health in the New Year. As this pandemic rages on, I pray the vaccine brings miracles of healing to the world. All I can offer today is a bit of distraction with some crafting. Remember the coupon code karenbearse gets you 10% off at TFS  *Affiliate- some of these companies have given me product to use, play & experiment with. The ideas are my own but I tend to work with companies whose products I like so enjoy the inspiration.  **some of these links are affiliate, I receive a small percentage from the company at no cost to you. This helps me deliver free content!


I really wanted to play with no finished project, just some ideas to get a start. I think wading carefully into the New Year 2021 is a good idea. Here are my 3 different background techniques to get you going. You can find all these supplies at Topflight Stamps. I am thrilled to be continuing on with this wonderful group of creatives for another 6 months. I hope you check back often to see my shenanigans. 

Background #1 & my favorite: Use a spray adhesive to stick your stencil down onto your surface. This tag uses a mixed media type paper which lets the product have some time before it dries. 


With the stencil stuck down, add powder. Infusions are pigment color with walnut crystals. The powder can be activated with anything wet. Try experimenting with gesso, decoupage glue or other mists. I am using a water spritzer today. For this tag I chose to keep the colors separate. Spritz with mists of water activating the powder. Using a finger, gently move the color being careful not to move the stencil. If you want to take it one step further, you could use a paint pen to make the stencil lines more crisp. 


Background #2: This is a 2 step background. First add a few colors of powder & spritz with water, use your finger to move the color & blend it. I only used 2 colors (Lemoncello & Royal Blood) but feel free to experiment. Dry & then move on to #3.


Background #3: The main reason for this background was to get the powder on the stencil for #2. Place stencil down & put a nice layer of powder, a little goes along way (Black Knight). Spritz with mists of water. I was surprised at how crisp the stencil image turned out. It makes sense though as I did not put too much water or move the product around. Blurry stencil images happen when the product goes underneath the stencil. 


Next take background tag #2 (left side) and flip the stencil over from #3 (right side) while still wet & press down on the tag using a paper towel. If the powder has dried simply spritz the stencil with water to re-activate it. This will transfer the image onto the tag, basically using your stencil as a stamp. The paper towel helps the image from bleeding and makes it crisper. 


Finished tag #2. That is it for today! Thanks so much for joining me. I hope you have the chance to try out these backgrounds. They are great for tags, cards or art journal. Have a wonderful week & stay healthy. 

Supplies:  


Monday, August 17, 2020

Planner Pages with PaperArtsy

Happy Mix Media Monday on Topflight Stamps, today we are going to play with planner or journal pages using PaperArtsy. Do you write in a journal? If you do is pre-prepping your pages something you do? Sometimes I do like to prep so I thought we could have some fun seeing some inky steps I like to use. 


I tend not to need the page to match the days events. I just want to add some fun & color to my writing. I journal almost everyday. I like to have the stories written down for the photos I take. That way if I decide to work on a mini album or planner page the story is already documented. Do you ever look back at a photo & wish you remember why your kids were laughing? This is a great way to keep track.


Let's Get Inky!

Step 1: Pull out a stencil & some paint. I used Fresco Finish Paint This paint has a matt finish, dries quickly & is easy to write on top of. That makes it pretty unique in the world of acrylic paint. I like to use a cosmetic sponge to dab paint through the stencil. Less is more if you want a crisp image. 

Step 2: Add some stamping. I picked 2 colors of paint for these cool leaves. Green Patina & Magic Moss. Added a quick spritz of water & applied with a brayer directly to the stamp. Just a light coat works best. Then stamp, ink up, then stamp. 

I love the varied color this technique gives. Remember to wash your stamp immediately, you don't want dried paint on it. I use an old toothbrush to get the paint out of tiny grooves. 

Add a Focal Image

Once my background was dry it was time for some fun images. For this layout I chose the PaperArtsy Zinis 23 & 32, cute little tweetie type birds. To make fussy cutting easier, stamp the image onto the background 1st. That way the fun little dots & accents transfer. 

Next stamp with archival ink on card stock & color in with markers or paint. I used watercolor markers just for fun. Love this little guy!

I added 2 of the birdies they add so much!!

I still felt like it needed something so some watercolor paint was in order. I added the paint on the leaves. The acrylic paint acts as a resist so my image still shows up. A bit of a border ties it all together. Now my page is ready for me to add the day, a quote, some photos or washi tape whatever is the order of the day. 


How About Another Page?

 I made 2 more pages using the same stamp & paint technique. For this one I used a circle stencil & the paint Slimed & Aquamarine. I used the same colors to stamp using Seth Apter stamps. 


Infusions

Adding a title seemed like a good idea. Using a small tag and some Infusions for color was up next. Simply tap out some powder. Add a few spritzes of water- see the magical color. Spread color around. I made 3 tags using a different color for each one. Lemonchello, A Bit Jaded & Black Current. Options friends.


Once the tag was nice & dry Seth's title word Now was used with black ink, then embossed with Seth's Aegean Sea embossing powder which is translucent & makes the word pop. 

I still needed a little pop of color so this fun hand stamp was painted. Just love this look. Hot Tip: while you have paint out, grab some spare card stock to make extra pieces to have on hand of decorating other projects. I used Cerise & Smoked Paprika.


Once again ready for washi tape, photos and the super important journaling. Love how much that pop of color with the hand adds. 


Best for Last

I just love this big butterfly flower stamp by Tracy Scott. I knew I wanted to use it on one of the pages. Stamping it out 3 different ways so again I have images ready to go in my stash. From left to right. 1: use Infusions on card stock. Let dry and stamp. 2. Paint using water color paint randomly on card stock, dry & stamp. 3. Stamp 1st then color using Dylusions spray either in a water brush or with a paint brush. 

Quick pic of the Infusions. 1st- put powder on card stock, you can see a little goes a long way. 2nd- add water spritz, less water for more vibrant color. You can also add more powder if you need to. 3rd- move paper around to get paint to move & blend. Use a paint brush if needed. This paint has walnut crystals which give them the dynamic look. If you don't want as much of the brown crystal look you can dab them up using a paper towel. 

As you can see I went with the Brush Marker painted version. I just love how dynamic these colors are. Thanks so much for hanging in on this very long post!! I hope you get the chance to get inky today! Remember photos of all the products used along with their links are on my Topflight Blog Post.

Supplies:

Monday, December 2, 2019

Inspired Book- Creative Mess Booklet #1

Hello Topflight Stamps Fans, I have post #2 for my Inspired Book that I made last month. November has been a crazy month of travel, teaching & kid stuff. This is going to be an inky post with a favorite technique for making the booklets that go in your journals. If you are on the Journal craze or just want to make a creative notebook I hope you have a chance to make one of these books. 


My 1st booklet is to write down ideas, inspirations & anything artsy that comes to mind. I made the cover a separate piece & the lined booklet was sewn together. This way I can simple replace the booklet when full leaving the cover intact. My pages were cut from lined paper 8"wide x 6.5" tall. It is hard to see the booklet in this pic, more on that below.


I have been playing with Gel Plate a lot lately mainly due to some of the classes I am teaching. I love the way ink moves so differently on the plate & allows for some unique quick & easy backgrounds. For the cover of my book I decided to experiment with Infusions to see how it worked on the plate. Basically sprinkle the Infusions on the plate & spritz with water. Dab the paper on the plate picking up the colors. A little goes a long way so just sprinkle a bit to start with and add a generous 2-3 spritzes of water. 


Infusions colors are so rich & concentrated. I did one layer (left hand side) of dabbing the paper down, dried with a heat gun & then added a 2nd layer (right hand side) more sparingly. Love how rich this color is! The interesting thing is I think the gel plate holds the walnut crystals allowing for more pigment to show through. 


I added a 2nd color- Royal Blood and just added a touch here & there. Love this background!!! I think you get a richer color with the Gel Plate, less of the brown from the walnut crystals. Just an extra tool in the tool box. 


Speaking of tools, did you know that on the Topflight Stamps shop page, a lot of the stamps shown have inspiration right there for you? Just click on the mini image to the right of the main image. I used this sample by Rachel Greig owner of Darkroom Door to inspire my cover. 


Loving the look of the background created, & not wanting to potentially wreak it meant putting the sentiment on another paper. The sentiment was embossed so it would really show. Adding the quote in Glistening Glass which is clear seemed a good idea. That means my sentiment will be white like the card stock. I put a few sprinkles of A Bit Jaded on the Gel Press, spritzed with water & once my image had cooled dabbed the paper in it. The emboss will resist the ink as it is water based. Sorry the colors are off in this photo you see the true color below.


I mistakenly rubbed off some of the word "am" but mistakes often create opportunity. I  re-stamped the word on white paper & cut it out, distressed the edges & popped it on my card. Love how that looks, really adds to the sentiment. I also carefully stamped some of the splats from the stamp with black ink, then distressed the edges.


Lastly I stamped some random images on my background just to add some interest. I used Grunge Marks & Arty Hexagons both from Darkroom Door Stamps.


I used a variety of stamps which I got from Topflight Stamps to add fun & interest to my pages. Some of the images were direct to paper but because it is thin the images were seen on the other side. Most were stamped on copy paper & cut out then glued.


Just stamp away- off course I used a trusty stamping press to make sure my images were crisp. These stamps are Seth Apter.

I also added some stenciling using different colored inks & a dabber to get a nice image. Some pages also had washi added for more color & interest. What I love about this project is I can use any colors or themes as the book goes on, it doesn't have to be matching. This washi is Alexander Renke & the stencil is Pronty.


Seriously love how these wee foxes look! They are from washi tape. The stamps are PaperArtsy Scrapcosy 5. Look at the fox looking up are the mushroom- too fun. 


Lastly I added some more Glistening Glass embossing powder to the outside of my book to give it the same shine as the spine. It will also protect that crackle paste so it doesn't chip off. I also added the A Flair For Buttons butterfly. For the full tutorial on this book you can go here. That's it for this post. I hope you can get some arting done today!

Supplies:
"          "      Stamps-Zinski Art 41, Scrapcosy 05,
Seth Apter Stamps by PaperArtsy
Eileen Hull Glistening Glass by Emerald Creek
Pronty Grunge Circle Stencil
Washi Tape- various & Foxes
Gel Press 

*Affiliate- some of these companies have given me product to use, play & experiment with. The ideas are my own but I tend to work with companies whose products I like so enjoy the inspiration. 

**some of these links are affiliate, I receive a small percentage from the company at no cost to you. This may help me continue to bring you techniques & more inspiration.

LinkWithin

Related Posts Plugin for WordPress, Blogger...