Showing posts with label tag. Show all posts

Monday, July 6, 2020

Christmas in July Topflight Stamps Style.

Hello Topflight Stamps fans, this week we are having Christmas in July!! This Mix Media Monday's project can be used many different ways. Just by changing the colors to reds & greens along with more Christmas like stamps this project could be turned into a Christmas card, gift tag, ornament, mini album... so many possibilities!
*Affiliate- some of these companies have given me product to use, play & experiment with. The ideas are my own but I tend to work with companies whose products I like so enjoy the inspiration.
**some of these links are affiliate, I receive a small percentage from the company at no cost to you. This helps me deliver free content!


 I was feeling very "Jingle All The Way" and wanted to use the newest diecut release by Eileen Hull as my base cause is is so cute & versatile. It was so much fun to make this project. For now it is a tag but I can change it into a mini album which I am tempted to do.   


Let's Get Inky!

I cut my pieces out of mat board to give my project some stability. This makes the project versatile as I don't know what I will be using it for yet. The diecut also comes with a zig zag twill type piece & 4 sizes of hearts. 


Next up was some color. I chose 3 Fresco Finish paints & blended Aquamarine & Blue Lagoon to make a 4th color. This way I know they will be the right tone. Then painted the colors light to dark in a stripe pattern.


Time To Emboss!

I knew that I wanted to add snowflakes using this great background stamp by darkroom door- Snow Flakes. Embossing is the perfect way to bring a dynamic look to the stamped image. I chose a few colors of Eileen's embossing & the embossing fluid from Wow.


The mitten once completely dry, was embossed using Seashell Ivory. This is a finer powder & did a great job to highlight the snowflakes. To emboss I stamped the snowflake with distress oxide in Faded Jean. This works for embossing as it has a higher wet time, but a bit of stickiness to keep the powder in place. The bonus is any place you miss with the powder, still gets the stamp image. I like to intentionally miss some spots or brush the embossing off to create that effect. 


This is one of my favorite techniques & I use it a lot but the results are so different depending on how it is done. For example here it was used with pattern paper 7 clear embossing to create the cover of a mini book.  The full tutorial is here.
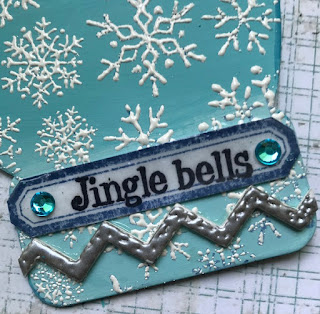

The twill piece was covered with the emboss brush & heat set using Polished Silver. These Molten Dimension powders are chunky & need a heavier embossing ink. See how the silver is so thick & real looking? My quote was simply stamped out & covered with Glistening Glass to get that epoxy look. Use an embossing pad for this with archival ink so the images don't smear. A few Diamond Sparkles were added to jazz it up. 


Love This Owl.

Time to add my focal image which is the awesome owl, it comes in a set of owls- so fun. 


The image was stamped with Archival ink & colored using watercolor paint. The hat was colored with alcohol ink markers so it would pop. The fluff of the hat was embossed with White Wonder which gives it this chunky cool look. Lastly the ribbon & chain with jingle bells was added.

Thanks so much for joining me today! Stay safe & sane- make art! Hop over to Topflight Stamps to see all the awesome products that were used on this project. Remember karenbearse saves you 12% *some restrictions apply.


Supplies:

Monday, June 8, 2020

Recycled Tag Art Using Darkroom Door


Hello Topflight Stamp Fans, let's make recycled tags!!! I was feeling Monday mix media-ish today & decided to pull out one of my 1000 tags from packaging that I save & hoard. I love, love tags and tend to stash them but today is the day to create using one as a base. I decided to play with more of my Darkroom Door Stamps. If you want some great inspiration their blog is full of it!
 

This tag has techniques that are great for an art journal page, full size planner page or art card. I wanted to add some photos from a recent mental health drive. It looks so peaceful but turned out to be quite the crazy adventure. There is plenty of room on the back to journal. *the supply list at the end of the post & if you go to my Topflight post there are pictures of the stamps with links too. Remember karenbearse code saves you 12%


Where To Start

My first job was to choose a tag out of my vast collection of saved treasures. Do you do save the packaging when you buy your scrappy fun? Do you wish you actually used some of the tags you saved? If you said yes then you are right with me!! If you save & use tags well done you. If you don't save at least some what are you waiting for LOL. Seriously you can also do this with a plain tag too!  


Gesso Is Your Friend


Step 1: I don't want to completely get rid of the images just push them back a bit. Plus it creates a more ink friendly background especially if the tag is a shiny surface. Gesso a few extra tags so you have some ready to grab. This is called batching, & saves time! If using a plain tag just stamp some random background images. 


Step 2: Add Random spritz's of Glimmer Mist. Even though I used red & green which can make mud just keep the colors a bit apart & you will be OK. Love how the spray picked up the texture of the gesso! Air dry or use a heat gun.


Step 3: Add some random background stamping with archival ink. That allows for more wet media to be used without worrying about smudging. 
Step 4: Lava Paste! Scrape some through a stencil & then use a heat gun to set the paste- it will bubble up and then harden when cool. If using a boarder stencil, use masking tape to isolate the part you want to use. Creates some really cool lava like texture. If you don't want it to puff up just let it air dry but it dries clear. If you just want white but not a lot of puff, heat for less time. This product dries fairly quickly which is great for mixed media. 


Batch Creating

Step 5: Darkroom Door has all these great sentiment stamps with multiple phrases on them. I stamped out a few, again so I have some ready to grab. 


Step 6: The sentiments fit quite nicely in some of the "Lots of Labels" set. This is how I made my super cool quote. The label was stamped with pigment ink & heat embossed. 


Made a few of all the things cause...saving time! Dang should have thought to make multiple colors!!!


Step 7: Cut out the inside of the label & adhere the quote behind it. This way I can pop any quote in without worrying about messing up! 


Step 8:  Add ink to ribbon (Apple Green Glimmer Mist) & let dry while finishing the details. You can add photos, focal stamped image, collage image. For mine photos were added, as well as bling on the label box. I also added the hand from the label set. Why do I feel the need to get any set that has that hand? 


This tag is going to go in my planner. The back side has lined, distressed paper with a few stamps for documenting the story. Thanks for joining me today. I hope you are healthy, safe & have a little time to escape with some art.

Supplies:
For product photos with links.
Darkroom Door Stamps- Adventure (Sentiment), Lots of Labels, 
Texture Stamp- Alphabet
"                " Stencils- Grunge Borders 
Prism Ink in Thundercloud, & Peacock Green.
IndigoBlu Gesso
Glimmer Mist in Apple Green, Cherry Pie & Glamour Gold
Lava Paste
Eileen Hull emboss in Aqua Splash
Diamond Sparkles - Green

Thursday, October 19, 2017

How To create an Art Tag in 30 minutes

Hi Blog land, welcome to how to create an art tag in 30 minutes! It is Thursday & my Topflight Stamps blog post is up. If you are like a lot of people, time is filled with busyness so how do we fit in that precious De-stressing art time? How about a little short cut tip? 


First up here is my art tag, this week the dteam are playing with butterflies. Using a preexisting tag all I had to do was stamp & emboss my image onto the tag. This was a great place to start. 


The stamp used is designed by Crafty Individuals, a company from England. The detail in these stamps is wonderful and allows for a lot of creativity. Look closely at the image, gears, postage stamps, clocks, writing... what is not to love! 


What made this tag so easy to make was my tin that sits beside me. It is filled with tags that are started with paint, ink or sprays leftover from other projects. When I want inspiration or I have a few minutes just to play I grab a tag. It is a wonderful starting point. 


All I needed to do was to stamp with black embossing ink and add some of the individual stamped images painted with watercolor. A little washi tape, flowers and quote was all it took to finish it up. I hope you take 30 minutes to play today!

Thursday, September 7, 2017

Spooky Halloween Fun on a Tag

Today I am playing with Topflight Stamps, making a spooky Halloween Tag. I love this holiday it is my 2nd favorite. I also love making tags so perfect combo. 


Spooky Tag Fun!

Here is my cool tag using Katzelkraft stamps. I also recently bought the Tim Holtz Stamp Platform, mainly for kitting for my classes. However I played with it for the 1st time on this tag & realized even mix media artist need this!! I will show you how the Stamp Platform saved my tag. I am also entering this tag in the Craft Stamper Magazine challenge site, this months challenge can be found here if you want to play along. 
First off here is the stamp set Halloween I got to play with. You can buy this from Topflight as well as Tim's platform. More on that as we play!


 Let's Distress a Tag. 

 Starting with tag spritzed lightly with water, spray your colors on the tag. I was worried that these colors would make mud together because of the purple so I did a test first on a piece of paper. Where the purple & yellow mixed it was muddy but a nice espresso color so I went with it. 


Opps Craft Fail...

After adding some washi tape I heat embossed the haunted house. My idea was to add some alcohol ink to darken it some & doodle. As I started working on it I realized a lot of the cool detail that makes the stamp special was being lost as the emboss is too thick for it to show. So I flipped the tag over & started again. I can always add a piece of pattern card stock on this side to hide my boo boo. 


Stamp Platform Time

At this point I pulled out this handy dandy device. You can find it here at Topflight Stamps. Rather then me try & explain how it works how about I let Tim show you in this video you can find here. 


Just like in the video, opened the tool & placed my tag using the magnets. Next step is to position the stamp on the tag & bring the top acrylic piece down & push so the stamp adheres to the acrylic. 


After opening the tool lid & inking my stamp I brought the lid down and pressed as if it was a normal acrylic block, just like in the video. After lifting the lid I realized that my stamp was resisted by the washi tape as it has a slick finish & bold image. Normally this would be a problem that potentially would cause me to start over. Not with the Platform however! I simply removed the washi tape. See the blank spot where the washi was on right side pic above?


 I simply brought the lid down again & re-stamped. The image is crisp & much darker. YAY!!!! Total craft save! It is hard to tell in the above pic how well this 3x stamped image worked but you can sure see it below.


Now let's add to this tag! Using the eye & bat stamps with some heat emboss helped the images to pop. I really wanted the bat to show up so why not yellow, this is art after all not real life. Who says a bright yellow bat could not be living on my imaginary tag? Inking in some details using paint & gel pens also really bought this tag to life.  


Time to add my stamped, distressed & pop dotted title. Love the details on this title! Finished this tag with ribbons & some charms. Thanks so much for joining me today & please head over to the Topflight Blog & leave me a comment, it would be much appreciated! I hope you have some time to play today!

Thursday, August 24, 2017

Butterfly Tag with Doodles

Fun doodle tag with Leane Creatief stamps. Happy Thursday & time for my Topflight Stamps project!!


Here is the happy colorful tag I made using this unique doodle stamp. I was visiting my folks with limited supplies but that is all that was needed to have some relaxing doodle time. 


I started by stamping my image on computer paper with Archival Ink as I wanted a permanent ink. I was lucky to be given the new TwinTone Markers by Tombo to play with & I have to say they are amazingly vibrant. This markers have dual tips, one a fine line, one a thicker line. You can see where I tested some colors to see which ones I wanted to use. It was just a matter of coloring in the stamp. I used a fairly light hand as I didn't want the paper to pill. I will be playing with these markers more so stay tuned. 


I started with a tag that already had some random color on it. Stamp the image with Archival Ink so you don't have to cut out the antenna's.You can find the stamp here.


Once the ink was nice & dry it was time to doodle. I used the Tombo Drawing Pen in size 01. It was nice & relaxing to just find some doodles to put in my butterfly. Then it was easy to assemble my tag. I just added some Tim Holtz ephemera & my tag was done.

Wednesday, August 23, 2017

Resin Obsession Book Marks for Journals

Hello Resin fans, I have a full tutorial over on the Resin Obsession blog on making book marks. This is a really fun project that is fairly easy, it just takes a bit of time. 


These projects made from different types of paper resin, which I will go through step-by-step. A great way to use up your ephemera pieces, project life cards, tissue paper, book paper etc. I had a lot of fun experimenting to see how the different papers reacted to the resin. I hope you hop on over & join me!!

Thursday, July 27, 2017

Cute Snowman Envelope with Tag at Topflight

Hello Inky Friends, I am here today with a cute snowman vellum envelope that has a Christmas tag inside. The Topflight team are having Christmas in July & I got to play with Katzelkraft stamps. This will probably end up in my December Daily but it also might end up in my #the100dayproject. Don't you love having options?! 

Christmas in July with Katzelkraft
Starting with a tag & blending Distress Ink on it along with a bit of stamping. The tag was then embossed & the snowflakes were hit with Silver Spark Metallic Lustre. The envelope has this cute frosty snowman on it. I started by making a snow hill on the envelope with Soft Fallen Snow emboss by Emerald Creek. Then I did a couple of patches using Winter's Mistake. I love this heat emboss powder because it has a real fluffy, shimmery snow like look to it.
 
 embossed snowman with a purple & pink scarf
Snowman using Emerald Creek Emboss Powder & Marvy Uchida
Hard to get a good pic to show how fabulous & shimmery my frosty friend is. On a separate piece of paper I heat embossed him in Onyx Frost 1st which gave me the outline. Next I used the perfect medium brush to color in the snow bits and did a 2nd layer of embossing using Winter's Mistake. Hot Tip: brush off any white that gets on the black before heating to make your image clearer. If the white embosses on black simply color it with a marker to turn it back to black. I cut him out & then it was time for some marker action.

Blending Alcohol Markers

Here I am testing out what marker colors to use. These markers are alcohol based & great for blending. Monsieur Snowman was adhered with foam tape to give him a bit of dimension. 

 The finishing touches were a star paperclip & some fibers for the tag. Now my envelope is all ready to go!! Thanks for joining me today! I hope you get the chance to get an early start on your Christmas Merry!

Topflight Stamps by Katzelkraft :
Other Supplies:
  • Emerald Creek Emboss Powder 
  • Marvy Uchida Le Plumme Markers- O835, B700, BV736, BV738
  • Ranger Distress Ink- Fired Brick, Peeled Paint, Cracked Pistachio

Thursday, July 13, 2017

Making Nautical Art Cards with Topflight Stamps


Today I have my weekly post from Topflight Stamps. Check out the sale at the bottom of my blog after you read the post! The theme over there is summer or nautical & I got to play with these awesome stamps from Joy Crafts-Seashore Icons.
art card with photo of seagulls & girl on floatation. Stamps with seagulls & ship wheel.
Stamps by Joy Craft have such great detail!

Playing with Stamps!

I decided to make some simple art cards, here is a quick rundown of how I made them.


This card started with random scrap paper adhered and was covered with acrylic paint & a scraper. I actually was arting on the beach where the picture was taken. Some random stamping of the Ships Wheel in black- notice how applying different pressure changes the look of the stamp. That is also as I was stamping on my lap! When I got home I added a photo from the trip, I love adding photos to my art cards.


The seagull was stamped on beige scrapbook paper, the postage stamp is from Pinterest & is on my Digi board. I added a few embellishments from Bo Bunny & did a bit of sewing. The feather was picked up on at the beach & adds the perfect touch of memory from the day!


Let's Make a Tag!

My second project is a tag that I had started with some cheese cloth & artisan powders. It was a demo I did in a class I was teaching. Perfect to add some nautical stamped images. I stamped the oh so cool light house & compass on scrapbook paper, & cut them out. The compass was adhered with pop dots. 


The lighthouse was added to with just a touch of color using Distress Oxide. Below I added some Glass Bead Gel & GemStones to act like the rocks! The background stamping at the top of the tag was part of that same stamp. The edges of the stamp are seagulls & clouds, so they were inked up and stamped. A bit of ribbon at the top & shazam, done. Thanks for joining me today, I hope I can inspire you to make some art. Pop on over to Topflight to get the best of Europe's stamps right here in the U.S. 

I am entering my tag in the Craft Stamper Magazine challenge. 

 There is a huge sale going on, all the summer stamps!


Topflight Stamp 
Other Supplies:
  •  Ranger-Jet Black, Cobalt Archival Ink
  •             -Fossilized Amber, Fired Brick Distress Oxide
  • Tombo Mono-Aqua Glue
  • Liquitex-Glass Bead Gel
  • Emerald Creek-Gemstones
  • Bo Bunny- Noteworthy Ephemera
  • Letters-Me & My Big Ideas

Sunday, February 7, 2016

Seth Apter Tag with Gelatos

I am designing a Gelatos by Faber-Castell class including some of my favorite things like Seth Apters new stamps which co-ordinate with his stencils. Very convenient and super cool. Gelatos are a creamy pigment stick that come in a chapstick type delivery system. They are luscious and can be used to create all types of art. Here is just a quick sample of using Gelatos to create a bold and water color look on a tag. Stay tuned for more fun with Gelatos!

LinkWithin

Related Posts Plugin for WordPress, Blogger...