Showing posts with label art cards. Show all posts

Monday, July 5, 2021

Art Card with Seth Apter Products

 Hello, fans of all things inky! I am here working with some of Seth Apter's latest release for Topflight Stamps. This release is with one of my favorite companies, PaperArtsy & includes 3 new stamp sets & 4 new paints. *If the products are sold out on Topflight, simply click on the "email when available" button on the left side of the Topflight Stamps site to be notified when they are back in stock.


Decided to continue my journey into art card/pockets. This time I pulled out an art tag that was made a bit ago & created a companion pocket. It will go in my latest junk journal & made me very happy to create a home for this funky cool tag. If you want to check out the tag tutorial you can find it here. There is also a video so you can play along!

*** I have also changed my email subscription to Follow It. This is just general housekeeping but you should now receive my blog notification from them. If you didn't get this post in your in box be sure to check your spam folder & add "Follow It" as a contact. Also if you don't want to miss a post just add your email to the box on the right of my blog to receive them in your inbox! 


Here is a video for you!! Play along with me as I go through step by step to creating this mixed media card or pocket! This would also be great as a cover of a journal. Right let's get to inking!! I made 2 backgrounds & you can see them in the video.


Step 1: using the new colors (Fuzzy Cactus, Aquave, & Desert Bush) of Fresco Finish paint & a brayer, simply roll some paint onto card stock. 
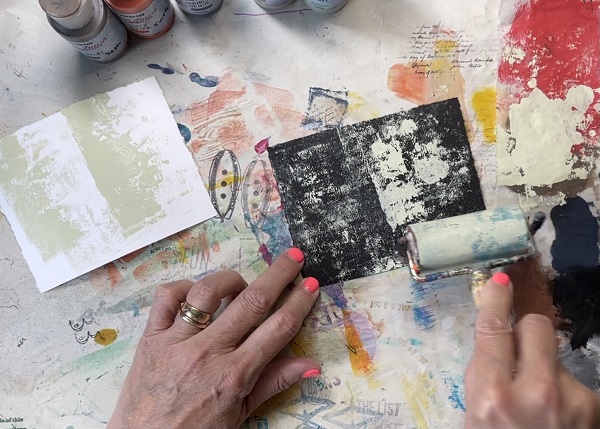
White & black card were used to give me an option. In the end I went with the black card stock piece so the photos may be a bit different but the technique is the same.

Step 2: Add some stencil work. This was done using Mud Splat & Double Denim with a cosmetic sponge. Use a deli paper as your palette, then reuse it in your journals. You will see that is how I added my title below.  

Step 3: Embossed images add that fabulous pop of dimension & shine. I pull out my swatch book to help decide what colors to use. So handy. 

These images were added with stamps, wow embossing pad & 3 colors of powder. Crusty Copper (circle), Blue Moon & Sea of Tranquility. Great names for powder too, plus very accurate as far as a description goes. 

Step 4: Using a piece of junk deli paper from my stash, the quote was stamped in archival ink. The ink needs to dry for a minute then the piece was torn out & decoupaged to my card. Love that pop of color.

Finishing up. The edges were sew with my machine in sort of a sloppy, mixed stitches kinda way.  

Lastly the stencil images were inked & smudged to help add some dimension. White ink pen was also added to the embossed images. Just helps them pop. Thanks so much for joining me today!! I hope you check out my YouTube video, subscribe & play along. Have a great inky day!

Supplies:

Monday, June 21, 2021

Make It an Art Card or a Pocket!

 Hello Inky Friends, today for Topflight Stamps, we are making an art card or a pocket element. I have been working on Junk Journals lately & am finding fun additions to pop in there. This card can either go in a collection or be added to a card stock background & turned into a pocket. This week the team is playing with Stamperia, so I used their stamps as my focal image. Feel free to make the same card using your favorite images.*Affiliate- some of these companies have given me product to use, play & experiment with. The ideas are my own but I tend to work with companies whose products I like so enjoy the inspiration.  **some of these links are affiliate, I receive a small percentage from the company at no cost to you. This helps me deliver free content! 


Here is my card, the inspiration for this page was the quote I found in a newspaper "encourage acts of kindness" something I am striving to do more. It is so easy to get busy leaving no time to help others who may be struggling. When times are stressful it is also a good idea to take your eyes off yourself. Makes me realize we are all going at it rough sometimes. 


I have a video for you too! This is a play along with me video so I hope you have the chance to pull out some supplies & make an art card. 


Step 1: This card started as a 4x6 piece of scrapbook paper. German book paper & another light scrapbook paper were torn & adhered with a glue stick.

Step 2: Next step was to add some stencil work with watered down Fresco Finish paint. I stuck to warm colors. 


 Step 3: Stamp the focal image with archival or waterproof ink. 


Step 4: Watercolor the focal image using watered down Fresco Finish paint, & cut out. Excess paint can be put on spare paper & used with stamps or as back ground pieces. Using cool colors or the opposite of the background helps the image pop.


Step 5: Add the focal image again directly on the background a few times. Also some random stamping was done with the driftwood to add texture.


Step 6: Add the sun stamped image. Originally I stamped directly on the background but the image didn't show up well. So it was re-stamped on white card stock, cut out & glued using Cosmic Shimmer Glue. My quote was cut apart, distressed with French Navy Prism ink & adhered

I found the background colors were overpowering the focal images so a light wash of watered down gesso was added. This helps keep the images intact but knocks them into the background a bit. To make up for the loss in color some mark making was done to help the background stand out just a bit. Pen was used & smudged to create shadows. 

Thanks so much for joining me today, I hope you have the chance to play along!

Supplies:


Thursday, March 25, 2021

Topflight Stamps 4th Birthday Blog Hop!

It's Topflight Stamps 4th birthday and to celebrate, I’ve teamed up with some great designers to showcase birthday cards using the unique products available at Topflight Stamps. Please hop along with us and see all the beautiful talent from this group of amazing designers! You should have arrived here from Cornelia Wenokor's blog. If not, no worries, catch the details below. I also have a video so you can follow along with me. You can see it below or link to it here. 
 
 
I am not a card maker but I managed this mixed media explosion of color & I kinda love it! Yes basically an art journal page for a card but it counts! I also had so much fun making this & may have gotten carried away. I kinda like when that happens. 
 

Here is the logo for our birthday hop. I hope you play along cause you can win prizes! Don't forget the awesome sale too! 
 
I did make a wee video for you to play along with me. I hope you pull out some of your supplies too. This card can easily be changed up to be a tag, an art journal page or a piece to put in your junk journal. 
 

So fun to use multiple products on this card. Don't you love playing with all the things? 
 
 
I do go over all the techniques in my video but here is a quick rundown for you. The magic of Art By Marlene's collage paper is the base to this kraft card stock card. I used a large craft scraper called stencil pal to apply the glue. It's a new way for me but I kinda like it. All the supplies & links to product are below. 
 

Stamp your focal image in archival ink. This cute cupcake stamp is PaperArtsy by Jofy. Perfect for any celebration. Using the new Lavinia Ink pads or a die based ink put some on your palette with a small spritz of water. Take a water brush & simply water color the image. Mixing these ink colors also gives you a larger palette as you can see in my video. For the frosting only the lines were colored.
 

Once the image was completely dry adding some chunky emboss for the frosting seemed logical. Crystal Glaze emboss by Andy Skinner has all sorts of mixed chunky goodness. Different blues, greens & copper it is very dynamic. Use a paint brush & embossing ink put on your palette. Try & avoid the lines of the frosting image but you can always use a paint marker to add them back in as I did. 
 

Both my focal image & the card Using washi tape is always the right answer. When adhering my paper crooked the bottom of the paper was torn so adding a strip of washi was a quick fix! 
 
 
Next up let's add some stamping. After the image was adhered down with double sided tape, multiple stamp "celebrate" quotes were made to give me some options. Darkroom Door Labels & Christmas sentiment stamp were perfect. My quote was easy to find using Art By Marlene's sticky quotes. Now we are getting somewhere.
 

Time to add some background stamping! Sometimes I do this at the beginning of making my background but today it was done after the card was almost complete. To keep the images from being to dark they were stamped once on card stock & then stamped on my background using lighter pressure. Bonus is left over collage fodder. A few different stamps by Seth Apter worked well. 


That is it! My card is complete & ready to be sent. I actually think I will put it in my Photo Journal with pictures on the inside of the card, from this years family birthdays. Thanks so much for joining me today. Read below for the prize info, the supply list & the link list. I hope you get a chance to get inky! 

Supply List
Of course, it wouldn’t be a birthday celebration without prizes! Topflight Stamps is giving one lucky winner a $100 Gift Certificate to the store. But wait, there is more, each stop on the hop has an additional $25 Gift Certificate up for grabs for some lucky commenter. For a chance to win, make sure to visit every stop on the hop and leave a comment by March 29th. Winners will be announced on the Topflight Stamps blog on March 31st. Good Luck!
 
***this contest is closed my winner of $25 is #15- Deb Bacon
 
Follow along here and if you get lost you can always go to the Topflight Stamp Blog. 

Monday, October 26, 2020

Thank You Card with Darkroom Door

Hello Everyone this Mixed Media Monday we are making a Thank You card using Darkroom Door from Topflight Stamps! I created a card that makes a nice impact using only 3 steps. It is fast & fun to make multiples of these. 


Best part of this card is, it would be easy to change them up just by changing the color palette & filmstrip theme. Darkroom Door has some fabulous new Filmstrip stamps, so there are lots of options. All the supplies will be listed below.


Start By Stamping 

To get the background going simply use different inks on your stamp pad, mist with water & stamp. I did this a few times with the same inked stamp & choose one that was more faded. This technique is called "stamping off'.  Darkroom Door has many Word Block stamps so it is easy to make cards for all sorts of occasions. 
 

 Yes Embossing!

Using some embossing to make the frame stand out works really well. It is a quick way to add some texture too. Love this Spiral Notebook frame. 


Focal Image 

Lastly the Paris Filmstrip was stamped on some parchment looking paper. 2 of the images from the strip were cut out & adhered to give my card that pop of interest. I love how detailed these stamps are. I chose not to use emboss so as not lose that look.


I may have to get this one, called Butterflies. It has so many possibilities!


You could pair it with the butterfly background stamp. They would be great using the same technique as my Thank You card. Here is used in this brick making project.

Supplies: 

Wednesday, January 1, 2020

New Eileen Hull Display Stand Release!!!

Happy New Year & with it brings new Eileen Hull die cuts by Sizzix! This whole month the team will be showing the newest dies with brilliant ways to use them! First up is the Display Stand. This is an XL die that works in the Big Shot, Vagabond... It cuts in one piece & can be flattened to send in the mail or for easy transport.


I really wanted a stand that could have multiple functions as the winter months go by. This way I can change what it is holding to fit either a calendar, photo, canvas or even decorative tags & projects. 


Let's go!!! The stand cuts & scors and makes for pretty easy assembly. I ran mat board through 1st. Then I added adhesive to the part that will be the back stop & the ledge using double sided adhesive & foil.


I ran this through a snow embossing folder. This folder is discontinued but you may already have it or could use the newer 3-D version for a similar look. 


Whatever you decide to cover you stand in, paper, ink or foil remember that the edges will show unless the edges are wrapped, colored or inked. I did a bit of both. Some of the edges had foil wrapped around the edges, some were inked with a silver paint pen. 


This was my 1st time playing with the Display Stand, so I have some tips for you. The front of the stand is a bit smaller than the back so you will need something to cover the mat board or your stand will have a white edge. I added glitter washi tape. This made the perfect edging for my project.  


I loved the color of the foils I choose but decided to add some purple to the Lapis Watercolor foil. This is also a great way to cover any mistakes that may have occurred along the way.  


If you would like to see the basics of playing with foil & adhesive you can check out my video here. 


To assemble the stand simply bend at the scored areas. Take the w shaped flap & bend it then push it through the gap. 


Keep pushing the piece through sliding the "W" portion pushing the stand piece back, 


until the middle of the W clips into the tabbed hole. 

Then simply bend over the flap front bringing it down toward that same gap. It will clip into the base quite nicely.


I added a lip to the edge of the stand so any paper or tags would easily stay put. This also gave me a place to add my flocked snowflake. It was made with layers of card stock, adhesive & flocking then simply die cut. The layers were too thick to cut through but made for a very cool embossed look. I didn't use the flock the way it is intended as I thought the die too delicate to mess with.  

I hope you get a chance to check what my teammates have come up with & be sure to check back this month as it is reveal month! Creativation is mid January so we will be up to all sorts of crafty shenanigans. Until next time- spend some time getting inky!

Supplies:
Eileen Hull Display Stand 
               - Double Sided Adhesive
Snowflake embossing folder
Foil Transfer Sheets in Lapis Watercolor & Rainbow Shattered Glass. 
Flock Transfer Sheets in Blue Sky
Stamps by Darkroom Door
Embossing by Emerald Creek 
 *Affiliate- some of these companies have given me product to use, play & experiment with. The ideas are my own but I tend to work with companies whose products I like so enjoy the inspiration.


Wednesday, February 28, 2018

Experiments with Marabu Mixed Media

Hello fans of Mix Media, I am inking with Marabu products today. The Mix Media Monthly team got to play with a few of their products this month. I decided to make a few art cards while experimenting. To see how these products perform read on! If you would like to win some see the challenge at the end of this post.


Here is Art Card #1, I will be posting a few more on my Instagram over the next few days so follow me over there to see what I come up with. https://www.instagram.com/karenbearse/


These are the products I was given. A stencil called Mandala, an Art Crayon in Sunshine Yellow, an acrylic Art Spray in Sunshine Yellow & Acryl Mousse in White (pastel paste). 


Acryl Mousse

I started with, (to me) the obvious what happens when the paste is used with a stencil? The paste is a gritty yet fairly smooth consistency. It held it's shape up well when scraped through the stencil. Dry time was 15-20 minutes for a thin layer, 30-40 for a heavier stenciled layer. I love the texture it creates.


Art Crayon

The best way I would describe this is- "if a Gelato & a Distress Crayon had a baby it would be this Art Crayon". Medium softness, water reactive with a good level of pigment, works better on a gesso surface. It is also "wipe proof" in 24 hours which is nice for layering. I did a test to see how the crayon would perform & was impressed with the results. This was just on card stock, it acted similar to the other products. I like how the pigment held up when water was added.  


I mixed a bit of the crayon with the Acryl Mousse & was impressed with how easily the crayon blended into the Mousse. The color saturation was also very good, ie: the paste did not just become a pastel color even though I did not use much crayon which indicates good pigment. Great way to color your mediums.

Art Spray

Billed as an Acrylic Spray that is highly pigmented, water soluble (when wet) with colors that blend. This I was very interested to play with as most sprays are watercolor & re-activate when water is added. Thus less desirable for creating layers. I found the spray went on easily with very good coverage. The color was bright & when water was dribbled while still wet, I could create water spots. Bonus when I dried it with a heat gun the color did not budge, even with a wet paintbrush and scrubbing. 


Let's Put Them Together

What happens when we put them together? I took my stenciled image & scraped the Acryl Mousse through it, let it dry. Next I added the crayon through the stencil on another part of the art card. The crayon blended easily through the stencil which was good. Using a baby wipe definitely helps this process. However I wasn't overly fond of the design I had created. User error!

I decided to blend out the crayon which was very easy to do & using Art Spray, misted over the stencil paste image. As it is an acrylic spray it did as expected which was to completely cover the white paste. 


Deciding that the white paste looked good, it was a simple fix to put the stencil back & add another coat of the mousse. I was surprised that the mousse stayed a perfect white, normally the spray color underneath bleeds through. That is the advantage of the acrylic spray. When dry it is fixed with no bleed through-hum.... 


Overall I thought the products performed really well. Really love the acrylic spray and the texture on the paste! Remember to hop over to Mix Media Monthly & participate in the challenge & you can win a prize package from Marabu Creative!

LinkWithin

Related Posts Plugin for WordPress, Blogger...