Showing posts with label decoart media. Show all posts

Thursday, July 27, 2017

Cute Snowman Envelope with Tag at Topflight

Hello Inky Friends, I am here today with a cute snowman vellum envelope that has a Christmas tag inside. The Topflight team are having Christmas in July & I got to play with Katzelkraft stamps. This will probably end up in my December Daily but it also might end up in my #the100dayproject. Don't you love having options?! 

Christmas in July with Katzelkraft
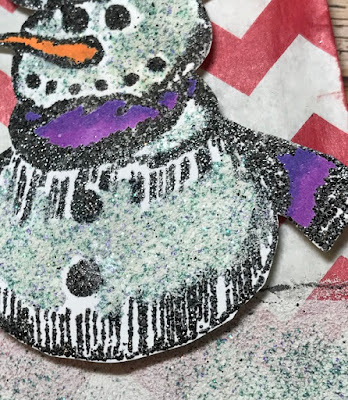
Starting with a tag & blending Distress Ink on it along with a bit of stamping. The tag was then embossed & the snowflakes were hit with Silver Spark Metallic Lustre. The envelope has this cute frosty snowman on it. I started by making a snow hill on the envelope with Soft Fallen Snow emboss by Emerald Creek. Then I did a couple of patches using Winter's Mistake. I love this heat emboss powder because it has a real fluffy, shimmery snow like look to it.
 
 embossed snowman with a purple & pink scarf
Snowman using Emerald Creek Emboss Powder & Marvy Uchida
Hard to get a good pic to show how fabulous & shimmery my frosty friend is. On a separate piece of paper I heat embossed him in Onyx Frost 1st which gave me the outline. Next I used the perfect medium brush to color in the snow bits and did a 2nd layer of embossing using Winter's Mistake. Hot Tip: brush off any white that gets on the black before heating to make your image clearer. If the white embosses on black simply color it with a marker to turn it back to black. I cut him out & then it was time for some marker action.

Blending Alcohol Markers

Here I am testing out what marker colors to use. These markers are alcohol based & great for blending. Monsieur Snowman was adhered with foam tape to give him a bit of dimension. 

 The finishing touches were a star paperclip & some fibers for the tag. Now my envelope is all ready to go!! Thanks for joining me today! I hope you get the chance to get an early start on your Christmas Merry!

Topflight Stamps by Katzelkraft :
Other Supplies:
  • Emerald Creek Emboss Powder 
  • Marvy Uchida Le Plumme Markers- O835, B700, BV736, BV738
  • Ranger Distress Ink- Fired Brick, Peeled Paint, Cracked Pistachio

Thursday, November 24, 2016

Let's Make a Necklace With Resin!

Hello Inky Friends, today we are making a necklace with resin! First of all Happy Thanksgiving to all of you In the United States. May it be filled with family friends, turkey & stuffing! 

I have a tutorial up on the Resin Crafts Blog using their amazing new 10 minute setting FastCast resin. This product is incredible and takes the long set time out of the game. 


Here is the necklace you can make, colorizing it however you choose. The beauty of this is if you need a necklace for say Thanksgiving dinner, whip it up in an hour and bam you are ready to go. Matching earring would be quick too! You can find the blog post here. Great for Christmas gifts too!!

Tuesday, October 4, 2016

Playing with Chipboard & Crackle Paste

Hello Blogland, today I am playing with chipboard & crackle paste over on the Southern Ridge Trading Co.. blog We are making this cute frame that is actually very simple! I am also entering this in the Frilly & Funkie Monthly challenge. The challenge this month is "going in circles" brilliant! The big question is... is this frame funky or frilly or maybe a little of both!


I used quite a few, fun chippies on this frame which has a picture of my daughter when she was just a wee toddler. We are also playing with crackle paste & doing a fun embossing technique. I hope you come along and play! 
***Excited to report this project won the challenge at Frilly & Funky. I will be on their blog as a future guest designer. Yay. 

Sunday, September 18, 2016

Guest Blogger for The Crafter's Workshop!

So excited to be a guest blogger for The Crafter's Workshop! I have been a big fan of their stencils for ever and now I get a chance to share on their blog! I have a tutorial up with lots of pictures so go check it out!!! This project looks complicated but I have made the steps easy so you can make an up-cycled brush, pen, whatever holder too!


I have another post this month so keep an eye out we will be playing with canvas!

Sunday, September 11, 2016

Seth Apter Journal Play

How do we create a grungy, metallic art journal page?

Seth Apter has a line of stencils, stamps, and die cuts. I have taken a few classes with him & not only are his products unique and different he is a super nice guy and really good teacher! You can buy his products directly from his shop or in your local scrapbook &  paper arts stores.


The start of the adventure...

  Let's start with corrugated cardboard. Inexpensive & easy to find! Add a coat of gesso, lots of stenciling using flexible modeling paste. To get an idea of what this will look like go here. Once this was dry it was time to add some paint. I used DecoArt Media fluid acrylics and painted the background in varying colors of blue/teal, using a bit of Paynes grey with the blues. Once that was dry some random stamping in archival ink gave nice interest & texture. 


Have you always wanted to learn how to shade? 

 Using a fine brush I painted darker on the sides of the raised areas, blending the paint with my finger as I went. This gave some nice depth to the images. Using a hard piece of foam I hit the high points of the stenciled areas with Metallic Luster, this is one of my favorite techniques! Just adds that wonderful, shiny, metal look that is nice & grungy. I used a quote stamp of Seth's as a focal point. His products fit into each other which is too cool, leaving all kinds of options. 


Time for some die cuts! 

I had cut a bunch of shapes from gelliplate papers. Choices.... In the end I was feeling circle-ish. I simply took the 2 inside circles from the Robo Ring die, placing one inside the other and cut. This left me with 3 circle rings and a middle full circle, which I did not use. I stamped on these with archival ink. I also cut the same out of cardboard- about as thick as a cereal box. The trick is to run the die cuts through the machine 2x- as in forward and back (leaving the sandwich in place so the dies do not shift) to cut this heavier material. 


After distressing the edges so no cardboard shows through simply glue down the cardboard circles with a strong glue. I left off the pretty tops to keep the excess paint from getting on them. Fill in the circles with DecoArts crackle paste. When dry the paint on the bottom layer shows through the cracks. 


Let's add a pop of color!

I used fluid acrylic which is enough to color the paste but once dry doesn't cover the crack effect.  Once that was dry I glued my gelliplate cut-outs on top. 


Adding paint on the inside of the circles gave it that depth. Almost done! Adding a key after wrapping a copper metal coil around it and a tag that was painted and stenciled with the word enter. Voila! The tag covered the back pages tab which I had found distracting.


That's it! This was a super fun page to work on, although with all the modeling paste etc. I would work on it, set it aside, work on it. Tip: have a few projects on the go to prevent staring at wet paste willing it to dry faster. You do want to let these pastes dry naturally for maximum effect. I hope you enjoyed this tutorial! Leave me a comment if there is a project you would like to see on my blog!  

Supplies:
Seth Apter:
  die by Spellbinders- Robo Ring
 stencils by Stencil Girl:
-numbers, story time & urban outsiders 
stamps by Impression Obsession:
-context, journal coins & pattern play
DecoArt Media:
 Fluid Acrylics- cobalt turquoise,  cobalt teal, paynes grey, 
quinacridone burnt orange.
 Crackle Paste   
Metallic Lustre- copper kettle
Americana Acrylic- Lemon Yellow
Ranger: archival ink- jet black
Daler Rowney- black acrylic ink

LinkWithin

Related Posts Plugin for WordPress, Blogger...