Showing posts with label mixed media monthly. Show all posts

Monday, June 8, 2020

Recycled Tag Art Using Darkroom Door


Hello Topflight Stamp Fans, let's make recycled tags!!! I was feeling Monday mix media-ish today & decided to pull out one of my 1000 tags from packaging that I save & hoard. I love, love tags and tend to stash them but today is the day to create using one as a base. I decided to play with more of my Darkroom Door Stamps. If you want some great inspiration their blog is full of it!
 

This tag has techniques that are great for an art journal page, full size planner page or art card. I wanted to add some photos from a recent mental health drive. It looks so peaceful but turned out to be quite the crazy adventure. There is plenty of room on the back to journal. *the supply list at the end of the post & if you go to my Topflight post there are pictures of the stamps with links too. Remember karenbearse code saves you 12%


Where To Start

My first job was to choose a tag out of my vast collection of saved treasures. Do you do save the packaging when you buy your scrappy fun? Do you wish you actually used some of the tags you saved? If you said yes then you are right with me!! If you save & use tags well done you. If you don't save at least some what are you waiting for LOL. Seriously you can also do this with a plain tag too!  


Gesso Is Your Friend


Step 1: I don't want to completely get rid of the images just push them back a bit. Plus it creates a more ink friendly background especially if the tag is a shiny surface. Gesso a few extra tags so you have some ready to grab. This is called batching, & saves time! If using a plain tag just stamp some random background images. 


Step 2: Add Random spritz's of Glimmer Mist. Even though I used red & green which can make mud just keep the colors a bit apart & you will be OK. Love how the spray picked up the texture of the gesso! Air dry or use a heat gun.


Step 3: Add some random background stamping with archival ink. That allows for more wet media to be used without worrying about smudging. 
Step 4: Lava Paste! Scrape some through a stencil & then use a heat gun to set the paste- it will bubble up and then harden when cool. If using a boarder stencil, use masking tape to isolate the part you want to use. Creates some really cool lava like texture. If you don't want it to puff up just let it air dry but it dries clear. If you just want white but not a lot of puff, heat for less time. This product dries fairly quickly which is great for mixed media. 


Batch Creating

Step 5: Darkroom Door has all these great sentiment stamps with multiple phrases on them. I stamped out a few, again so I have some ready to grab. 


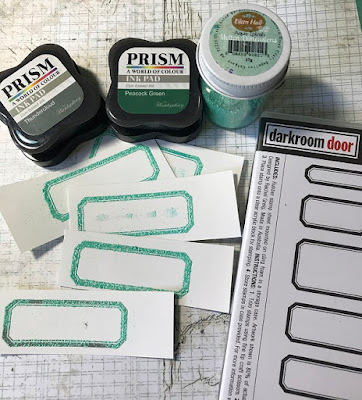
Step 6: The sentiments fit quite nicely in some of the "Lots of Labels" set. This is how I made my super cool quote. The label was stamped with pigment ink & heat embossed. 


Made a few of all the things cause...saving time! Dang should have thought to make multiple colors!!!


Step 7: Cut out the inside of the label & adhere the quote behind it. This way I can pop any quote in without worrying about messing up! 


Step 8:  Add ink to ribbon (Apple Green Glimmer Mist) & let dry while finishing the details. You can add photos, focal stamped image, collage image. For mine photos were added, as well as bling on the label box. I also added the hand from the label set. Why do I feel the need to get any set that has that hand? 


This tag is going to go in my planner. The back side has lined, distressed paper with a few stamps for documenting the story. Thanks for joining me today. I hope you are healthy, safe & have a little time to escape with some art.

Supplies:
For product photos with links.
Darkroom Door Stamps- Adventure (Sentiment), Lots of Labels, 
Texture Stamp- Alphabet
"                " Stencils- Grunge Borders 
Prism Ink in Thundercloud, & Peacock Green.
IndigoBlu Gesso
Glimmer Mist in Apple Green, Cherry Pie & Glamour Gold
Lava Paste
Eileen Hull emboss in Aqua Splash
Diamond Sparkles - Green

Friday, June 15, 2018

Eileen Hull Wrap Journal Project

Hello fans of Mixed Media, I have an Eileen Hull Wrap Journal project to show you today. We are at the mid-way point of our last Mixed Media Monthly... sad face. I hope you take the time to join in for the chance at winning a Passport Die! Hop on over to see the mid-month inspiration from my team mates. Thanks so much to Donna for putting me with this wonderful group of creative women especially Lisa Hoel our DT lead who did a wonderful job of corralling us every month!!


This project was made using the techniques from my last post. I will have a tutorial but right now I am scrambling with end of the school year events, sport cross over time as we switch from spring to summer & of course the regular parts of life that do not appreciate the a fore mentioned items! I used products from last months sponsor Emerald Creek & dies, stamps from the fabulous Seth Apter.


Our challenge should you choose to accept it ... & guidelines are here. 


The prize you can win is one of my favorite Eileen Hull Designs products!! This die is so versatile.  I have used this A LOT!! Please take the time to hop over & give the team some love!!! I hope you get the chance to get inky today!

Friday, June 1, 2018

Seahorse Wrap Journal with Eileen Hull

Hello fans of Mixed Media Monthly, I am showing you a seahorse wrap journal today. This month the team is playing with Eileen Hull Designs Wrap Journal by Sizzix! This is a brand new die that is making it's way to stores right now & should be available in June. I have some photos to show you this how this die works. I will have a full tutorial next month as my Inspiration Team post. Make sure to follow me so you don't miss it!


This is my luscious mixed media book. I used all the fun techniques!! As you can see this book has a cover that wraps around- hence the name. It cuts in one long piece & holes on the spine that punch out to make room for 4 signatures.


This month the challenge is Wrap it up. Sadly this will be the last month of the Mix Media Challenge. It has been only 1 term for me & I have loved working with these talented, talented girls. I know a few have been on this team for years so please take a moment to give them some love on their blogs. The prize this month is sponsored by Eileen Hull. The prize is the awesome passport die which I have made many, many books from. 


I hope you come & join us!! Also go over & check out what the rest of the team is up to!


Love adding beads & charms to these books!!!


This is how the book opens up. Plenty of room for a memory book, art journal, a place for art cards. Like Eileen's other books you can use elastic on the spine to just slip the signature in & out or thread the spine to make the book more permanent. 

 I like to do both, use elastic to give me flexibility & then when the pages are ready, thread them to make it permanent. Thanks so much for joining us at Mixed Media Monthly!!!

Tuesday, May 1, 2018

Experimenting with Rust Emboss & Emerald Creek

Hello,today we are playing with rust for Mixed Media Monthly's next challenge! The theme for May is... all things rust. We have one of my favorite companies as the sponsor, Emerald Creek! They are an awesome Woman Owned company that make incredible embossing powder. Kim Evans is the master designer, chemist, powerhouse behind & in front of the scenes. I am so excited that I get to work with her products. Emerald Creek's newest venture is a collaboration with Seth Apter. This amazing product called Baked Texture, is in my opinion the hottest new product from Creativation 2018. 
 
Let's Play with Emerald Creek!


Experiment with die cuts!

For my post today I started by experimenting with the Chunky Rust. That was my idea but I soon got distracted & had to play with a bunch of the powders. I ended up making more of a sampler. Yes I do like to use all the crayons in the box!  


I have a bunch of different design team posts & classes coming up & Kim sent me a nice plethora of her emboss powders. This is just a fraction of what is available so you need to check out them out!  Please look to buy at your local scrapbook store & support them 1st. Save the scrapbook stores!! If you don't have one or they don't carry the powders they just arrived at Topflight Stamps. Seth also sells them in his store along with his awesome line of stamps... You can also get them directly from Emerald Creek, along with stamps, decorative brads & charms. In the US go here, for Canada here.


May Challenge Rust!

The prize is 3 jars of Baked Texture & 3 jars of Emerald Creek emboss. I decided to play with some die cuts and started out with Rust in mind. I wanted to make something cool, grungy & different so I went with rust flowers. Using Eileen Hull's Heart Petal die seemed a good place to start. I simply layered color using the different emboss. 


Sadly I did not take many step out pics but I do intend on doing a video on the process. Here is the largest petal (cut it kinda catty wonkess but it worked as I trimmed it) I started with a layer of Patina Oxide.

Rusty, Shiny, Grungy Eileen Hull Flower

Here is my assembled flower you can see the large petal from above on the bottom layer. Next step was to add sprinkles of Chunky Rust but still letting some of the patina show through. The middle petal I started with Burnt Copper Leaves then added the Chunky Rust. The smallest petal has Rocky Road. I was going to add the rust on top but loved the look of the 3 together as is. I simply layered my 3 petals & adhered with a brad.

Time to Emboss


Embossing Tips & Tricks!

I do have some emboss tips for you. These powders have multiple layers of chunkiness. For example the Chunky Rust has little balls of fluff like substance. The challenge with this  when you heat with an emboss tool it blows the balls of fluff off or the top layers of cool chunkiness. You can heat from the bottom of the die piece but what if I am working in an art journal page? That is not an option. Here are the tricks.
  1.  Use an emboss ink pad or dabber to ink up your piece.
  2.  With a folded, clean piece of paper underneath , sprinkle your emboss powder on liberally & gently tap of extra. Using the paper return excess into jar. Be careful to keep powder colors separate or create a new exciting color!  
  3. Start your heat guns & let them run for 30 seconds-ish to get them warm.
  4.  Use a low blow heat gun like the Ranger Heat Tool. Hold over the piece, moving slowly to get the powders warm and start the process. This will heat the emboss enough to hold the chunky top pieces.
  5. Switch to the emboss heat tool & move slowly & watch the magic as your emboss turns to a shiny amazing finish.

Baked Textures


Shiny & Chunky! 

This is where my experiment went awry and I just wanted to test/swatch out the different colors. I took other pieces of cardboard cut with Tim Holtz's Gadget Gear 2 and heat embossed using the above steps. Cutting some of the gears allowed me to add more color. Emerald Creek has different categories of emboss like Seth's Baked Texture. There are 7 powders in this collection. 

Add some glitter to your emboss!

Here are 2 of the colors in the Allure category. They have some glitter which the camera doesn't really pick up. My last step was just putting the pieces together to make a fun embellishment. I hope you join us this month for our challenge. You can win 6 jars of this amazing powder!!! Join my blog & follow me as I will be working a lot more with this emboss in the coming months!!

Sunday, April 15, 2018

Mix Media with the Color Wheel

Hello Mix Media Enthusiasts, today we are playing with complementary colors. This month the Mix Media Monthly challenge is all about the color wheel. I have to say I have actually really enjoyed this challenge. It is making me use colors I would not normally pair together, & stick with 2 or 3. I tend to use all the colors all the time!


For my 2nd project this month I went with a mini art journal page. I decided to go with complementary colors yellow & purple. This page is 3x4" & is part of my #the100dayproject which I will talk about in a future post. If you want to see my mini pages I am posting them in Instagram almost everyday.


I hope you hop over to Mix Media Monthly & join in the fun!! You can win a prize!!! As always there is lots of inspiration to be had from my very talented team mates! 

Sunday, April 1, 2018

Mixed Media Monthly Organizer Book

Hello Inky Fans, I am here with a Mixed Media Monthly Organizer Book using the Passport Die by Eileen Hull. I want a book to carry with me when I go to the local scrapbook store that has a record of paint colors I own. I don't know about you but I am constantly buying the same colors and leaving the fun new ones behind! 


Here is my project for the month of April- wow time flies! I decided to use the Marabu Acrylic Mousse- Pastel Paste from last month. I wanted to see how it played with Dylusions Paints by Ranger. 


Here is the photo inspiration for this months challenge #47 as well as the explanation. I decided to go with split complement colors- so blue with the splits being yellow-orange & red-orange. 


I started by die-cutting my passport pieces using mat board, then scraping the paste through a stencil by RubberMoon. Once that was dry I spritzed the board using Dylusions Spray. 


I painted the raised portions with Dylusions paint & added some stencil work. In hind sight it probably would have been easier to tint the paste & apply it already colored. 


For the spine I added some stamping using paint. I also hit the high points of my stencil image in copper paint to add a little metallic look.


3 signatures were made using ruled paper. Each signature has a cover made with scrapbook paper. I can always add more paper as I build my lists.


I used hair elastics to hold the signatures. They work perfectly & are just the right color! Thanks for joining me today & I hope you join our challenge on Mix Media Monthly this month!

Wednesday, February 28, 2018

Experiments with Marabu Mixed Media

Hello fans of Mix Media, I am inking with Marabu products today. The Mix Media Monthly team got to play with a few of their products this month. I decided to make a few art cards while experimenting. To see how these products perform read on! If you would like to win some see the challenge at the end of this post.


Here is Art Card #1, I will be posting a few more on my Instagram over the next few days so follow me over there to see what I come up with. https://www.instagram.com/karenbearse/


These are the products I was given. A stencil called Mandala, an Art Crayon in Sunshine Yellow, an acrylic Art Spray in Sunshine Yellow & Acryl Mousse in White (pastel paste). 


Acryl Mousse

I started with, (to me) the obvious what happens when the paste is used with a stencil? The paste is a gritty yet fairly smooth consistency. It held it's shape up well when scraped through the stencil. Dry time was 15-20 minutes for a thin layer, 30-40 for a heavier stenciled layer. I love the texture it creates.


Art Crayon

The best way I would describe this is- "if a Gelato & a Distress Crayon had a baby it would be this Art Crayon". Medium softness, water reactive with a good level of pigment, works better on a gesso surface. It is also "wipe proof" in 24 hours which is nice for layering. I did a test to see how the crayon would perform & was impressed with the results. This was just on card stock, it acted similar to the other products. I like how the pigment held up when water was added.  


I mixed a bit of the crayon with the Acryl Mousse & was impressed with how easily the crayon blended into the Mousse. The color saturation was also very good, ie: the paste did not just become a pastel color even though I did not use much crayon which indicates good pigment. Great way to color your mediums.

Art Spray

Billed as an Acrylic Spray that is highly pigmented, water soluble (when wet) with colors that blend. This I was very interested to play with as most sprays are watercolor & re-activate when water is added. Thus less desirable for creating layers. I found the spray went on easily with very good coverage. The color was bright & when water was dribbled while still wet, I could create water spots. Bonus when I dried it with a heat gun the color did not budge, even with a wet paintbrush and scrubbing. 


Let's Put Them Together

What happens when we put them together? I took my stenciled image & scraped the Acryl Mousse through it, let it dry. Next I added the crayon through the stencil on another part of the art card. The crayon blended easily through the stencil which was good. Using a baby wipe definitely helps this process. However I wasn't overly fond of the design I had created. User error!

I decided to blend out the crayon which was very easy to do & using Art Spray, misted over the stencil paste image. As it is an acrylic spray it did as expected which was to completely cover the white paste. 


Deciding that the white paste looked good, it was a simple fix to put the stencil back & add another coat of the mousse. I was surprised that the mousse stayed a perfect white, normally the spray color underneath bleeds through. That is the advantage of the acrylic spray. When dry it is fixed with no bleed through-hum.... 


Overall I thought the products performed really well. Really love the acrylic spray and the texture on the paste! Remember to hop over to Mix Media Monthly & participate in the challenge & you can win a prize package from Marabu Creative!

Thursday, February 15, 2018

Tag Fun at Mixed Media Monthly

Hello Inky Friends, I have a post over on the Mix Media Monthly Challenge Blog today. We continue to play with hearts & love! Come join us for a chance to win $25 from Topflight Stamps. 


 I made a tag for my on-going #the100dayproject. This is way out of my normal style but I kinda like it & did get to use up some of my stash.


Here is the inspiration this month. We are playing with lots of red & hearts for February.


I added some gesso to start, this tag was the back of a resin tag. The gesso helped to give it a good foundation. I knew I wanted to add some collage elements so this is where my process started. 


Next step was to emboss. I stamped with Distress Oxide & then covered it in emboss powder. I like using Distress Oxide, it is great for embossing & that way if the powder comes off the image is still colored. 


The Silverster Kracher emboss color by Emerald Creek is red mixed with white.


This stamp is from a set by Carabelle Studios,  Steampunk The Butterfly Effect. 
Love that Steampunk set!


I continued to build my tag. More hearts were definitely needed. I used 2 colors of Distress Ink on the hearts. Picked Raspberry & Wilted Violet. 


Side bar: as I was stamping I put too much ink on my stamp so I stamped off on my agenda. This gave me an idea, to stamp over the image in black slightly off from the 1st image. Kinda cool. 


Here is the set the heart came from, that eye is pretty cool too. This set is also from Carabelle Studio called Mirror of the Soul by Birgit Koopsen. 

Time for more... I find sometimes projects go through a case of the uglies. The trick I use is to just keep adding until you find your way. In this case I added some shading & a quote. 


Then I added bling & a stacked flower. Now I may be overdoing it but of course I just kept going. 


I added some gears with star brads, and shadowing around the ephemera. Ok now I am done! Thanks for joining us at Mix Media Monthly, I hope you play along!!

LinkWithin

Related Posts Plugin for WordPress, Blogger...