Showing posts with label fresco finish paint. Show all posts

Monday, July 5, 2021

Art Card with Seth Apter Products

 Hello, fans of all things inky! I am here working with some of Seth Apter's latest release for Topflight Stamps. This release is with one of my favorite companies, PaperArtsy & includes 3 new stamp sets & 4 new paints. *If the products are sold out on Topflight, simply click on the "email when available" button on the left side of the Topflight Stamps site to be notified when they are back in stock.


Decided to continue my journey into art card/pockets. This time I pulled out an art tag that was made a bit ago & created a companion pocket. It will go in my latest junk journal & made me very happy to create a home for this funky cool tag. If you want to check out the tag tutorial you can find it here. There is also a video so you can play along!

*** I have also changed my email subscription to Follow It. This is just general housekeeping but you should now receive my blog notification from them. If you didn't get this post in your in box be sure to check your spam folder & add "Follow It" as a contact. Also if you don't want to miss a post just add your email to the box on the right of my blog to receive them in your inbox! 


Here is a video for you!! Play along with me as I go through step by step to creating this mixed media card or pocket! This would also be great as a cover of a journal. Right let's get to inking!! I made 2 backgrounds & you can see them in the video.


Step 1: using the new colors (Fuzzy Cactus, Aquave, & Desert Bush) of Fresco Finish paint & a brayer, simply roll some paint onto card stock. 

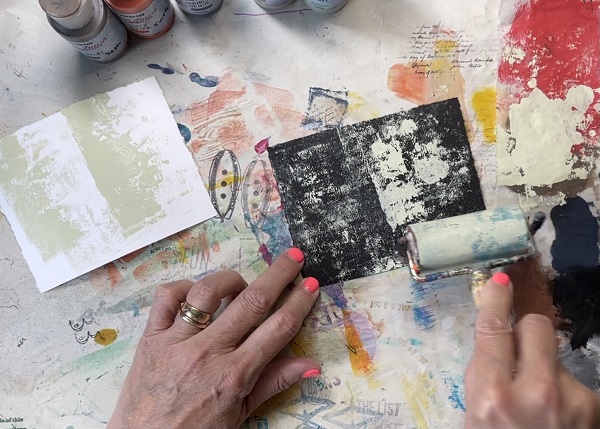
White & black card were used to give me an option. In the end I went with the black card stock piece so the photos may be a bit different but the technique is the same.

Step 2: Add some stencil work. This was done using Mud Splat & Double Denim with a cosmetic sponge. Use a deli paper as your palette, then reuse it in your journals. You will see that is how I added my title below.  

Step 3: Embossed images add that fabulous pop of dimension & shine. I pull out my swatch book to help decide what colors to use. So handy. 

These images were added with stamps, wow embossing pad & 3 colors of powder. Crusty Copper (circle), Blue Moon & Sea of Tranquility. Great names for powder too, plus very accurate as far as a description goes. 

Step 4: Using a piece of junk deli paper from my stash, the quote was stamped in archival ink. The ink needs to dry for a minute then the piece was torn out & decoupaged to my card. Love that pop of color.

Finishing up. The edges were sew with my machine in sort of a sloppy, mixed stitches kinda way.  

Lastly the stencil images were inked & smudged to help add some dimension. White ink pen was also added to the embossed images. Just helps them pop. Thanks so much for joining me today!! I hope you check out my YouTube video, subscribe & play along. Have a great inky day!

Supplies:

Monday, June 21, 2021

Make It an Art Card or a Pocket!

 Hello Inky Friends, today for Topflight Stamps, we are making an art card or a pocket element. I have been working on Junk Journals lately & am finding fun additions to pop in there. This card can either go in a collection or be added to a card stock background & turned into a pocket. This week the team is playing with Stamperia, so I used their stamps as my focal image. Feel free to make the same card using your favorite images.*Affiliate- some of these companies have given me product to use, play & experiment with. The ideas are my own but I tend to work with companies whose products I like so enjoy the inspiration.  **some of these links are affiliate, I receive a small percentage from the company at no cost to you. This helps me deliver free content! 


Here is my card, the inspiration for this page was the quote I found in a newspaper "encourage acts of kindness" something I am striving to do more. It is so easy to get busy leaving no time to help others who may be struggling. When times are stressful it is also a good idea to take your eyes off yourself. Makes me realize we are all going at it rough sometimes. 


I have a video for you too! This is a play along with me video so I hope you have the chance to pull out some supplies & make an art card. 


Step 1: This card started as a 4x6 piece of scrapbook paper. German book paper & another light scrapbook paper were torn & adhered with a glue stick.

Step 2: Next step was to add some stencil work with watered down Fresco Finish paint. I stuck to warm colors. 


 Step 3: Stamp the focal image with archival or waterproof ink. 


Step 4: Watercolor the focal image using watered down Fresco Finish paint, & cut out. Excess paint can be put on spare paper & used with stamps or as back ground pieces. Using cool colors or the opposite of the background helps the image pop.


Step 5: Add the focal image again directly on the background a few times. Also some random stamping was done with the driftwood to add texture.


Step 6: Add the sun stamped image. Originally I stamped directly on the background but the image didn't show up well. So it was re-stamped on white card stock, cut out & glued using Cosmic Shimmer Glue. My quote was cut apart, distressed with French Navy Prism ink & adhered

I found the background colors were overpowering the focal images so a light wash of watered down gesso was added. This helps keep the images intact but knocks them into the background a bit. To make up for the loss in color some mark making was done to help the background stand out just a bit. Pen was used & smudged to create shadows. 

Thanks so much for joining me today, I hope you have the chance to play along!

Supplies:


Monday, June 7, 2021

That Time I wanted to Play with Crackle Paste

 Hi Arty Friends, 

I was starring at a blank piece of paper wondering what to do for my Topflight Stamps blog post when it came to me. Crackle Paste. Yup that one thought, as I had nothing else to go on I went with it. Let's see where it led me. *Affiliate- some of these companies have given me product to use, play & experiment with. The ideas are my own but I tend to work with companies whose products I like so enjoy the inspiration.  **some of these links are affiliate, I receive a small percentage from the company at no cost to you. This helps me deliver free content!


This is my finished art journal page. I so miss the ocean & going to the beach. We try to go every summer but the summer of 2019 we only got 1 1/2 days in. Little did we know that covid was going to come hammering down. Creating a beach drought so to speak. 

I started with a stencil & the crackle paste, simply scrape some on with a palette knife. My paste is kinda old & didn't go on well. I added some water to see if that would help. While that was drying I pulled out some Fresco Finish paint.

Added some paint to get some color down, just with a dry brush. Some of the paste peeled off as I was laying down the color. 

Hum let's see if we can try a solution to the peeling crackle paste. I did a second round of the paste but 1st added a layer of decoupage glue, while it was still wet did another round of the crackle paste through a stencil. My thought was when the glue dried it would stick the paste to the paper. I also added more water & stirred the paste up, it also was a closer consistency to fresh paste but I thought the crackles might be lost in the process. 

While that was drying the focal image was stamped on card stock, & cut out. It is a Stamperia set called Octopus. The backing of these stamps is very different so they are flexible and do not adhere to an acrylic block.  Simply run a bit of adhesive on a block if you want to use it that way. I also stamped the quote in French Navy ink. Some random stamping in Thundercloud with the background image from the same set was next. It just adds a bit of interest. 

Next up was some seaweed courtesy of the Lavinia, Sea Flower. It was stamped in Rainforest Green, Ocean Spray & Cinnamon Swirl. It didn't show up as well as I liked. So the image was re-stamped in French Navy. That worked well & made it look like a field of seaweed with the lighter images creating depth. 

The glue under the paste tricked worked with the newer image staying put nicely. Even with the water added there was still a lot of crackle effect so that was a nice surprise.

Added a bit of washi tape, always good to add a pattern. 

Next up was some stencil work with some acrylic paint. Used Pixie Spray to help the stencil stick to the card stock while I worked. 

With a paint brush & some warm colors I painted inside the stencil.


Before the shapes were cut up some random stamping was added. Once dry the shapes were cut out & doodled around. The nice thing about this technique is you don't have to be good at drawing to make something cool! In hind sight the doodling should have been done after the circles had been adhered. 

All that was left was assembly. I put the pieces together and this is what I came up with. The following night I woke up in the early morning with the idea that the bubbles were not great & what I needed were fish! 

Back to the drawing board! Painted on a piece of deli paper with random blue Fresco Finish. A color similar to China, Blueberry & South Pacific I did 3 spots of plain color & then one big swatch mixing the colors using a dry brush.


Then I added some fish from the PaperArtsy set ESC10. It may be out of stock but there are plenty of fish stamps if you go here. The deli paper fish gave the journal page a bit of something extra. Well that is it for this week. I hope you give this tutorial a try & play along.

Supplies:

Monday, April 12, 2021

Topflight Stamps Mixed Media Art Journal Page

Hello Mixed Media Fans, this week we are making an art journal page for Topflight Stamps. I hope you join me & create your own sunny page! 

I am doing another page in my Art By Marlene Journal and it is kind of happy & sunny. Spring is starting to actually show its warm face in our area. I added a photo after the piece was finished. I love adding photos to my art journal page it adds to the story & helps document what is going on.


Start with some paint & a stencil. Using Fresco Finish paint and a dabber to create a fun image. I chose colors that daisies come in but remember this is art so the sky's the limit. The big flower was made using the Daisy Daisy stencil. As is usual there is a supply list below. 

Next, stamped the cute gnome directly on the mixed media paper. "Ernest" was painted with Prism ink & water. The shroom was stamped on card stock & painted with wet Fresco Finish paint.


I love using ink as paint. Really adds potential to your paint supply! Simply stamp a bit on your craft mat, add a spritz of water & you are good to go.
 

 Finally some random stamping around the edges, love using these multi image stamps! This is a really large stamp with lots of images on it! Got to love that French Navy ink. Really pops off the page.

 Very interesting how the image is sort of buried into the flower and creates dimension. Thanks so much for joining me today I hope you have a chance to create an art journal page! Hop over to Topflight Stamps to see pics of the stamp sets...

Supply List:

Monday, February 1, 2021

Art Journal Page to Chase the Blues Away

Hello Inky Painty Fans! For this Mixed Media Monday I have an art journal page for you. It has been a long time since I finished a larger page & it felt good to get back to it! This week is anything goes at Topflight Stamps so let's play with a few fun products. *Affiliate- some of these companies have given me product to use, play & experiment with. The ideas are my own but I tend to work with companies whose products I like so enjoy the inspiration.  **some of these links are affiliate, I receive a small percentage from the company at no cost to you. This helps me deliver free content!


I got a new art journal from Art By Marlene & one of the cool things is it is a 3 ring binder. The paper is a nice 300 gsm multi purpose paper which measures 6 3/4" x almost 9".  


The outside is vinyl & there is also a zip pocket on the inside to hold your ephemera, cut out stamp images or paper elements pad. I love the vibrant colors of these paper element pieces.

Design Time.  

I started by choosing which paper element pieces I wanted and placing them on my page. Taking a photo at this stage is always a good idea to remind you of placement.


Let's Paint!

Next up was dry brushing Fresco Finish paint directly on the paper. I used a palette of blues, yellow & green. This will help the hot colors of the diecut pieces to pop. 
 

Using up the excess paint on a 2nd art journal page means that I have a background already started for next time. 


Adding Some Stencil Work

Using some fun Darkroom Door Stencils and a dabber to add some background interest, was up next.  I kept the color's similar to the background but I did want the stencil work to show a bit. Again used up the extra paint by adding some stencil work, this time in my daily journal.


Doodle Time! 

I really love the circles from the Polka Dot stencil so doodling helped bring out the design a bit more. One of the bonuses of Fresco Finish paint is you can use a pen right way without damaging the pen. Most acrylic paint would need 4-6 hours to dry before you could draw on it.


Rebuild the Elements

Now it was time to add my elements back in & adhere them to the page. Love where this is going so far! The great thing is, these elements are already cut you just have to pop them out of the paper pad. The tea package was made into a pocket by taping the bottom & sides only. I love using everyday ephemera in my work to remind me of things like the tea I was drinking at the time. 


Add a Title

Now it was time to add a title using my favorite new alphabet stamp set. The words were stamped on white card stock & cut out. The letters have lots of little details that would get lost by fussy cutting. There is a trick so you won't lose these. This is a great technique to use for example when you don't want to cut out bee antenna, or a birds legs. 


Simply stamp the images directly on the background of your art journal page. Now the little details are there. Just adhere the cut out pieces on top. For the letters hot tip the top of the letters have depth & the bottom are just a line. This helps for letters like i or o so you don't stamp them upside down. 
 

The result is very subtle in this case but adds depth & the little details without a white edge showing.
 

Lastly I used the same color palette to make up my tag. More of the paper elements were used as well as a few quotes from Marlene's Sticky Quote pad. 
 
  
The tag was coated in decoupage glue so the elements will not pull off when it is removed from the pocket. Don't you love that cute little fish?
 

 The bonus is every Yogi Tea tag has a quote on it. I choose "happiness is an accomplishment" which is a very perfect quote for times like these. That little tag peaking out of the tea pocket makes me so stinkin happy!! Thanks for joining me today, I hope I inspired you to get some paint on! You can see pictures of the products in my Topflight Stamps blogpost.

Supplies:

LinkWithin

Related Posts Plugin for WordPress, Blogger...