Showing posts with label mixed media. Show all posts

Wednesday, May 3, 2023

Card Case Set Sail Album for Eileen Hull

Hello Blogland, I am here today with my Card Case Set Sail Album for Eileen Hull by Sizzix. The team is playing with the theme Die Cut Mania, using different substrates & tips, tricks for using your dies. If you want to join in make sure you share your project in the Eileen Hull Fan Club on Facebook. As always there is a supply list with links below. *Affiliate- some of these companies have given me product to use, play & experiment with. The ideas are my own but I tend to work with companies whose products I like so enjoy the inspiration.  **some of these links are affiliate, I receive a small percentage from the company at no cost to you. This helps me deliver free content!


I love working with acetate sheets & the Score Board dies cut them like butter. Starting with the brand new Card Case die was the way to go. I made a gate fold album with it & a unique removable album that makes working in this book much easier. The inspiration for this project was the newest paper line by Heidi Swapp- Set Sail. All kinds of goodies in this book. So grab a cup of coffee & let's make an album!

For the cover I used the acetate paper from Heidi Swapps Set Sail Collection. It has a gold print on one side & silver on the other. I made mine with the gold. You will want to cut 2 covers. The tip with cutting a book cover from Eileen's die cuts  is cut one book cover with gold sail boats down toward the die & one with the gold boats up. This will give you a book cover with the same pattern on the left & right side of the book. I also cut a cover out of card board to use as a template. You will have to manually add some of the scor lines when working with acetate. 

Use the template to add the scor lines in, with a scor board. You will want to reverse the scor lines on the 2nd cover piece. You end up with an album spine fold on the outside of each piece, the spine middle piece do not scor as this will be a flat back. As with all Eileen's books there are many ways to put them together. 


Here is what the book looks like when put together. To make the front pieces line up for the gate fold, you will want to trim the spine in the back so that it only overlaps by about 1/4", then adhere the 2 pieces using Super Tape. 


Now to make the booklet. There are a number of ways you could do this. There is room for 2 booklets, one on each side. You could do 2 overlapping books like the gate fold I made here. Or the way I did it which was 1 book that will slide into one of the sides. I like the size of this book idea, page size is 7"x4.5" & it fits 4x6 photos nicely. 

 Heidi Swapps new line Set Sail is coming into stores now & I only could get a few pieces of the paper. When you get the individual 12x12 papers they are double sided. The paper pads are one sided. The good news is Heidi's papers from different lines work well together so I used the paper pads Art Walk, Old School & Sun Chaser as well. The page above is a side pocket which fits the tags & quote card. Added some stamping & the seagull sticker from Set Sail sheet.

The paper pads come in 6x8 size they are printed on one side & white on the other. Some are vertical & some are horizontal which means the papers ended up different sizes which adds interest & just plain fun. I used washi tape on some pieces to make a longer paper from 2 smaller pieces. Love the quote sheets, they make great tags & cards. This pocket was made from the Card Case die.

Also time to pull in Eileen's other dies like the Library Card which made a handy dandy envelope. The button is from the Card Case die, cut with paper & chipboard then layered to make a stronger element. It was used as the closure on the pocket.

Then the papers, pockets & inserts were assembled to make a booklet. Each page was folded and then fit into each other to make a signature. I like 9 to 10 folded papers to make a book. Once they were assembled holes were punched about an inch from the edges & a ribbon was threaded through.

Then corresponding holes were punched on the left side spine of the cover. The ribbon was threaded through and tied on the outside. The great thing is if I want to work on the book it can just be pulled out. 


When working on a transparency I like to double up the image. For example if I put a palm tree on the front cover I will sandwich another on the back side of the transparency. Same goes for photos or images which can sometimes get tricky. The great things with die cuts is they are easy to flip and get the mirror image. So sorry the palm tree from the set Tropical by Tim Holtz has been discontinued.


My final tip is to cut Impresslits using water color paper or heavy card stock. This can also be done with 3D Embossing Folders like Eileen's Crochet Mandala, then cut out. Paint with acrylic paint. Dry. Hit the high points with Luster Wax. I like using 2 colors so in this case I used the new color Charcoal & my stand by fav Rose Gold. I will be adding more photos from the inside of my book using more of Eileen's diecuts on my Instagram & Facebook Pages if you want to follow me on those platforms. Thanks so much for joining me today. Remember to check out Eileen's blog for links to my teamies projects! Now go get inky!!

Supplies:


Tuesday, December 6, 2022

December Roundup for Eileen Hull

 Hello Eileen Hull Friends! Can you believe we are well into December?? I cannot keep up with the flow of time & am just realizing that need to jump on the HoHoHo of the season! First it is time for our Inspiration Teams yearly roundup of favorite projects.  


Never an easy task to pick only 3, but that is the assignment. Here is my fancy photo with all 3 projects in it. Apparently this year I was really into color & also under developing my photos cause they all seem very light!


#1: Here we go in order of calendar release with the link included.. drum roll please. Gustov Klimt Box which was one of my Chapter 1 release projects. This was using Eileen's Book Box.


 #2: The Four Seasons Journal which was the release for Eileen's Maker Forte stamps in February. This also became a class at my local store in which we made a booklet every month to go in it. Started with the Full Size Journal, adding in the Snail Mail die & stamps. This one was very satisfying to complete.


#3: The Travel Journal which is also on it's way to becoming a class in a bit of a revised fashion. Love all the mix media on this one. Also lots of Eileen's stamps and quite a few of the smaller dies. Yes I love making books!! Thanks for a great year of support from everyone. I hope you have a fantastic holiday season & get to spend lots of time with friends & family. Cheers!

Tuesday, April 5, 2022

Eileen Hull Chapter 2 Sizzix Release Hop!!!

 Hello fans of all things die cutting. Today is the day for Eileen Hull's Chapter 2 Release with Sizzix!! Always lots of excitement. This release is all about a new to Eileen base product, shadow boxes. I have zero experience making these so let's see how I fared! 


This is just the sneak peaks but tutorials will follow. I also made some really good mistakes which is great because I will show you how I fixed them so you can too. Just stay tuned for the tutorials. 

Here is the graphic for the blog hop, Facebook Live. I hope you can join us on Eileen Hull Designs page as the team shows some of the projects live. Below you can see separate photos of my projects.


Box #1: My Hummingbird Photo Box was made with 49th & Market. This is a great paper line for making these shadow boxes as it is a bit heavier than most. There may be a surprise on the backside too!  

Box #2: Lacrosse Team Box was made to celebrate 2 of my kids in their High School Varsity Lacrosse success. They both wore #24 which was pretty cool. I have a 3rd box in the works these were surprisingly fun to make & can't wait to show you more! Follow the links below to get to the next post! You can always go to Eileen's blog to find all the links too!

Eileen Hull Designs << you are here
Pam Bray
Maggi Harding
Jennie Atkinson
Lisa Hoel
Karen Bearse
Tonya Trantham
Sue Eldred
Elizabeth Robinson
Jenny Marples
Madeline Arendt

 Supplies: 

Tuesday, March 29, 2022

Topflight Stamps Birthday Blog Hop!!

Today is the Topflight Stamps 5th Birthday Blog Hop!! I was thrilled to be asked back to help them celebrate, so thank you Donna. If you haven't been over to the website, it is a great place to get those hard to order (especially with overseas shipping these days) companies that are based outside the USA. The supply list is below.  Please hop along with us and see all the beautiful talent from this group of amazing designers! You should have arrived here from Erica Stranges's blog. If not, no worries, catch the details below. *Unfortunately due to new tax laws and the USPS limiting delivery areas Topflight Stamps is only able to ship to US and Canada right now.
 

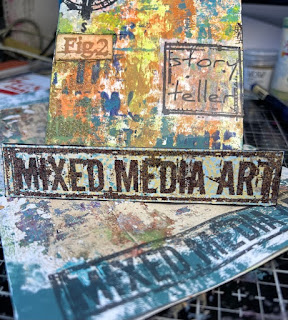
I decided to work with mainly Seth Apter products, one of my favorite designers & all around great guy. I really needed another phone stand plus these are so fun to make & very handy to have all over the house! They also make great gifts. The base of the stand is a Sizzix die cut by Eileen Hull. 
 
Here is the graphic for the Birthday Celebration!! Who doesn't love a sale? Time to stock up! Bonus fun there is more...
GIVEAWAY DETAILS
Of course, it wouldn’t be a birthday celebration without prizes! Topflight Stamps is giving one lucky winner a $50 Gift Certificate to the store. But wait, there is more, each stop on the hop has an additional $25 Gift Certificate up for grabs for some lucky commenter. For a chance to win, make sure to visit every stop on the hop and leave a comment by April 3rd. Winners will be announced on the Topflight Stamps blog on April 7th. Good Luck!
 

How about a quick tutorial? I will also share some awesome Gel Press wipe up prints that came about as I was working. You will want to cut 1 base out of mat board for this project. It comes together really easily.  Starting with Fresco Finish Paint & doing some wipe up to clean my press a bit. I like using a light color like Nougat, Vanilla or even a blue like Antarctic. If these colors are not available simply look for light colored paint. I brayered just a bit of light tone like Truffle on my board. 
 
 
Here is the wipe up print. A wipe up print is when you take your dirty Gel Press that has dried paint on it. Add a layer of paint & put your paper down. The idea is you want the wet paint to dry on the paper & the layer of dry paint so it will pull up. Keep rubbing until the paper is not as cold 30 sec to a minute? Depending on the paint you are using. 
 

You can lift up a corner to see if that dirty layer is being pulled up. Wait too long and the paper will stick to the plate. You can also just clean you plate with a baby wipe or hand sanitizer gel. Here is what my plate looked like after, there is still some paint there which can be cleaned up, sorry no before but you can see all the paint that is on the print. That was on my plate!
 

Next added some more color. You chose what colors you like to use. This was done just dabbing some color from the plate to the board. 
 
 
I have 2 Gel Press videos which will show you how easy & fun it is to create pieces which can be used in other projects or added to the mat board before you cut out your shapes. 
 

Now how about some stencil work. When using the press you will want to put your stencil face down so the letters are backwards. That way what ever you pull the letters will be in the right direction. Add the paint on top of the stencil, lift the stencil.


Press the board onto the stencil image in a few different places. This is one of my favorite Gel Press tricks. I show you how to do this in the video.
 

Here I am just building up the color adding Magic Moss paint from the press onto the board in different spots. Notice how it pushes the letter back a bit? Changes the color in spots. So fun! I am also pressing the 2 smaller pieces, you can see them in the upper right corner.
 

Here is my finished background. I also use the paint to stamp some images. Put a bit of paint on the plate, brayer it out & then dab the stamp in it. Stamp. Clean your stamp immediately with water & a rag or toothbrush. You don't want that paint to dry on your stamp. 
 

I showed the paints I used, if Topflight Stamps doesn't have the one you want just substitute it. Don't be afraid to play around with your color palette. Here is a close up of the stand put together. Hot Tip: wait until you finish building the main cover area before you put it together LOL.
 

Alright time to add more stamping. I did this in 3 ways. #1 stamping on tissue paper with archival ink, then using a paint brush to tear the image out. 
 

#2 was using embossing powder. Seth has 2 new trios out & I got my hands on one of them. Welcome to the family Just Deserts. I love swatching new colors, really helps when I go to design. 
 

I also swatched some Prism Inks. These were all done using French Toast. The original color is underneath- Wow see how this expands your color choices?! 
 

Adding the title Mixed Media using Mud Pie embossing. While I was working also added some images to those wipe up prints for art journal use. You can also see the tissue paper stamped with story teller. Love this set so many great images. 
 

To finish & protect the surface of the stand I used a varnish. If you like a matt finish you can go with Cosmic Shimmer. I like gloss so I used Liquetex Gloss Medium & Varnish. It starts out milky but dries super clear & glossy.  Hot Tip: Make sure your tissue paper images stay down, you may need to smooth out any bubbles that are created. Also if you board bows a bit don't worry it will be fine when dry & you can gentle bend it into submission LOL. 
 

Last here is my phone on the stand. Makes for such convenience. With so much of our lives on our phone having this mixed media stand just makes me happy!!! I hope you have a chance to get inky today. Make sure to check out the other makers & Happy Birthday Topflight!! 


Follow along here and if you get lost you can always start at the Topflight Stamps Blog.

Topflight Stamps

Kathi Rerek

Dina Kowal

Esther Asbury

Annette Allen

Jennie Atkinson

Rachel Kleinman

Connie Mercer

Charmaine Canham

Lisa Hoel

Jenny Marples

Cornelia Wenokor

Rachel Greig

Ericka Strange

Karen Bearse

Melina Dahl

Autumn Clark

Maria Willis

Angela Myhre

GIVEAWAY DETAILS

Of course, it wouldn’t be a birthday celebration without prizes! Topflight Stamps is giving one lucky winner a $50 Gift Certificate to the store. But wait, there is more, each stop on the hop has an additional $25 Gift Certificate up for grabs for some lucky commenter. For a chance to win, make sure to visit every stop on the hop and leave a comment by April 3rd. Winners will be announced on the Topflight Stamps blog on April 7th. Good Luck!

 
Supplies:

LinkWithin

Related Posts Plugin for WordPress, Blogger...