Hello Fans of Eileen Hull, very excited to be here with the special Scrapbook.com (SBC) release with Eileen Hull & Sizzix! The links will be at the end of my post. These products are available only at SBC. You may have seen my book with some of the elements covered when we did the Chapter 3 release a few weeks ago. Today you get to see the full cover. Photo credit goes to my son Caleb as I was unable to take the money shot! See below for all the details of the blog hop & this release!
Here is my Field Notes book with the new Scrapbook.com release. Stay tuned for the step by step directions coming in a few weeks. I will also be sharing individual shots of inside pages throughout the month on my Instagram & Facebook. Make sure you follow me there (links on the right of this blog) I share a lot of content.
Here is another shot of the cover of my book. The release includes the stars & moon die, the houses layered on this cover. Much more to see inside so stay tuned!
In Eileen's words... Introducing a new die collection designed just for Scrapbook.com!
You will find lots of ways to use these dies whether you like making
cards, journals or home decor. Each die coordinates with the set but
also stands alone, giving you good value!
The
Card Caddy is a ScoreBoards die, specially designed to cut and score
thick material like matboard, chipboard, leather, felt and fabric,
creating a sturdy base for other coordinating dies in the collection.
The Caddy assembles in minutes. Use the die to create a card box,
container for food gifts, holiday packaging or stationery, art journal,
planners and cards- all this from one die!
Each
of the three coordinating Thinlits sets fit perfectly on the box- cover
with paper or fabric and create a special box of cards for yourself,
friends or family!
Everyday
Tags & Labels includes 13 dies: labels, tags, snowflake, flowers,
and stars- everything you need throughout the year to add to gifts,
cards, tags and journals!
The
Floral Silhouettes die has 12 elements: floral borders and swag,
individual layering flowers and centers and delicate foliage. Make the
flowers in layers, or cut from watercolor paper and paint each flower by
hand! Flowers work on everything and these are the cutest shapes!
The
Starlit Village & Card Panel die set comes with ten dies: two rows
of small houses, individual houses, moon, star cluster and Warm Wishes
sentiment. These dies make a gorgeous Christmas village- or paint a
pastel row to make beach cottages- it’s all up to you!
These dies are only available atscrapbook.com so buy while they still have some! Schedule for featured dies: Week 1 Card Caddy Week 2 Starlit Village & Card Panel Week 3 Floral Silhouettes Week 4 Everyday Tags & Labels
I hope you join us as we celebrate over the next month. Eileen will be doing some special lives in the Eileen Hull Fan Club on Facebook. I will have lots of content in August using these dies so wohoo! Also make sure you follow SBC on their social media platforms. If you sign up to receive emails you get notified of all the good stuff, including new releases, sales & more!
Links to new diecuts: ONLY AVAILABLE AT SCRAPBOOK.COM
Hello Topflight Stamps Fans!! This week the team are playing with darkroom door Background Stamps. If you saw all the awesome Christmas in July 2 weeks ago we all used the same Snow Flake stamp as our background- so funny we had no idea!! *Affiliate- some of these companies have given me product to use, play & experiment with. The ideas are my own but I tend to work with companies whose products I like so enjoy the inspiration. **some of these links are affiliate, I receive a small percentage from the company at no cost to you. This helps me deliver free content!
I
have been working in my garden & have wanted to add some
painted rocks for awhile & this seemed the perfect time to do
it. I am so happy with how they turned out. One of the great things
about this technique is you don't have to be able to draw to get a very
cool painted rock.
Here is a sample of some Background Stamps that darkroom door has available. So much bang for your buck! You can use the whole stamp as I have done on my rocks, cut out individual images or use it as a background to create interest.
Let's Get Painting!
First I picked out a rock & a brick that I was going to work on. I started by washing them & letting them dry. Next step was a layer of white gesso. While that was drying in the sun I prepped the background. Simply stamp on tissue paper with Archival ink. Using decoupage glue paint the rock and adhere the tissue, paint a layer of glue on top as well to seal it.
Next up let's add some color! I used an alcohol ink based marker to color the flowers. Some of the flowers were simply one color, others had the darker color on the inside & the lighter color pulling to the outside. As my base is decoupage glue the marker has no problem grabbing on to the slick surface.
I also liked using the alcohol markers because I wanted something permanent. As these rocks will be outside in the elements another layer of decoupage will be necessary so I didn't want the colors to smudge. Yet another bonus of using alcohol markers, is the transparent color. The stamped image is still visible, letting the images sing.
Add A Quote...
I love quotes and a rock is the perfect place for one. It may encourage the viewer to pause to read and really enjoy your creation. For my brick I decided to keep it simple with just the image & quote. The quotes were done on card stock the same way, in Archival, inked and glued.
I am moving my rock around my garden trying to decide where it should live. Kinda like it sitting with my hydrangeas!
Here is the last example of using the Snow Flake background stamp with embossing powder. You can see this post here or just keep scrolling it is the next post down. If you want more examples take a look and see all the different ways to play with these awesome stamps. Start here to take a look. Then go to older posts to see more! This is a great way to see how one stamp can look so different! Remember to check back on the blog this week to see how my teammates play with these stamps!
If you want some snow flakes there is also a winter sale going on!! Time for some early Christmas shopping perhaps? That is it for today, I hope you get a chance to gather some rocks & get inky!!
Hello Stamping Fans, today I have a mini art journal or art card for Topflight Stamps. I hope you are staying safe & healthy & taking some time to do some art. I am finding even if I don't feel like it once I get going it does really help. The stress & uncertainty that I know we are all facing, gets pushed away when you art. Even if you don't feel like you can do something please just sit down with whatever your favorite product is and play it really does help.
*Affiliate- some of these companies have given me product to use, play & experiment with. The ideas are my own but I tend to work with companies whose products I like so enjoy the inspiration. **some of these links are affiliate, I receive a small percentage from the company at no cost to you. This helps me deliver free content!
Along those lines there are, as I said many artists giving generously of their time doing Facebook or Instagram lives. I am trying to focus on a few of my favorites as I do my Mixed Media Monday's Post. It really is a great way to get that creative juice going. This week is Seth Apter. If you ever have a chance to take a class from him do it! He is a great teacher & super nice human being.
This card was inspired by one of Seth's recent Facebook lives where he played with his new embossing powders. Topflight Stamps happens to carry both the stamp set & his embossing powders. I simply painted the background with a few Fresco Finish paints.
This art journal page uses Seth's newest PaperArtsy stamp set release called ESA 13. I embossed the circle with Sea of Tranquility on card stock.
The background once the paint was dried was embossed with Crusty Copper using the cool letter like background stamp. The journey stamp is the title & stamped with Archival Ink in case color was added it would not smear.
To finish it off a Tim Holtz paper doll was added & a Clippings Sticker was distressed & added as well. If you want to follow along with Seth's Facebook Lives go to his page here.
He also has a creative group on Facebook that is filled with great art & wonderful folks so if you play with his supplies you can post your creations, join in the challenges etc. It is called the Seth Apter Creative Community. Now go get inky!
Supplies:
Remember if you put in my code karenbearse you save 12% off your order.
It's Topflight Stamps 3rd birthday and to celebrate, I’ve teamed up with some great designers to showcase birthday cards using the unique products available at Topflight Stamps. Please hop along with us and see all the beautiful talent from this group of amazing designers! You should have arrived here from Jennie Colacicco's blog. If not, no worries, catch the details below.
GIVEAWAY DETAILS
*CONGRATS TO #16 Shell B* this giveaway is closed...
*Affiliate- some of these companies have given me product to use, play & experiment with. The ideas are my own but I tend to work with companies whose products I like, so enjoy the inspiration. **some
of these links are affiliate, I receive a small percentage from the
company at no cost to you. This helps me deliver free content!
I love when companies bring you products that build on their existing products, giving you more ways to use them. Darkroom Door is one such company & I have been buying their stamps since way back in the day when they came in tins! I have had this quote stamp for a couple of years & now it has the most brilliant matching frame.
There is also a video that has start to finish making this card. I cut out all the extra goof ups along the way or the video would have been 2 days long!!! I hope you get a chance to follow along & make your own card.
I am not a card maker so this was a challenge for me & I made lots of alternative plans along the way so I will add in some other options for you.
Let's get started! All of the products used today can be found on the Topflight Stamps site, & there is a supply list below. Step 1: Putting paint on the stamp with a dabber & moving fairly quickly, apply paint to the stamp & then heat emboss with a clear embossing powder. I wanted a chunkier one so I chose Eileen Hull's Glistening Glass. This made the colors pop & creates a resist if more color is added which was my idea to start with. If any spots are missed go back in with a fine paint brush & Wow Mixed Media embossing then re-emboss. Makes fixing mistakes easy.
Step 2: I added some paint to my background, adding water to create a water color look. Originally I was going to just pop this on top of the frame background so I cut it out. Not happy with the way it looked made me change. I decided to make my card all on one piece of card stock. The paint colors are Mermaid & Sargasso. Use a baby wipe over the words to get any residual paint off and help the words shine.
Step 3: Not sure of the how the frame would look so many test runs were done. This does give options and also was a great way to experiment to come up with different ideas. Most of these frames just did not create enough contrast. I wanted to showcase the frame as it is so cool. Option 1: Stamped with multiple colors of Prism inks & then embossed with the Glistening Dimensions. I loved this one but the colors were too much like my background.
Option 2: Painted the frame with a dabber & Pea Coat paint, added the clear emboss. Really love this just didn't get enough emboss on it & wanted a more dynamic frame color.
Option 3: Using an embossing ink to try & get a better coated image then the paint which is drying too fast. Used Etched Pewter & Crusty Copper. Lost some of the image which is OK I can do it again but it was too pale. Love the copper though & in the end went with that.
Option 4: Took the frame idea from option 3 & added some infusions powder to it. Love the look but it was too dark for this card. I see this being turned into a grungy art journal mini.
Step 4: In the end I went with the Crusty Copper & made the bold decision to adhere it straight to the background. 1st the middle of the stamp was cut out to make positioning easier.
After carefully marking my position & with all my supplies at the ready, embossed with the copper & it worked!!! I think making all my practice runs definitely helped me get it right in one go.
Step 5: The background mat is a piece of scrapbook paper with stamped edges to create more interest. I used a few stamps from different Darkroom Door sets, along with Prism Ink.
Step 6: Decided to add a triple mat and a piece of webbed material. The material came from a gear sports bag. To turn this into a birthday card all that was needed was the sentiment.
Step 7: Topflight Stamps has lots of Happy Birthday words to chose from, however I did not have any on hand so mine was printed out on the computer, distressed with Cinnamon Swirl, then adhered to muslin. The final touch was to add some white & black pen work. I love how my inky, messy card turned out.
Here is another option, this was just done with ink & a stamp platform- easy peasy & still looks cool.
Paint was added as well to the background, there is not as much wow factor as the emboss but this was fast & simple! You could also cover this with the clear emboss after. The yellow bottle missing is Ochre.
I hope you had fun today & continue on the hop... so much great inspiration to be had now go get inky!!!
Follow along here and if you get lost you can always start at the Topflight Stamp Blog.
Hello stamping fans, I am here with my Topflight Stamps Mix Media Monday!! This week the Design Team are playing with the Carabelle Studios "My Stamp". This is such a great idea!!!! It allows you to make your own postage stamps.
SO 1st off I flipping love this system. I was literally in the process of making my own stamps when this came out. I made 3 stamps for this post & will show ideas on how to use them. They were made with the same technique just slight variations. Yet the results are subtly different.
Let me explain the "My Stamp" system. Start with the base which is called "My Stamp". I stamped the full image but you also have the option to make much larger stamps using the frame edge, & repeating it. I so can't wait to play with that one!
Next there are many strips of stamps that will make the middle of the stamp for you. Not going to lie I squealed like a little girl when I saw these. I got "Fantasy", they come with 8 stamps that can be used as the main image. Don't forget you can also use them as stand alone stamps! You can check out a few of the options here.
I started by stamping the images on card stock paper with archival ink, then cutting it out. For Tuba Playing Card lady I colored her in with colored pencils. Next the edges were distressed with Prism Ink in Roasted Coffee.
Stamp 2 was stamped in multiple colors of archival ink using a Stamp Press. I started the bunny fur in brown- simply mask off the face & stamp the rest in black.
Next color in with watercolor paint & when dry outline the bunny head in black to make it pop.
I cut out this frame with normal scissors & then cut it out again using postage edged scissors. Which edge do you like best? I really hope Carabelle Studios come out with a die cut that will cut the image out.
Now for the magic. Simply cover the stamp image with Embossing Ink & cover in Vintage Beeswax embossing powder. Shake off the extra & put back into the jar & heat. You will get this lovely vintage faux encaustic shiny look.
The 3rd stamp was made by stamping on book paper. The background of this stamp already has the music notes on it so I ended up with it looking like it was on music paper- kinda fun! It was painted with water color also & then embossed with the Vintage Beeswax emboss.
Now how to use them, 1st: The butterfly man I used as a closure for an envelope. Simply put tape along the bottom of the stamp & line it up on your envelope so the flap tucks inside the stamp & holds it shut.
2nd: Tuba playing card lady I added glue on 3 sides & made a small pocket to put a tag in. This would be great to use in a mini art journal or scrap book. You can also of course use them as an image for a card or art journal page. I hope you enjoy this little postage stamp tutorial & you get a chance to play with this system. Remember if you use my name karenbearse code you save $$$! Have an inky great day.
Hello Inky Friends, this week I am doubling up being "inspired by" Tracy Evans & using Eileen Hull's newest diecut the Pocket Notebook. Happy Mix Media Monday!! I love, love Tracy Evans stamps by AALL & Create & conveniently they are available through Topflight Stamps. I also love Tracy's style & have had the pleasure of seeing a lot of her projects live & in color when we were team mates on Eileen Hull's Inspiration Team.
I made this book using a few of Tracy's projects as my inspiration, with a few spins of my own. I could literally spend days making these inspired books!!!
It was hard to choose just a few projects to base mine on. Here are the links to the ones that inspired me directly. This Lucky Tag was one. I like sewing on my projects & so does Tracy, she also uses a very soft minimal palette on this project which will be a challenge for me!!!
This Flower Stems card is what inspired the colors I chose. Really love that vellum too! Plus the stamps... love them!
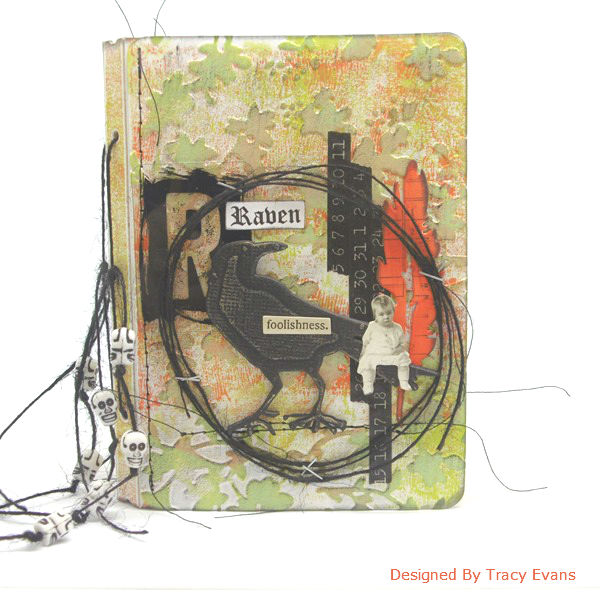
This Raven Passport Book inspired my use of an embossing folder as the background, I also really love the placement of her ephemera on the front. Although I didn't end up going this route, hummmm maybe inspiration for the inside? Please take the time to go check out this super talented, lovely lady on her Craft Addicts blog. A lot of Tracy's stamps are available on the Topflight Stamps website.
Let's get started!! I began using mat board die cut with the Pocket Notebook die. This book size is fabulous with a spine that can be adjusted to almost any size up to 2" & if you wanted a bigger spine just cut 2 spines & attach them! Step 1 was to add the embossing, but the covers are bigger than the standard Sizzix embossing folder. To solve this problem simply emboss out of paper, tear & attach. I picked a few of my favorites so I was able to add multiple designs to my covers. This was glued down with 3D Gel to help the embossed areas remain strong. Any open areas were simply filled in with crackle paste & set to dry.
Next up color- I used a combo-ish that Tracy has been using lately. Fresco Finish paint in Mermaid, Amethyst, & Blueberry watered down & applied sparingly then wiping back with a baby wipe.
Next up time for some stamping, with Black Archival ink in random places using Tracy's stamp- #79- Bloom & Grow. I LOVE THIS STAMP!!! The arrows & heart are from another other set called Hearts.
For my focal image a bouquet of hearts seemed a good idea. I stamped in archival ink just in case I wanted to add some ink, then sewed some sketchy lines leaving the threads long & messy.
I made a few extra to keep in my stash.
Last few steps were to arrange the hearts,& add some metal.
Here you can see part of the back with all that luscious texture. Join me back here next month where I will continue working on my book by adding the elastic & the start of the insides! Thanks so much for joining me, hope you have the chance to get inky today!