Showing posts with label pocket notebook. Show all posts

Tuesday, June 2, 2020

Amazing Cork Fabric Pocket Notebook For Eileen Hull

Hello Blogland I hope this post can brighten your day with an amazing cork fabric notebook. This month the Eileen Hull Inspiration Team are playing with Belagio's mind bending cork fabric. How can it be cork & fabric too- what???? I have some tips along the way as the cork does respond differently than fabric but is still easy to work with. *Affiliate- some of these companies have given me product to use, play & experiment with. The ideas are my own but I tend to work with companies whose products I like so enjoy the inspiration.


Here is my finished Pocket Notebook! Going into this I had a few ideas of what I wanted design wise. 


I had to see if that concept would work with the cork! I knew I wanted a Pocket Notebook to put in my Tim Holtz Sample books that I have been making. More about that further on.


It was really hard to just pick out one print as the options are pretty cool.I am a big fan of copper so the cork/copper combo was a good choice. I also really love the wood grain pattern so the spine was a great way to put that in. 


Belagio cork is available by the roll 18"x 15" with 9 different patterns that can be purchased at Hobby Lobby. Nature & natural with gold can be bought by the yard at Walmart with fabric sections. Amazon.com also carries it as well as some craft stores. If you have a local Scrapbook Store ask if they can carry it. We need to support our local stores especially with most of them having been effected by Covid-19!


 Let's Go!!


I made this book with Heat'n Bond Fusible Fleece in the middle as I like the quilt like feel to those books.  ***if you want to make a book with the cork but not sew, simply use Foam adhesive between 2 layers of cork, cut 2 pieces using the die cut, adhere & bam book made.
Start by following the directions to prepare the fleece. I did not pre-wash the cork fabric as it is going on a book this step is not necessary. Cut 2 Pocket Notebook shapes out of the fleece. Adhere to the cork following the directions using an iron on wool steam, holding for 10-15 seconds. *** the iron does wrinkle the copper & the cork somewhat but creates a cool texture. If you don't want that look just adhere the fleece with glue. Cut the cork leaving a 1/4" space all the way around the edge. I learned from making a previous book that the fabric should be a bit bigger then the fleece or foam die cut if sewing around the edge is the goal. Otherwise the foam or fleece shows through. 


Once you have the covers create a spine for added reinforcement. I cut 2 pieces of the spine from foam adhesive using the die cut trimming them, then putting them together with the one center hole lined up. Peel off one side of the adhesive & put on your spine cork piece, cut leaving 1/4" around the edges. This will give me 6 signatures. The beauty of these books is you can make them as wide or skinny as you like.

Time to Sew


Over lap the 2 covers in the middle, pin & sew. I used a zig zag stitch. One of the challenges with the cork vrs. fabric is the cork is less pliable & doesn't fray. Fraying is a great way to hide sewing mistakes LOL. It was tricky to line the cork up, sew without the edge of one side showing here & there. The simple fix is trim the edges after sewing &/or distressing the edges with ink or add lace.


Decide the fabric for the inside of the book. I used 2 different patterns. I cut them 4 3/4 x 7 1/4 ish leaving the inside spine area open. The edges were sewn at the top, outside & bottom edges with a 1/4" seam allowance using a zig zag stitch.


Here is a photo from the inside adding in the spine pieces. Cut another piece of the copper/natural cork fabric. It was cut to match the outside piece. Using a cropodile re-punch the holes in the outside spine piece following the hole placement of the foam adhesive. Adhere the outside piece, then glue the inside piece- I used double sided adhesive for this. Re-punch the holes & add eyelets. 


Adding Ephemera is the best part!  

Now that the book is put together it is time to decorate the cover! I used the newest Tim Holtz Idea-ology products. Fabric tape was used under a distressed quote chip for my title. Love the KB distressed metallic Type Chip letters. Redline tape is a good choice to adhere the ephemera.  


I made an ephemera layer with the butterfly which was just plain fun to do. The butterfly was glued with Glossy Accents to the 2ofclubs but for extra security it was adhered with the brad using a cropodile to punch through the chipboard. The fabric scrap & card sandwich were adhered with Redline Tape. 


To add the books 1mm elastic was strung through the eyelets. I start in a middle eyelet threading to the inside and then down and out creating elastic lines to slide the booklets in. When I have gone through all the holes the elastic is simply knotted on the inside. 


Details such as threads & charms were added. I strung ribbon through the elastic by the eyelets & hung charms & beads using jump rings. Some of the beads were threaded onto the ribbon. I really love that wood grain pattern that I used for the spine. 


 On the inside cover a cork pocket was added with some more ephemera. Here you can see some of the other cork fabrics, the back ground fabrics, the pocket are all different types of cork! The ephemera is more of Tim Holtz's newest release.


Tim has been doing a Facebook Live every week that focuses on tons of awesome techniques. Lucky for me watching them on replay is possible & seriously so fun. Art in troubled times is the best recipe. The cover photo is a screen shot from his promo photos on instagram.


You can catch these shows live almost every Saturday. I haven't been able to so watching on replay enables me to create technique booklets complete with samples and directions. I have slowly been making these books which leaves me covered in nummy ink!


To make the inserts, I simply cut double sided TH scrapbook paper & lined paper, folding the papers & inserting them inside themselves to create booklets. I can always go back & sew the spines of these books if I want. Then just slip the books in the elastics-easy peasy. 


Well thanks so much for joining me today. I hope you have the chance to get make a book or get inky!! Make sure you pop over to Eileen's blog to see what my team mates have come up with. Also be sure to join the Eileen Hull Fan Club, Eileen does 2 Facebook Lives a week with all kinds of techniques & projects, tons of inspiration!

 Supplies:

Eileen Hull Pocket Notebook by Sizzix
Cork Fabric by Belagio Enterprize- Rose Gold,
Eileen Hull Foam Adhesive, Double sided adhesive & Redline Tape by Therm*O*Web
HeatnBond Fusible Fleece 
Tim Holtz Idea-ology- Stitched Scraps, Quote Chips, Thought Tokens, Baseboards Junk Drawer, Fabric tape, Type Chips, Ephemera, Paper Ecetera,
Here are some other papers that would be fun to use- Departed,&  Abandoned.

Monday, December 2, 2019

Inspired Book- Creative Mess Booklet #1

Hello Topflight Stamps Fans, I have post #2 for my Inspired Book that I made last month. November has been a crazy month of travel, teaching & kid stuff. This is going to be an inky post with a favorite technique for making the booklets that go in your journals. If you are on the Journal craze or just want to make a creative notebook I hope you have a chance to make one of these books. 


My 1st booklet is to write down ideas, inspirations & anything artsy that comes to mind. I made the cover a separate piece & the lined booklet was sewn together. This way I can simple replace the booklet when full leaving the cover intact. My pages were cut from lined paper 8"wide x 6.5" tall. It is hard to see the booklet in this pic, more on that below.


I have been playing with Gel Plate a lot lately mainly due to some of the classes I am teaching. I love the way ink moves so differently on the plate & allows for some unique quick & easy backgrounds. For the cover of my book I decided to experiment with Infusions to see how it worked on the plate. Basically sprinkle the Infusions on the plate & spritz with water. Dab the paper on the plate picking up the colors. A little goes a long way so just sprinkle a bit to start with and add a generous 2-3 spritzes of water. 


Infusions colors are so rich & concentrated. I did one layer (left hand side) of dabbing the paper down, dried with a heat gun & then added a 2nd layer (right hand side) more sparingly. Love how rich this color is! The interesting thing is I think the gel plate holds the walnut crystals allowing for more pigment to show through. 


I added a 2nd color- Royal Blood and just added a touch here & there. Love this background!!! I think you get a richer color with the Gel Plate, less of the brown from the walnut crystals. Just an extra tool in the tool box. 


Speaking of tools, did you know that on the Topflight Stamps shop page, a lot of the stamps shown have inspiration right there for you? Just click on the mini image to the right of the main image. I used this sample by Rachel Greig owner of Darkroom Door to inspire my cover. 


Loving the look of the background created, & not wanting to potentially wreak it meant putting the sentiment on another paper. The sentiment was embossed so it would really show. Adding the quote in Glistening Glass which is clear seemed a good idea. That means my sentiment will be white like the card stock. I put a few sprinkles of A Bit Jaded on the Gel Press, spritzed with water & once my image had cooled dabbed the paper in it. The emboss will resist the ink as it is water based. Sorry the colors are off in this photo you see the true color below.


I mistakenly rubbed off some of the word "am" but mistakes often create opportunity. I  re-stamped the word on white paper & cut it out, distressed the edges & popped it on my card. Love how that looks, really adds to the sentiment. I also carefully stamped some of the splats from the stamp with black ink, then distressed the edges.


Lastly I stamped some random images on my background just to add some interest. I used Grunge Marks & Arty Hexagons both from Darkroom Door Stamps.


I used a variety of stamps which I got from Topflight Stamps to add fun & interest to my pages. Some of the images were direct to paper but because it is thin the images were seen on the other side. Most were stamped on copy paper & cut out then glued.


Just stamp away- off course I used a trusty stamping press to make sure my images were crisp. These stamps are Seth Apter.

I also added some stenciling using different colored inks & a dabber to get a nice image. Some pages also had washi added for more color & interest. What I love about this project is I can use any colors or themes as the book goes on, it doesn't have to be matching. This washi is Alexander Renke & the stencil is Pronty.


Seriously love how these wee foxes look! They are from washi tape. The stamps are PaperArtsy Scrapcosy 5. Look at the fox looking up are the mushroom- too fun. 


Lastly I added some more Glistening Glass embossing powder to the outside of my book to give it the same shine as the spine. It will also protect that crackle paste so it doesn't chip off. I also added the A Flair For Buttons butterfly. For the full tutorial on this book you can go here. That's it for this post. I hope you can get some arting done today!

Supplies:
"          "      Stamps-Zinski Art 41, Scrapcosy 05,
Seth Apter Stamps by PaperArtsy
Eileen Hull Glistening Glass by Emerald Creek
Pronty Grunge Circle Stencil
Washi Tape- various & Foxes
Gel Press 

*Affiliate- some of these companies have given me product to use, play & experiment with. The ideas are my own but I tend to work with companies whose products I like so enjoy the inspiration. 

**some of these links are affiliate, I receive a small percentage from the company at no cost to you. This may help me continue to bring you techniques & more inspiration.

Tuesday, November 5, 2019

Christmas Junk Journal Organizer with Eileen Hull's Pocket Notebook

Hello Blogland, I am here today with Part 1 of a Christmas Organizer using Eileen Hull's Pocket Notebook. This is a project that I have had in my brain for literally years, or a variation of it anyway. As November has hit the Inspiration Team are working on holiday projects so grab your favorite beverage- coffee, spiced cider or wine depending on the time of day!


Here is my finished book cover. This is a definite case of having an idea in your head with no idea if it will work out in practice. The best part for you is I will have a list of what I would do different next time, as I did come across some challenges along the way. 


I wanted this book cover to be made of fabric with quilt like padding but sturdy enough that it could hold many pages & end up being a chunky junk journal. I set off on this journey with some luscious Tim Holtz fabric. It is not Christmas themed but has the potential with the map, postage & package labels... love it! Here is the back of my book. Directly below in red is what I would do differently. If you are making a book read the steps 1st & in red see how I would fix my challenges & do things differently.  


I am entering this in the Mini Album Makers Challenge this month. 


 *I would change the way I make the next book. I think I would fuse the fleece to the inside papers & cut the covers using the die. Next assemble the book covers as usual. Then hand cut the fabric larger than the book & adhere the fabric with double sided adhesive, leaving a 1/4" around the edges so I am not sewing through the adhesive. Another option to solve this problem would be distressing the edges or adding something around the edges like lace. 


Step 1: Carry on this way if the edges don't bother you & you want the look I achieved. Cut a piece of fabric large enough to cut 2 book covers out of & iron on the Therm*O*Web Heat n Bond Fusible Fleece. Follow the directions on the packaging. This will be the outer layer of our book. 


Step 2: Cut 4 pieces of book paper or newspaper (this will be sandwiched on the inside of the book so it doesn't matter what it looks like). Cut 2 pieces of music paper being careful with the direction- ie: cut one piece with the holes on the left & one with the holes on the right so when you put your book together the music & words are the right way up. Adhere 3 pages together either with a glue stick or double sided adhesive keeping the glue away from the edges so you won't sew through glue. Make sure the music paper is on top to create the inside covers. 


Assemble the 2 covers using Red Liner Tape along one of the middle edges & lining up the middle hole.


Sew around the cover. *this is what it would look like if you are using the other method. The cover would be sewn from the inside of the book. It will be necessary to  re-punch the holes through the fabric with a cropodile. Follow the rest of the directions as normal.


Here is my book after the edges have been sewn.


Step 3: At this point I felt my spine needed some re-enforcement so I cut a piece of mat board to fit inside the spine, covered it with double sided adhesive & fabric. I went with fabric, tearing instead of cutting it about 1/2" wider then the board. Just a design decision. Alternatively you could also paint the mat board or cover it in paper. 


Adhere & then re-punch the holes using a cropodile or punch, don't worry if you can't see the holes very well because of the fabric & the batting. Hot Tip- fabric only tears in one direction you may have to cut it & fray by pulling at the strands along the edges. Also cut your fabric a little longer as well so the mat board doesn't show. The base of our book is done!!! Now it is time to decorate. 


I had the hardest time trying to figure out what to put on my cover! I had ideas of die cut corrugated deer, Santa ephemera or junk journal type ephemera. Nothing was working, I think in part I did not want to cover up the fabric. Finally I went with a combo of digital ephemera & die cuts. I am really happy with how this turned out!


Here is part 2 in the series you can find it here. This one is a tutorial on how to create tags, pockets etc to build the ephemera for the book. Next month I will work more on the inside Junk Journal pages, the binding & theme of the book.I hope you have a chance to get inky today!


Part 3 is up! It includes how to make the 1st book which is a December Journal booklet

Supplies:
Eileen Hull Pocket Notebook die by Sizzix 
Tim Holtz Snowflake, Tree & Deer dies by Sizzix
HeatnBond Fusible Fleece by Therm*O*Web
Double Sided Adhesive & RedLiner Tape by Therm*O*Web
Fabric & Christmas Ephemera by Tim Holtz
Owl Digital Tickets by Artymaze
Flowers by Prima Marketing
Distress Oxide in Gathered Twig by Ranger

Monday, November 4, 2019

Inspired by Tracy Evans for Topflight Stamps & Eileen Hull Part 1

Hello Inky Friends, this week I am doubling up being "inspired by" Tracy Evans & using Eileen Hull's newest diecut the Pocket Notebook. Happy Mix Media Monday!! I love, love Tracy Evans stamps by AALL & Create & conveniently they are available through Topflight Stamps. I also love Tracy's style & have had the pleasure of seeing a lot of her projects live & in color when we were team mates on Eileen Hull's Inspiration Team. 


I made this book using a few of Tracy's projects as my inspiration, with a few spins of my own. I could literally spend days making these inspired books!!! 


It was hard to choose just a few projects to base mine on. Here are the links to the ones that inspired me directly. This Lucky Tag was one.  I like sewing on my projects & so does Tracy, she also uses a very soft minimal palette on this project which will be a challenge for me!!! 

This Flower Stems card is what inspired the colors I chose. Really love that vellum too! Plus the stamps... love them!  


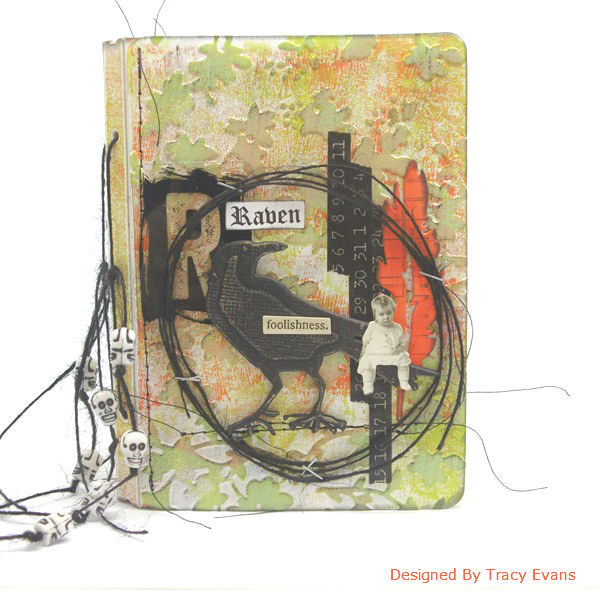
This Raven Passport Book inspired my use of an embossing folder as the background, I also really love the placement of her ephemera on the front. Although I didn't end up going this route, hummmm maybe inspiration for the inside? Please take the time to go check out this super talented, lovely lady on her Craft Addicts blog. A lot of Tracy's stamps are available on the Topflight Stamps website.


Let's get started!! I began using mat board die cut with the Pocket Notebook die. This book size is fabulous with a spine that can be adjusted to almost any size up to 2" & if you wanted a bigger spine just cut 2 spines & attach them! Step 1 was to add the embossing, but the covers are bigger than the standard Sizzix embossing folder. To solve this problem simply emboss out of paper, tear & attach. I picked a few of my favorites so I was able to add multiple designs to my covers. This was glued down with 3D Gel to help the embossed areas remain strong. Any open areas were simply filled in with crackle paste & set to dry. 


Next up color- I used a combo-ish that Tracy has been using lately. Fresco Finish paint in Mermaid, Amethyst, & Blueberry watered down & applied sparingly then wiping back with a baby wipe.


Next up time for some stamping, with Black Archival ink in random places using Tracy's stamp- #79- Bloom & Grow. I LOVE THIS STAMP!!! The arrows & heart are from another other set called Hearts.


For my focal image a bouquet of hearts seemed a good idea. I stamped in archival ink just in case I wanted to add some ink, then sewed some sketchy lines leaving the threads long & messy. 


I made a few extra to keep in my stash. 


Last few steps were to arrange the hearts,& add some metal.


Here you can see part of the back with all that luscious texture. Join me back here next month where I will continue working on my book by adding the elastic & the start of the insides! Thanks so much for joining me, hope you have the chance to get inky today!

Supplies:
Tracy Evans stamps by AALL & Create- Feathered Bloom & Hearts
PaperArtsy Paint in Mermaid, Amethyst & Blueberry. 
Eileen Hull Pocket Notebook by Sizzix
Eileen Hull Redline tape by Therm*O*Web
Metal by Prima Marketing
Archival Ink by Ranger in Black Soot, Cornflower Blue, Plum
Crackle Paste by Ranger

LinkWithin

Related Posts Plugin for WordPress, Blogger...