Happy New Year to you all! It's been a rough couple of years & I hope this year brings you some wonderful new experiences, good health & lots of fun damn it! This month the Eileen Hull Inspiration Team is collaborating with Gel Press. I love Gel Printing & this project is going to be part of a class series I am teaching. I also have a 2 part brand new Gel Press YouTube video for you.

The Full Size Journal is just my absolute favorite. I love, love the size at a fabulous almost 9" tall & 6 1/4 wide makes for a perfect junk journal, art journal, photo album you name it! Also it is the perfect size for a Gel Press Journal. In today's post I am going to give you 3 ways to use your Gel Press & a brief outline of how I made my book. Warning: You do need a "Big Shot Plus" as this is a larger die then the normal size.

Now a quick intro from Eileen on this collaboration:
Eileen
and Teams are collaborating with Gel Press all through January to see
what magic can be made when both products are combined. Make sure to
check in at the blog at http://eileenhull.com
each week to see what comes of our Gel Press journeys. And check out the
Gel Press blog too to see what they are doing with my journal bases at https://gelpress.com/ It's a match made in heaven 

Let's talk about the journal die 1st. I am going to link to 2 other books I have made, these will be at the end of the post. All these books were made slightly differently so good ideas on options. I cut the base of the book using a cereal box. As the covers are larger then the current Sizzix mat board this is a good way to get around that challenge. You will need 2 covers.

Assemble using Redline Tape.

Here is what the inside will look like when assembled.

Then it was time to pull out the Gel Plate. These plates come in all sorts of shapes & sizes, you can find them here. Getting started I wanted to get some base color on my canvas down. Choosing lighter,
brighter colors was a good way to go. If you are new to Gel Printing I
would advise playing with lots of paper to get the hang of it, that way you have quite a selection to choose from.
I made a video! Here is Part 1. Part 2 is being edited now, please subscribe to my YouTube channel & get notifications, or follow my blog & a handy dandy email will arrive in your inbox!

Gel Press Technique 1: Put dabs of acrylic paint down & use a brayer to blend the paint. There is a learning curve of how much paint to put on. Just play & practice to get it. Hot Tip: You know you have it when the paper dries pretty quickly & you can get 2-3 pulls.

Use another paper to clean the brayer off. Lightly rub a piece of paper on the plate & then pull it. You should be able to get at least 2 pulls. See my video for better explanation.

Gel Press Technique 2: Put stencil down 1st then add paint on top, brayer, pull stencil off & brayer the painted stencil on a paper to get a bonus print. I like to spritz my stencil with water 1st. Then put paper on Gel Press & pull a gel print. Use different types of paper like deli paper, book paper, kraft card stock or scrapbook paper. When using deli paper leave some parts of it clear. These pieces are great to use for decoupage.

Gel Press Technique 3: Use technique #2 & add the stencil images to papers that already have background color. You can either simply add the entire image or bits of images, overlapping using totally different colors from the background. You can see the entire chevron was added with blues & greens, then bits are being added. I usually do this in black or white.

Once you have a nice selection of papers it is time to design. One of the things I like to do 1st is scan my favorites so I can print them out again if I need a quick print.

I cut 3 prints to make the cover pieces. Do this however you like, pieces of different prints, patch work type, strips of paper etc. As you see from this photo I cut my 2 cover papers to just fit over the spine. My spine piece will cover these papers by about a 1/4". Hot Tip: This is a good time to add your handle. I always forget & end up having to find away to cover the screw bit that shows on the inside cover. Once the outside is done, pick your favorites & cut to fit the inside covers. The width of the book is over 14" so if you want to use one print you will need larger paper. I copied the outside layout for the inside. The piece I picked for the spine area had too much white space for my liking.

In my video I talk about staining the white, but don't go into details. The base paint of my gel prints is acrylic so this allows for adding an ink that is water based. I decided to add some Mica Spray. Using my swatch book was a great way to see which color would match.

I chose Flickering Candle. The ink was sprayed on, then spread with a wet paint brush. Let dry a bit then use a baby wipe to clean the ink off the paint area.

See how that works? Plus there is some nice shimmer that the camera doesn't pick up. Bonus you can still see the paint nicely.

Here is the inside after adding pockets. I am trying to use items that I already own & Project Life cards fit the bill. Some washi tape was used at the bottom for interest.I added a few other things which you can see in a photo below.

The holes for the binding need to be re-punched. Hot Tip: Hold your book up to a window & you should be able to draw the holes. Then re-punch with a Crop O Dile. You can chose to string this anyway you want. Elastic is my favorite way. I made one signature so far with a mix of gel prints, tags, ledger paper etc. Not sure what I will use this book for yet stay tuned.

The last element was a tag I had made months ago. It was hanging on my desk right in front of me just waiting for a project to land on. If you want to make an element like this there is a tutorial here.
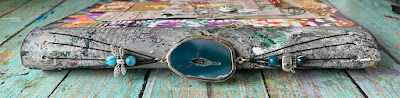
I wanted to add a few close up photos for you. Here is what my finished spine looks like. I seriously love this book, it may be my new favorite! The print that you see is created in Part 2 of my Gel Press video. So grungy cool!

Here is the inside cover & pic of my 1st signature. I added some elements from Eileen's Maker Forte stamps. The signature starts with some packaging. Again one of my goals is to use that cool stuff that gets saved forever!

One last close up of the cover. Yes I think I used all the colors! Alright. I will be doing a video flip through on my Instagram in the next few days just FYI. Hopefully I will have added a few more signature. Alrighty as promised next up are a few more examples of the Full Size Journal with links!

This is a canvas journal with paint & decoupage on the cover. Different construction then the one I am making today. Also a peak at the inside pages.

Journal #2 was full on mixed media with all the layers! It was made of mat board which means sturdy to start with. Lots of inky tips & tricks in this tutorial. Also used Gel Press prints for the inside pages. Nummy. Click here to see all the yum. Thanks so much for joining me today. I hope you get a chance to get inky!
Supplies:
- Big Shot Plus -Sizzix
- -scrapbook.com
- Full Size Journal - sizzix
- - scrapbook.com
- Gel Plates
- cereal box
- Redline Tape 1/4"
- Ultrabond Glue
- WeR - cropodile
- AALL & Create washi
- Dyan Reaveley washi
- Archival Ink

I love this cover and the instructions are fabulous, just the way my head works. Oh wait, maybe you should worry. Lol. I’m going to try this with one of my other journal dies as I don’t have a big enough machine for that large cover. TN or pocket? Or both! Thanks so much for sharing
ReplyDeleteThank you so much! LOL Yay please make one! I would do both of course! The great thing is your insert would fit easily as the size of the books are a folded piece of paper. Good Luck!!
Deletestupendous as always karen! I am working my way through your excellent videos, thank you! =)
ReplyDeleteThanks so much for the comment Lisa super appreciate it!!
DeleteKaren- thanks- I learned a lot! This is gorgeous all the way through. Scoreboards + GelPress = amazing!
ReplyDeleteThanks so much Eileen!! Yes they really are a match made in heaven. Glad I could inspire!!!
Delete