Saturday, November 30, 2013

Viva Las Vegastamps! DT Tryouts!!!

I love this company's stamps- Viva Las Vegastamps! they are quirky, fun and detailed. Totally up my alley. I so would love to be on their design team. One of my favorite things about these stamps is they drive me to create unique and interesting projects. 
My first project for the tryout is this colorful quirky altered lunch box. Super glossy, with bold beautiful color. I used lots of the stamps on this mainly from plate 922.

 This tin will be a box to put Project Life cards in and is a gift for my sister-in-law for Christmas (shhhh don't tell her). I used a tissue paper technique to get the stamps on the tin. I will be sharing how I did these techniques in later posts over the next few weeks. 
  Here is the backside of the tin- love this funky "Sitting Elephant" guy! 
 Some close up shots with the great detail that makes me love this tin. "Whimsical Bug" hurdles the latch. The more time I spend with this tin the less chance my SIL will have of getting itl!!!!
My favorite stamp shockingly is "Whimsical Owl".

Here are the shots of the sides of the tin. The kitty quote is something my family  reference a lot. Yet another fun thing about making your gifts you can personalize them to fit the receiver. 
Side 2: of course the fish in boots is trying to get the flying bee called "Bee Hung Up"!

My 2nd project for the Viva Las Vegastamps! DT tryout is a mixed media canvas. There are multiple techniques on this canvas but one of my favorite stamp techniques is turning a stamp into an embellishment using utee. Again I will share this technique later in the week but it creates a unique embellie that you can color to suite your canvas, scrap book page etc. Very dynamic and with a cool metallic shiny finish. 
On this canvas I used the Viva Las Vegastamps! Moon stamp. Ironically I have wanted a stamp like this for years so I was very excited to find it! Here is a close up of the embellishment. Totally cool!

 3rd project is an art journal book. The cover was made with a gelli print technique. The colors are vibrant & luscious.


Inside the book all the pages are gelli prints, comprised of paper, tags, envelopes with fun flips and flaps. I put some of my favorite stamps and quotes in this book. The stamps were colored in different ways, some with spray inks, markers, twinkling H20's... This is actually a class I just taught on the weekend- I love this little book!!!

Back ground gelli plate with some hand made washi tape. Here I used one of the "whimsical houses" stamps from plate 910a. The "skinny girl" comes from plate 922.

Here is another page using the "whimsical bird in mask" eclectic & fun Viva Las Vegastamps! For a stamp addict like me this company is heaven! Thanks for taking the time to look at my creatios and giving me the opportunity to join your great company. 

Wednesday, November 27, 2013

Viva Las Vegastamps Monthly Challenge

The funny thing is I have wanted a moon stamp for like ever & finally I find it at Viva Las Vegastamps. I love this stamp! Bonus- I have wanted to do this project since this awesome stamp company started doing this challenge but... so this month we are on!!!! Here is my take on the challenge of brown, oranges & I see beige. 

Of course the photo does not do this page justice!!! The rays coming from the moon are gold with lots of texture- stencil + Viva Ferro = luscious. The quote is all me. Background is Dylusions spray over gesso. Stamped with Archival Ink and the rooster is painted in with twinkling H20s- very shimmery. 
I so love this companies stamps & am glad to have them. The cool rooster also has the squares from the challenge-get it?!!!!
Here is the challenge page:- Viva Las Vegas Stamps

Monday, November 18, 2013

Christmas Love Campaign

There is a great contest going on over at the Susan Weckesser's website.I love the idea of Christmas Love Campaign & plan on making some more to give away not just as prezzies so I will keep you posted on my progress. Here is my 1st one just to get warmed up!!!! Here is some of the info from Susan's website.

When: November 1,2013 - January 7,2014

The Mission: Create something (anything crafty),cards, sewing, editable art, beads, you name it, and then give it to someone. ANYONE....even a TOTAL STRANGER!

 Here is the canvas I did as a gift to my husband (brilliant right- cause I love all things THoltz).
 I actually am making quite a few crafty gifts this holiday season so this will help get me to realize I need to move it!!!!
Thanks to Suzie Bentz for spreading the word & getting me hooked up to this great campaign! Thanks to Ranger for donating prizes!!!! Ready set- craft!!

Monday, October 21, 2013

Magical Gelliplate Trilogy Class


If you are in the DC area & have always wanted to play with the gelliplate come take my Magical Gelliplate Trilogy class back by popular demand. Oct. 27th from 12-5pm.


Gelliplate is all the rage in both scrapbooking & especially art journal. Originating from the monoprint concept & seriously improving on it is the gelliplate. This is a fun unique class designed to give you a really strong base in the art of gelliprinting. Your journey will include over 20 ways to use your gelliplate. We will have enough prints to create 3 books. One is a cute board book that will be used as a reference/color combination guide. From this book you will be able to look back on the class & remember how to use your gelliplate & what your favorite color combinations are. The 2nd book is a spiral bound book that is filled with completed backgrounds you can use as an art journal, smash or mini-book. If you don’t like the papers I chose feel free to pick others from the store or bring your own. Book 3 is the coolest! A mini-canvas bound book which can be used however your imagination chooses to. I love this book! I see it as an awesome gift for someone, or to document an event or trip, favorite quotes, I see black & white photos… As an added bonus you will learn how to make these 3 books so you can make more!  Hence the title, magical & trilogy-this will definitely be a fun class! Once you have your gelliplate you will be able to use it over & over to inexpensively create amazing backgrounds for art journal, cards, scrapbook pages even project life! I am also planning a gelliplate2 class. Instructor:  Karen Bearse. For more information you can go to ScrapbooksPlus website.

Wednesday, September 18, 2013

LSNED 3 Green Thumb

Not shockingly falling seriously behind in well, everything-ah the life in September!!! Just a quick post to get my Shimelle class LSNED pages going. Sept.3rd I was reveling in my new fabulous purchase of Hardy Hibiscus. I had bought a small plant and fell in love. I killed it by not transplanting it but I also thought as it was a hibiscus it wouldn't make it outside anyway. While winery hopping in PA I saw a fabulous flower garden filled with huge towering bushes of these same flowers. Discovering they did grow in this area-I was ecstatic! Even more when I found 2 of these plants at Home Depot of all places. 
 The flowers are about 10 inches in diameter- I KNOW RIGHT!!!!! My journal side was about how I used to have the black thumb of doom and kill all my flowers. Now I am slowly being able to plant, water, grow-it sounds so simple! I managed to get these in the ground, they have been alive for 2 weeks & doing really well. I can look out at one of them from my scrap book room window & see the flowers-makes me sooooo happy. 
SAD UPDATE- the bloody deer have come & eaten off all 10 of the buds on this plant- devastated!!!!! The plant still looks great but no frickin flowers!!!! Me now hates deer precious.

Tuesday, September 10, 2013

Feeling Holtzy

Working on my art journal page for A Year in the Life of an Art Journal-yay for me. The challenge is Artsy Fartsy- (no problem), and draw a picture of your coffee cup. Drawing is not one of my favorite things although it is on the list of things to learn so away I went. I started with a printed copy of an unfinished art journal background and than drew away. I love how it turned out & that my cup doesn't totally suck! 
  My art journal background ended up being too busy, the cup got lost, so I did a heavier wash with gesso behind it which solved the problem. Once the cup was adhered it was outlined with oil pastel than smeared (love this look, also done on the sun). The page ended up with lots of Tim's stamps on it. When I started I wanted to put the phrase "coffee, please Jeeves" and have the man stamp on it. As the page progressed I changed that idea and just have the stamp quote "caffeine isn't a drug, it's a vitamin" on my cut out sun. The man was stamped with distress paint, colored with stain and stamped with background stamps again with archival ink. I love the colors of this page they are very vibrant. What are you working on today?

Sunday, September 8, 2013

SDC115

It has been awhile since I have done any challenges...but that is on my list of resolutions so as a New New Year is rapidly approaching-better get on it!!! Day 1 of my LSNED this Daniel Torrente stamp was absolutely perfect for my quote. Love this little creepy mermaid stamp!
I did this for the Stampotique challenge this week-it has 4 layers-paper, tag, stickers, washi tape. 
 
I am a fairly patient Mom and love hanging with my 3 wonderful, crazy, eclectic children but...The story on the other side of the layout, was about being at a museum with my kids on our 3rd day of vacation. My 2 youngest have a love/annoy relationship. They get along great until they don't and they feel the need to constantly, non-stop criticize, correct, or challenge (yes I call them the 3 c's) every time either of them opens their mouth. It gets old. I had just spent 30 minutes with my very unhappy daughter at the Gettysburg military boutique looking at all the non-pink "boys stuff"while the boys saw the war movie. The boys joined us in the boutique. My 2 start in immediately on each other commentating on everything they see. She thinks it's cool- he disses it, he comments on it- she corrects him etc. The straw that broke my camels back was when we were leaving the boutique, my 9yr old daughter pointed out the cool never ending pencil and my 15 year old felt the need to mention that it would in fact end at some point if you used  it continually. I am surprised my brain matter did not in fact explode against the walls of the museum. The need to be anywhere but with my 2 delightful and wonderful offspring was immediate. I blasted them with inspiring words of love and encouragement than told them I could not be anywhere near the 2 of them at this moment & stormed out of the museum. It was a glorious exit with all 3 of my children starring at me in shock & awe. Of course my daughter followed me out, confused by my need for solitude. I only needed one minute of deep breathing, I went back in and told the 2 chronic debaters they were not to be within 10 feet of each other the rest of the visit. So you see the lesson I did learn that day was "even Mom's lose their cool".

Friday, September 6, 2013

Learn Something New Everyday

My friend Deborah Mahnken has done this class for a number of years. Every year she journals everyday for the month of September following Shimelle Laine's class. It only costs $15 to join & you are in for life-pretty good deal! For a few years Deb made fabulous mini books . Last year she used a composition book & I loved it. Due to extreme peer pressure (on my part not hers) I have decided to join in. I am totally copying her idea of using a composition book although I have not done the cover yet. I am on the hunt for the PERFECT scrapbook paper or maybe art journal cover... I love how Deb puts 2 pages together with washi tape on the edges & seeing how I am a total washi addict, copy away this is fabulous. 

It took me a bit to figure out what LSNED all about so I will help you out. Basically you jot down what you do in the day focusing on learning something new. For me I tweaked that with the idea of it might not be something new but something I have never scrapped about & would like to get down on paper. That's what is great about this, there are no hard & fast rules. Shimelle gives you prompts everyday to help if you are stuck. The idea is more to think & journal or just scrap, or whatever you want to do. It is to get you being artistic everyday for the month of September. Or you can write stuff down everyday & work on it on the weekends or at the end of the month or...refer to figure A there are no rules. 

Here is my entry for Day2. The journaling is on the other side. There were a number of lessons I learned that day, some of them not so positive which I did journal about because it was important but rather than beat myself up 2 days in a row I decided to focus on the positive side of the story which was a big compliment on my parenting by another mom. It is so easy to get negative in this life and I try to capture the story truthfullybut than put the positve spin on what happened. I really don't want to look back on my journals & have it all be life sucks. Even if life is sucking, if you grab onto the good points, which are mostly always there (and usually more important anyway) it helps your view.Thanks Shimelle I am enjoying your class!!!


Tuesday, August 27, 2013

A Year in the Life-August.

Wow where has the summer gone???? If you figure out how to slow time down please let me know the secret. As I get back into the swing of things, first up is art journal. I am teaching my art journal club in a few weeks & need to get back on it. For inspiration I went to A Year in the Life of an Art Journal-yay and completed a page for this challenge. The theme was "Regrets" & the technique was to use some modeling paste on the page.
This is what I ended up with & I was very happy to use up some of the chipboard alphas I have. My tag has the regrets in hidden journaling on the back. My regrets (although I have plenty) at the moment are about money. Spent too much, saved to little which is creating a lot of stress in my life. Part of this page is to remind me to "move forward", and "alter lifetime imperfections". A variety of techniques were used, paint, spray with stencils, stamping. Even though the subject is touchy the page makes me happy!!!!

Wednesday, July 3, 2013

Project Life Occasional Wednesdays.

Ok instead of Weekly Wednesdays which I announced I would do in a fit of insanity, lets start of with something less daunting like occasional Wednesdays so here you go Project Life Occasional Wednesdays #1.
Here are a couple of things I like to document in my project life which makes it very different from scrapbooking. 1: Products we use regularly, or we especially enjoy.  In this case I documented my allergy meds- an unfortunate necessity right now but a part of life that should be documented. 2: Books, movies and TV that we are currently watching. These also work as great fillers when I have a slow week with not as many photos as the previous week that may have been picture heavy.
Have you ever gone out to a restaurant or event and realize you wanted to take a photo but didn't? Sometimes it is refreshing to do a pocket with the restaurant logo, business card and what was ordered or a photo of the food. That way you still have the memory of your outing. Here is the pocket I used with the paper bag logo from Red Lobster.


 This is the full layout it is on. Love me some Project Life!

Tuesday, July 2, 2013

A Year Art Journal Page

Ok so bad bad blogger. Life is crazy & hectic. With 3 kids finishing the school year, sports wrap up, all the banquets and parties that require volunteering the summer is finally here. Lots of time for laziness and creativity but wait. Instead there are classes to be designed, directions done, photos, billing... plus in splashes swim team season. Welcome to more volunteering, swim practices and meets. Hello where is my summer????? My kids are logging in 1000s of hours in the computer gaming world loving that I am too busy to kick them off, meanwhile I am cleaning and still running around like the crazy girl. Where is the time for day trips, board games, and vacation? Not to mention why is the hammock empty???? Why are I not in it sipping a margarita and reading Sookie Stackhouse's last book??? Oh right I am a M-O-M...
Today I forced myself to get some free art in. Art that is not for a class or someone else but for me. Stuck I was stuck starring at my page. Best way to get going is to do a contest, challenge... some of my best learning comes from participating in this kind of thing. Hence my page for A Year in the Life of an Art Journal. Voila...

 You can find the prompt here. It was to use coffee rings so I made some using Art Anthology's Sorbet which gives it dimension and glitter. My page was dark (a pre-done background that I had no idea how to continue on) so I put my rings on book paper & cut them out. I used THoltz'z fabulous dies on some random art journal pages that I had saved for just that purpose-to cut up for a page. Highlighting them with white oil pastel helped them to pop off the page. The journal reads- "With life being so busy I spend the a.m drinking my first cup poolside at swim practice. I need to have my 2nd cup w/ a book or journal on the patio. Relax!"

I do need to remember that summer is only a short time in the year & I need to spend some down time with my family re-charging my batteries! What are you going to do to enjoy your summer more?

Thursday, June 13, 2013

The Magical GelliPlate Trilogy

Hi Blog land! I have been making gelliplate prints like a crazy person for a class I am teaching in July. Once I got started I literally couldn't stop & would say to myself "ok 1 more". 2 hours later there would be 30 more prints. This thing is so much fun! If you haven't heard of gelliplates you can check out their blog at Gelli Arts

The original idea for my class was 1 album of gelliprints but I realized I had way too many prints to do just 1 book so I made 3 art journal books!!! One will be a bonus reference book that can be looked at for ideas both color & technique. While at the store Suzie & Donna helped me name the class! So the trilogy was born. Here is a sneak peak at my unfinished class. I will be teaching it at ScrapbooksPlus in Chantilly, VA on July 14th, it will be posted in the next few days on the website. The Magical Gelliplate Trilogy. *A gelli plate will be included with the class so if you don't own one- hold off until then*

Friday, June 7, 2013

Viva Las Vegas! DT Tryout!

I recently became totally enamored of a company that makes awesome, fun, quirky stamps. Viva Las Vegas Stamps! As I placed my first order I also found out they were doing a design team call- how fabulous!!!! I am looking for a team to be on that reflects the products I love to use & they definitely fit the bill,  it does help that I am stamp addicted & they have a huge variety of cool stamps. It is hard for me to pick only 3 projects to post. I use stamps on everything- project life, scrap pages, altered books & items, mix media canvas, & especially tags & art journal pages. The first project I used this sheet of stamps that they sell unmounted. It is plate 922 & has so many great designs to choose from. I will definitely be playing more with these!

 I got the stamps in time to use them on 2 of the projects with some scrambling! My first one is the cover of one of my art journal books. The background paper is a Trader Joe's flyer- yay to recycling. I spritzed color using a stencil. All the stamps are Viva Las Vegas. I like using portions of stamps in other ways, for example as a background texture or as part of an alphabet. The checker board on the letters is part of the Whimsical bird in mask stamp. The boarder is part of the Whimsical Fence stamp.VLVS stamps are perfect as they have so much detail & design in them- they are begging to be used as a texture stamp. 


My background has texture & made stamping directly to it difficult so I used one of my favorite techniques. I stamped on tissue paper & adhered it with decoupage glue. This process makes the tissue just disappear and allows the stamped image to almost float a bit on the page.
This allowed me to get a wonderful, crisp, detailed image of the bird stamps. I couldn't help adding the cute flamingo that came with my order- it makes me very happy! 
 I added some ribbons, fiber & bling to finish my book off. I used the No. 5 tag stamp on card stock & covered it in glossy accents to create an epoxy that could be hung with charms from a chain on my book.

Here are some of my favorite art journal pages in this book.

Inside the flip portion.


Project 2: My son & I are watching Doctor Who. Image my glee when I found the Viva Las Vegas set of stamps based on the show! Plate-925
I had to do a tag! I took the photo with the opening credit screen shot in the background- love how that turned out! 
However you couldn't really see the tag so I did a second less fancy pic that actually showed the tag.
For Project #3 I am using a scrapbook page that has lots of inky goodness on it!

Thanks for joining me!!!


Wednesday, May 29, 2013

Project Life- scrappin up your pages.

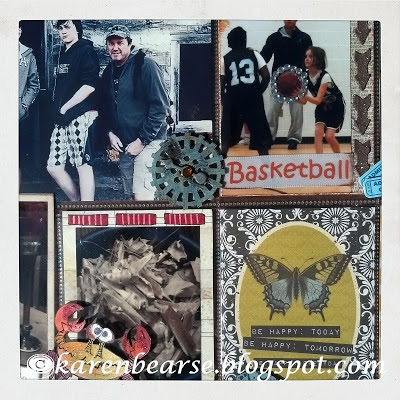
While I am loving working on my project life my style tends to be less traditional- shocker I know for those of you who know me. I love adding ink, metal & chipboard to my pages. I try to do a few simple faster pages- stick & go & than a nice scrapped up one. Here is one of those scrapped up ones.

I approach each area as it's own box of happiness and than when I have all the boxes put down I scrap it up. Adding the fun elements. I used a lot of want2scrap on these pages. Chipboard in gears & swirl, bling & their cool arrow stencil. Can you spot their brick stencils in use? 
I used the brick stencil tracing the bricks but in a straight line on top and bottom of my crab bowl. Painted it in red & added white lines with a gel marker. It is a super simple way to ink up your cards. I also used their arrow stencil with viva decor ferro on the side of the basketball card. Note the bling encircling the basketball- very sparkly. Using Want2scrap  gear chipboard I painted it with THoltz distress paint & added one of his clock parts. I love using stamps to embellish. Especially when I can't find a sticker etc. I usually have a stamp that will do the trick- hence the cute crab painted in & with some glitter to make him sparkly.
For the swirl chipboard I painted it & once the paint was dry stamped it to add that cool factor. Note the journal card below it. A light piece of scrapbook paper, spritzed with dylusions spray & the arrow stencil, stamped with a journal block & voila there is my cool journal card that adds that inky spot that I love to my project life! So get excited because I am starting a weekly project life post. Every Wednesday I will do weekly project life pages, ideas or cards to inspire you to make your project life unique like you!

Thursday, May 23, 2013

Twinkling H2O's

Wow life is busy!!! I taught my monthly art journal club this week & it was fun, fun, fun!!! The girls seemed to have a great time, this is really a wonderful group of women, very encouraging, positive & welcoming of new people. This month we worked on twinkling H20's a product I was not familiar with, but have learned to love! Pigment in a cake form infused with mica with the properties of watercolor only different because of the mica - shimmery goodness!

They come in these pots of yummy colors. You start by "waking them up" or spritzing liberally with water to activate the color & the mica. Let sit for 5 minutes, a spritz more  water & they are ready to play! I must admit there is a learning curve with these. I started using them as I would an acrylic paint and wasn't doing too well with the whole blending thing. I did some blending exercises as in water color and started to get it. Lots of water is the key so the colors can pool & run together. What helped me to understand was making these swatches of 2 to 3 colors. I wrote the colors on the back & now I have some great color combinations to use in future. This was learning to use the color & water in good proportions.
I encourage you to play with this product to get used to how to use them. To make the colors richer, darker with more mica it is best to build the color in layers. Here are a few of the backgrounds I did. 

 I used stencils with metallic acrylic paint to create a resist- once dry I played with the twinks. Hard to see but the page is shimmery.
I also colored in a stamped image trying to get better at blending. Again the colors look much more luscious & shimmery than in the photos.
Here was a page I did right in my art journal to help with the learning curve.
The key is practice & practice but this product gives you a very unique look in your book and is very addicting!

LinkWithin

Related Posts Plugin for WordPress, Blogger...