Wednesday, December 6, 2023

2023 Favorite Projects for Eileen Hull Design Team

Hello Fans of Eileen Hull! It is the last blog post of the year which is traditionally where the teams show their favorite projects of the past 12 months. Never an easy task to just pick 3, but here we are. I will have links to 2 of the individual projects as well below. All of these wonderful dies are made by Sizzix.

1st, I have an announcement that I will be stepping down from Eileen's team. I have been on her Inspiration Team for 7 years!! It has been an honor & a privilege to design along such a wonderful group of women. Eileen, our fearless leader, is one of the kindest, most genuine & fun to be around people that I know. I have watched in amazement as she has tackled building an awesome community with her Eileen Hull Facebook Fan Club. She has had to learn so much tech along the way, all while being an amazing family leader of her kids & grand kids, as well as taking care of her aging mother. Super Woman in many ways traveling the country & building an etsy shop on top of all that!! Oh & did I mention she also designs awesome dies for Sizzix & other product lines along the way? Incredible human, & one of my all time favs, that Eileen. I wish both her & the team all the best as they continue to inspire all of us with their incredible talent. I will pop in and say hello once in awhile and you will still see me creating especially on Insta & FB. 

Here is a quick look at my 3 favorites. Below is the individual photo & blog link should you want to make one. All of them have full step by step tutorials just for fun.  


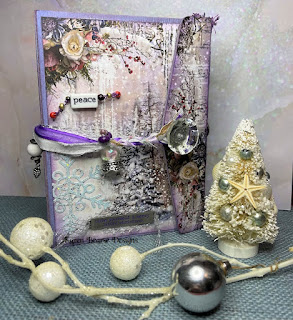
All right enough waxing poetic here are my 3 favorite projects of the last year, in order of dates. 1st up was in January of 2023, the snowy Frame, Pocket Journal. You can find the post here. I don't often work in purple but I should because I love it! 


Next up let's fast forward to September. Which for the record feels like was just last month. However time is a "big ball of wibbly wobbly time-y wimey stuff" as said brilliantly in Doctor Who. It was also time for a Nature Journal! This project was made using the aptly named Field Notes Journal. The paper is gorgeous 49th & Market.


Love how wide this spine is!! The rub on's for this line are divine. You can find the tutorial link here.


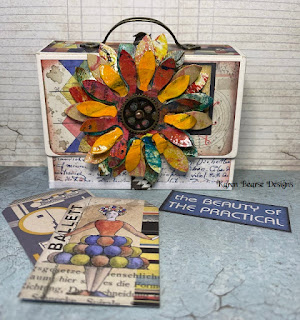
Last but not least is... drum roll please. The Ephemera Keeper! I don't have a blog post on this but it was created using the Wrap Journal. The Sunflower die is front & center. 


The inside is full of envelopes using another favorite die of mine the Journaling Card, Envelope, & Window thinlet set.  


Here is a peak at one of the envelopes. Each envelope creates space for lots of fun ephemera. The tea pot creates the closure. This paper line is also a favorite by Stamperia called Bauhaus. All the art! Well that is it for my annual round up! I hope you have enjoyed my Eileen Hull inspiration as much as I have enjoyed bringing it to you. I will see you around! Take care & remember to get inky!!


Wednesday, November 1, 2023

Envelope Recipe 3 ways for Junk Journals

Hello junk journal fans! Today I have a recipe to use Eileen Hull's Envelope die by Sizzix, 3 different ways for your journal fun. You can also incorporate this into your mini albums or scrapbooks. This month Eileen's teams are creating "recipes" to help you create!

*Affiliate- some of these companies have given me product to use, play & experiment with. The ideas are my own but I tend to work with companies whose products I like so enjoy the inspiration.  **some of these links are affiliate, I receive a small percentage from the company at no cost to you. This helps me deliver free content!

As both Eileen & I are heavy into the junk journal realm right now, I decided to work with that as my theme this month. Now that the holiday season is almost upon us, quick & simple crafting is what most of us can aspire to. Eileen's Envelope die makes building pockets of fun easy peasy. 

The other thing that makes envelope & junk journal easy is the delightful products that go so well together. Think embossing folders & Luster Wax, 49th & Market sets like Spectrum Gardenia, digitals like those from Pink Monarch prints. So much product, so little time. 


1st let's look at assembly. Figure out paper placement, remember that directional paper needs to be cut upside down so the flap & base will be right side up. This does mean that the front where the address would go is upside down. You can always cover this space with another piece of paper.  For easy envelopes use double sided paper. Or cut another piece that will cover the inside flap.


Here you can see using that 2nd piece of paper. Glue the inside paper piece using a strong glue stick like UHU. Fold the tabs & add glue to them then fold up to create the envelope. Voila an envelope. 


 Envelope Idea #1: Page Fold Over

The envelope folds over the page so the flap is on the other side & creates a pocket. The front of the envelope has 49th and Market ephemera. Their paper is heavy & works great for this.


The envelope flips open to reveal the envelope pocket. This gives extra space for some more of the ephemera. Great space to add in some photos. 


Here is what the envelope looks like before it is attached. The elements from this paper line are just gorgeous. The designer is Katie Pertiet and her images are stunning, & the colors are so vibrant. 


This is the flap side, the bottom & side were glued so it creates a tuck spot. This technique adds some serious real estate to your junk journals or scrap book pages. Lots of potential for tags and added ephemera. Plus the bonus of that interactive envelope!


Envelope Idea #2: Double Pockets

For these envelopes I used digitals by Pink Monarch Prints. Anna's designs are wonderful & there are so many cool kits to play with. I made 2 envelopes and they were glued on another piece of her digitals. This whole page will go into my junk journal. The bottom envelope was glued on the bottom, top and right side, leaving the left side as a pocket. The arrow paper clip holds the flap closed.
 

Inside is a file folder & a tag with room for more. The top envelope was glued on the sides & bottom leaving a top loading pocket. Tags are tucked in with room for photos and journaling. The flap is held closed by the butterfly ephemera. Inside the pocket is a tag with a side tab, just for fun. 


Envelope Idea #3: 3D Embossing & Wax

For this envelope I played with heavy vellum. I did realize that 3D is probably too deep an emboss for vellum as it is tearing a bit. Maybe just a regular folder would work better. Let's do it anyway. 
 

Start by cutting the heavy vellum with the die. The 2 flaps were 3D embossed using Eileen's Key folder. The tabs have Redline Tape which is the best for this kind of paper. Don't assemble the envelope until your closure is added.


Next luster wax was rubbed on using a flat foam hitting the high points. I used Rose Gold on the bottom flap & Charcoal on the top. Set aside to dry, which does not take long.

A tab will be the closure so a slot was needed for it to tuck into. The Waterfall set has a slot die that worked perfectly for this. Remember to open the envelope before you run it through your Big Shot so you only cut the flap part. 

 
One side of the tab was adhered, then a brad, then the other side of the tab. Before I put my envelope together a piece of paper was glued to the inside. The envelope was adhered. There are spots were I missed with the embossing so the simple fix was a spot of washi tape. An idea I had after making this was to add a layer of collage medium to the entire envelope. That would take care of the issue of tearing, making the envelope more sturdy.
 

The pocket was glued on the sides and adhered to my junk journal page. Now a tag will fit and slide through, showing more of the tag to add interest to the page.
 
Here are the inserts, digitals by Pink Monarch Prints. The nice thing about digitals is you can size them for whatever you need.
 

If you want to see more envelopes and how to work with the other elements of the die set you can go to my other post here. I hope you stop by Eileen's blog to see what the rest of the team has going on this month. Also make sure if you are not a member of the Facebook fan club, join up, so much inspiration and a wonderful community over there. 

Supply List:

Eileen Hull Dies by Sizzix:

Friday, September 29, 2023

The Magic of Mother Nature Field Notes Journal for Eileen Hull & Sizzix

Hello Fans of Eileen Hull, today I have this awesome Field Notes Journal that is chock full of the newest Sizzix releases. This month the design teams are working on all things Fall or Halloween. Play along in the fan club- links below. This project is also chock full of my newest obsession- 49th and Market. If you haven't tried these papers, ephemera, washi, acetate, rub-on's their lines are so chock full of fabulousness! They are a makers dream.

*Affiliate- some of these companies have given me product to use, play & experiment with. The ideas are my own but I tend to work with companies whose products I like so enjoy the inspiration.  **some of these links are affiliate, I receive a small percentage from the company at no cost to you. This helps me deliver free content!


This is my journal. Just love the images! You can see the 4 brighter images are acetate, the title is a rub-on. That cute little lady bug just adds so much nature. 


Recycle That Cardboard!

I try to recycle when ever possible & the beauty of Eileen's Score Board Dies is they cut those heavier materials easily. You can of course glue the paper to the cardboard & then cut it. I find it easier to cut separately as I tend to be directionally challenged. As you can see I used a priority mail box that I had received as my cardboard. Painting the edges of the cardboard helps if your paper alignment is a bit off.
 
 
I have done many a tutorial on how to put together these journals so I will link one below if you need those steps. Today I will focus on decorating and the inside pages. Once the book was put together, a piece of canvas was adhered using Collage Medium. 
 

The best part of 49th and Market rub-on's is you can use them on fabric!!! It takes a little extra rubbing but looks fantastic. Once the spine is adhered there are actually 5 holes. I like my signatures to be chunky so decided to only have 3. After the canvas had dried I re-punched the outside & middle holes. This spine measures just over 2 1/2"! Love it. After my inside paper was adhered I added a strip of canvas there too & re-punched just those 6 holes.


Embellishments Rule!

Next up was to just decorate the cover. Again it is so easy with all the ephemera that comes in these packs. This book was made with the Vintage Artistry Nature line (links below). You can see from the cover, simply layer your pieces & glue. I also added Sizzix Effectz Liquid Gloss to the eyes of the butterfly. You can see from the top photo it just adds this nice 3D crystal effect once dry. It goes on milky then dries clear. You can also see from this photo (cover shot too) how 2 brads were added & then my elastic band was run through, stitched & made to go over the backside of the book. More on this below.
 
 
To create the closure I knew I wanted something different. Also wanted the ability to enlarge the band as my book grows. Here is a shot of the back of the book. This was accomplished by using a dress pin. The elastic band was folded and then pinned. As my book expands I can just release some of the elastic and re-pin. Of course a charm had to be added! The band was added to go behind the book leaving the ephemera on the cover free. 


 Adding a Title. 

The Magic Of Mother Nature is the perfect title for this book! It is a rub-on, again put on canvas. The edges were pulled to make them fray & distressed with a bit of water & Distress Ink. 


Time to Jazz Up the Spine.  

With the success of the rub-on's of course I needed to add some to the spine! The imagery is just gorgeous with incredible detail. Adding these after my spine was done allowed me to easily navigate the holes. There is only 1 signature at this time, this book allows the freedom to add one at a time. I simply ran my elastic through the middle of my signature (booklet) 2x & tied in the middle of the booklet.

 
More goodness on the inside cover. Love the frame from this die cut. Created this embossed pocket that has an acetate insert. Did you know rub-on's work great on acetate as well as canvas? The best part is you can create multiple peekaboo images that change as you pull tags out. 
 
 
Here is a close up of the frame. It was cut from more of the cardboard & then painted. Once completely dry, stamped images were embossed. Love, love this look. The acetate has both rub-on's & is stamped with Archival Ink. Eileen's flowers were inked, stamped & embossed. So dynamic & shiny! 


A look at the bottom layer when tags are pulled out. Other images were strategically added to peak through the window. These were cut using the Library Pocket & Card. These dies are fabulous for junk journals. Especially love adding the tabs! 


Inside pages

Let's look at some inside pages. 49th & Market plus Eileen"s Library Card die work so well together! I have used it here sideways, as a tuck spot. Added those cute little bird rub-on's, so fun. 
 
 
Another thing I love to use in my book is cards as pockets or flip ups. In this case a top loading pocket & a flip up. Inside is a lovely surprise, a tiny envelope with little treasures. 


Let's look at the treasures. The tickets are ephemera from the same paper line. I just love this tiny envelope, and the wee heart. Made with Eileen's Envelope, Folder & Flowers set. Note the butterfly centered in the heart die. The stamp shape is from the Snail Mail die. Pocket full of fun. 

 
This pocket was made from the Folio Pocket, a bit of inked paper, the heart from the Envelope set. Just love that simply adding a few elements to a pocket adds so much interest. 
 
 
As promised a link to book assembly plus inspiration on another great book! Same idea though, cut 2 covers add Redline tape & assemble. That is it for now. Please follow my other social media sites for more inspiration (links on the right side). Also make sure to check in weekly on Eileen's blog for the teams latest inspirations. Join the Eileen Hull Fan Club for 2x weekly live events. Get the latest scoops there! Have a great day & make sure you get inky!


Supplies:
Eileen Hull diecuts by Sizzix

Tuesday, September 5, 2023

#ICAD Box with Eileen Hull's Slotted Treat Box by Sizzix

Hello fans of Eileen Hull! Today is the tutorial for my #ICAD box using Eileen's Slotted Treat Box by Sizzix. This is a fantastic size box although you do need the  Big Shot Plus machine that cuts the XL dies for it. The finished box nicely fits 4x6 cards which makes it very versatile. I left my box lid off as the cards were a little too tall.  


I love making altered boxes & Eileen's Scoreboard dies are great for this as they cut the heavier materials. So easy to cut, assemble & decorate.  

The #ICAD challenge was the perfect excuse to make a box! If you haven't heard of this challenge hop on over to my Instagram or Facebook where I have been sharing these cards. The challenge is hosted by Tammy Garcia & starts on June 1st, runs for 61 days. I did this knowing I would not make the time frame but wanted to play regardless & have made 56 so far. These magical art cards fit great in this box which makes for easy viewing!


Let's Get Started!

You need to cut 2x sides and fronts and 1x bottom. This photo has the sides & fronts shown. the bottom is just a rectangle piece. I used cardboard, you could also use mat board which would make your box super sturdy. Add supertape to  the tabs & fold on scor lines. 


Assembly is pretty easy just remove the red cover (use a pokey hole tool to slide under the plastic) of the supertape. Attach the side tab to a non tab side making sure your base piece tabs are at the bottom, as shown above. Then remove the base tab tape & adhere the bottom piece to create your box. 

Let's Decorate Our Box!

I like decorating my box after assembly. You can add the paper before if you like as well. Just be mindful of the direction of your paper... For this box I used the very cool looking Simple Stories Simple Vintage Essentials. Cut paper for front and back - 6 1/4 x 2 1/2" &  sides are 4 3/4 x 2 1/2". My favorite way to add paper these days is to dab a line of Mixed Media or Ultra Bond glue and then use a Stencil Pal to drag the glue down the paper. Makes for easy adhering. Set box aside to dry. 

Time to add Mixed Media!

Here is the perfect way to use all those gel prints that you have lying around! I have also linked a Gel Press video I have if you haven't played or want a tune up.


Just take those prints & cut a bunch of flowers, folders etc using the Everyday Envelopes & Flowers set.

I wanted my flowers to have a pop of interest & adding embossing powder is just the trick. The fun thing is any white areas will be tinted by the glaze color & it will change the other colors. Scroll back up & you can see how the blue became purple. If you want your colors to stay the same just use a clear powder. 


 You can add another layer by stamping with an archival ink on top! 

Here is a leaf from the same set. It changed the blues to greens. YAY! Just have fun & play with the glazes, they sure add a punch.


 Last Step

All that was left was assembly. The file folder was cut in half, word stickers added  & the cool little bee. The folder pieces were stacked and glued down. Glued the flowers & leaves down on top of the folder piece. Added the cool mushroom sticker. For my ICAD card the same embossing techniques were used on more gel prints. The embossing makes my title look so dynamic! The letters were cut from the Tile Alphanumeric die, the 2023 is from the inside of that die. The cool label is the handle that comes with Treasure Box. That's it for today, I hope you enjoyed my tutorial & you have a chance to go get inky!

Supply List 

Eileen's Diecuts by Sizzix

Other Supplies:

LinkWithin

Related Posts Plugin for WordPress, Blogger...