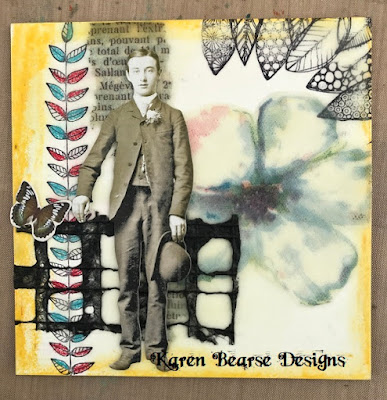
Hello & happy Thursday to you all! This means it is time for my Topflight Stamps blog post. Today I am playing with one of my favorite things encaustic on a canvas. I don't do this often but I need to because it is a lot of fun & the results are very cool.
Playing with Wax!
Here is my finished canvas. There are quite a few layers on this as that is how encaustic works! You heat prepared beeswax, brush it on a encaustic friendly surface, heat the wax to fuse it. Add your layer, add wax, heat the wax to fuse it & repeat. There is of course a lot more to it then that, but for today I will just show you how I created my layers.
Stamps from Topflight
First let's talk about the stamp set I used! I played with Carabelle Studio stamps using Birgit Koopsen's creations. Scribbled Leaves & Textured Circles. So many possibilities with this set.
Time for some images...
With encaustic, to get crisp stamp images they need to be on the bottom layer. There are ways around this but that is where I started. For this piece I had an idea of where I was going so I placed my ephemera as I worked to make the layering easier. The leaves on the left side were stamped directly on the encaustic board with Archival Ink. They were colored with Caran D'ache Watercolor crayons.
Next I stamped the leaves in the upper right corner. At this point no wax has been used. I also cut a flower from a paper napkin to add. Note how stark the white is. This will change as the wax layers are added.
Let's Add Some Color
Here is where I started adding layers of wax and ephemera just building up the piece. The yellow was added using oil pastels.
While my paper doll was added last I kept placing him as I worked so I knew where he would end up.
Adding A Personal Touch with Words.
Can you see the wax?
Here is another close up getting some of the wax to show. This piece was created in a monthly group I am in. A group of women from different walks of creative life that come together to play & teach each other. This month my friend Deborah Mahnken led the project. It was fun to see how different each persons project turned out.
That is it for today. I hope you enjoyed the tour of my canvas. Hop on over to Topflight Stamps & order some of their cool stamps, then add your creation onto our Facebook Group, Topflight Stamps Design Gallery! Until next time, get inky!


I really did enjoy seeing how you brought this canvas together Karen, the encaustic looks amazing, I love that stamp set too! Anne xx
ReplyDeleteThanks so much Anne! It was a fun one.
DeleteSo amazing Karen! I could kick myself for giving away my melting pot. This is such a tremendous style. Hugs, Autumn
ReplyDeleteThanks so much Autumn- you don't need a melting pot you can use tins & a griddle. Just need a good heat gun, I hadn't used a proper encaustic gun & it really made life so much easier.
DeleteI'm dying to try encaustic art at some point. You've made a lovely canvas here and the Carabelle stamps are ideal for it. Thank you again for inspiring me xx
ReplyDeleteThanks so much Jenny! Yes you should try it is a lot of fun. How about I come to England & teach you!!! HAHAHAHA
DeleteThis is gorgeous Karen, love all the elements and the composition. Tracy x
ReplyDeleteThanks so much for leaving that nice comment Tracy!!
DeleteMy name is Mrs Aisha Mohamed, am a Citizen Of Qatar.Have you been looking for a loan?Do you need an urgent personal loan or business loan?contact Dr James Eric Finance Home he help me with a loan of $42,000 some days ago after been scammed of $2,800 from a woman claiming to been a loan lender but i thank God today that i got my loan worth $42,000.Feel free to contact the company for a genuine financial service. Email:(financialserviceoffer876@gmail.com) call/whats-App Contact Number +918929509036
ReplyDelete