Hello arty friends, today is tutorial day, how to make the Eileen Hull Geometric Gift Box by Sizzix. This project packs a dynamic punch yet is relatively quick and simple to make. In fact I took the pieces of the project home for a visit with my Mom assembling it while we chatted away. As always there is a supply list below.

Here is just one way to use this papercraft box, as a beautiful gift box. This is a perfect gift for a hostess, teacher or friend. You can also use it to house pens, tags, paint brushes, or fake flowers for a decor item. The list is endless. I have linked a few videos below so you can see how Eileen die cuts & assembles this box. This Scoreboard XL includes triangle & star shapes to make extra design possibilities!

Let's Get Started!
The 1st thing you will want to do is cut your base using mat board or cardboard. The photo above is with card board using Eileen's Vintage Button 3D Emboss with cardboard & paint. Just to show how versatile this product is. For my gift box I also recommend the Sizzix Making Essential mat board (Little Sizzles) link below. It is the perfect weight for the Scoreboard diecut & will guarantee success. You will want to cut 2 of the geometric portion, & one of the squares with tabs. Use one of the 3D embossing folders to create amazing texture on the 2 geometric pieces. I used Eileen's Woven Leather folder, which has amazing texture. Hot tip: The geometric piece is slightly longer then the embossing folder. For the 1st pass of the folder simply place your cutting mat before the line at the bottom of the folder. This way you will only emboss the pattern and not the folder line. Now turn your folder around and reposition then run through as normal to get the last bit embossed. The line won't be there!
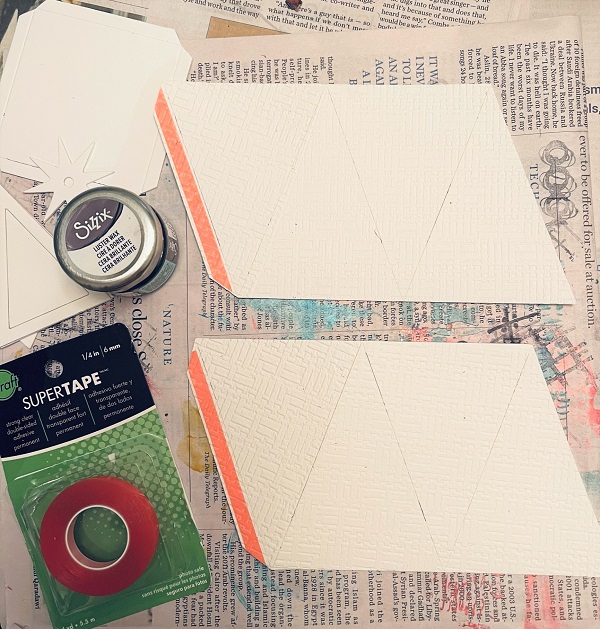
Next step is to add Redline or Super Tape to the end tabs of each box piece. I also pulled out the Luster Wax for the next step.

Making the Design pop!
One of the match made in heaven duos is the 3D embossing folder & Luster Wax. The wax is super easy to use, with a nice smell & most importantly has a quick dry time.
To apply just use a hard piece of foam with a small, thin layer of the wax. Skim the surface of the embossed areas to just pick up the high points. As you can see in this quick video changing the color of the base & wax completely changes the look of the project. Brown card stock with Gold Luster Wax for example.
Time to Assemble.
The best part of this box is it is so easy to assemble. Taking each of the geometric shapes, bend the pieces at the score lines using the side of a table, cut side facing up. Remove the protective paper from the Redline tape (using a pokey hole tool to slide between the red plastic and the tape makes this easy). Line up those 2 pieces and adhere the tab side to the non-tab side, making sure your pieces are in a straight line as in the photo above.

Take the bottom piece (the square with tabs) bend the tabs, and add a strong wet glue like Ultrabond, in a fine line along the inside bottom of the box. Take your square piece tab side facing up and slide it into the box from the top and push it through to the bottom. It will fit really well and the glue just adds a little extra strength. Now we have a box!

To add details I covered a piece of the mat board (large enough to cover the star shape on the die cut) with Surfacez Metallic in Silver. This is a sticker sheet which makes this step easy. Once that was cut out a star brad was put through the hole in the middle. This was adhered over one of the triangles. Look at all that silvery texture! Now all that is left is what to put in your box.
How To Video
If you want to see a video over view, of the box & how Eileen assembles the box including the lid, here is the Chapter 4 release video. This video includes the samples that were made with the dies plus some of the team (including me) showing their samples. This is a great group of gals!! If you just want to go straight to the info on this diecut go to the 1 hour 28 min. point. Eileen shows you how to cut, add the tape, bend the scor lines all the things!!
Expanded Geometric Box
This
diecut can also be made into a much larger box as Eileen shows in this
video. If you don't want to listen to the fun chatter & see the
bonus samples of gorgeous projects start at the 19 minute mark. I know
this is on my crafting list! I also used the lid to create a mini 3"x3"
art journal which you can find examples of it my last post & on my
Insta or Facebook pages (link on the right of this post).

Thanks so much for joining me today. I hope you enjoyed this tutorial, please leave a comment with your thoughts. I would love to hear from you. For more Eileen Hull inspiration make sure you join the Facebook Fan Club where Eileen does 2 live videos a week. Also check out the blog with links to lots of amazing creations & tutorials from the Inspiration & Education Teams.
Supplies:
- Geometric Box
- 3D Embossing Folder Woven Leather
- " " Vintage Buttons
- Making Essentials Mat Board
- Luster Wax
- Aluminum Metal Sheets Silver
- Redline Tape
- Ultrabond Glue

so cute Karen!
ReplyDelete